ALMOST EVERY COACH says that goal-line defense is the most important zone on the field and that your team needs to play great goal-line defense — but very little is written about this important area or covered during coaching clinics.
Why is this? Is it because many coaches do not have a goal-line defense that works effectively most of the time? Way too often in my coaching career, when my defense has had its back against the wall, my teams have failed to make a good goal-line stand. I tried an 8-3 scheme, and my original version of a 6-5 scheme, but neither of these schemes produced great results.
During the off season between 2000 and 2001, while I was the defensive coordinator at Bellevue high school, I began to study and play with goal-line defensive ideas. I came across an article written by Dale Sprague, of Western Maryland College, and I knew I had found a possible answer to my problem.
I took Sprague’s base scheme and came up with several new ideas and tried them at our football camp. To my great surprise, our great wing-T running attack from Bellevue — one that averaged well over 400 yards a game — could not effectively block this newly devised defensive scheme when we ran it in practice. The other great fact was that the defensive players couldn’t wait to play it!
Principles of the Goal-Line New Scheme
The goal-line defense detailed in this article is based on three essential principles.
1. The are two nose guards in the A-gaps and each NG must attack his assigned gap.
2. The defensive ends line up in D-gaps outside the last man on the line of scrimmage and blitz the backfield without losing outside contain.
In this position, they are unblocked by any lineman or player on the line of scrimmage.
3. The defense must cover all running gaps.
Evolution Of A Goal-Line Defense
My goal-line defense was basically borne of necessity. I was tired of watching power teams line up and ram the ball down our throats! I decided that they may throw it for a score but I was going to stop the score on the ground and still find a way to stop the passing game.
Since most offenses emphasize positive yards and ball security in the red zone, I knew we had to create situations that would give us the best chance of out-numbering their blocking scheme and provide a good chance of a negative yardage play.
By charging hard up the middle and having two unblocked defenders attacking the line of scrimmage from the edges, this scheme limits where the offense can successfully attack on the ground.
The blitzing ends take away the D-gap and squeeze the C-gap and often at least one defender gets to the ball carrier before he can get to the LOS.
For an offense to get wide with its ground attack, it must beat the unblocked DE — which is a match-up I’ll take 100 percent of the time!
We also found that usually one of the two NGs got good penetration to stop the play for a loss or make the back bounce into the DEs.
The risk of a pressure defense in the red zone is minimal compared to the potential rewards — giving up an attempted field goal sure beats allowing a touchdown.
There are two other advantages to using this scheme.
- It reduces the time that the offense has to execute the play.
- Two unblocked players often cause even the most disciplined offense to make mistakes like procedure or motion penalties.
Most teams can account for one blitzing player but can not handle two blitzing players.
Introducing The Scheme
We taught the new scheme at our week-long football camp and I was amazed at how well it worked. Even Butch Goncharoff, the head coach at Bellevue High School,who can run the ball against anyone, said this was the hardest defense to block that he had ever run against.
Once I saw that this goal-line scheme could be effective, my attention turned to personnel for the unit. I decided that I was going to find the 11 toughest football players on our team, regardless of position, and play them in this new goal-line scheme.
The entire coaching staff agreed that no player was off limits. This goal-line defense was going to be special — it was going to be seen as an honor to play on it.
Finally, I decided that we were going to attack — with no read-and-react instructions. We were going after the football as aggressively as we could without losing total control.
Our goal as a unit was to produce negative yardage plays for the opposing offense — no touchdowns — and force field goals.
Once this philosophy was established, we developed player techniques so each player would know both his alignment and assignment.
The final step was to figure out how to play the defense against every formation or scheme we would face.
Player Keys, Techniques
With the scheme and personnel in place, we then drew up techniques and keys for the unit’s players:
Nose Guard: Key on ball movement. Penetrate the A-gap and attack.
Align on the inside shoulder of offensive guard (2I technique). Do not allow the OG to release or pull. If the center blocks away, squeeze your gap.
Defensive Tackle: Key on ball movement. Penetrate the B-gap and attack. If a tight end is present, align on the inside shoulder of the OT (4I technique).
If there’s no TE, align on the outside shoulder of the OT (5 technique). If in a 5 technique, drive the OT into the OG before penetrating the B-gap.
Defensive Ends: Align 1 1/2-yards outside the last man in the OT or TE position. Do not make contact with anyone on the LOS. Blitz into the backfield, but do not lose outside containment.
Key the ball and ball movement. Quickly find and tackle the ball carrier for a loss. The DE is the key to this defense — he must make a big play!
Linebackers: Align 3 yards deep and on the outside shoulder of the OG. Key on the nearest back. If the TE is on his side, play the C-gap. If there’s no TE, he is free to flow toward the ball.
Cornerbacks: If there’s no wide receivers on the CB’s side, play head up on the TE. Deny the TE’s inside release and drive him into the pile. Use “trail-man” technique on the TE.
If the WR is on his side, play man coverage. Align to the inside shoulder of the WR and deny all quick slants or inside routes. Force a fade, out or corner route. At the very least, force an outside release to destroy the timing of the route.
Strong Safety: With a double-tight alignment, play the C-gap on his side and key the nearest back. When there is a WR on his side, play man coverage. He’ll align in the inside shoulder of the WR.
Deny all quick slants or inside routes and try to force a fade, out or corner route. At the very least, he must force an outside-release to destroy the timing of the route.
Pass Rules
I number receivers from left to right (in a defensive view) from 1 to 5.
I have included pass coverage responsibilities on each appropriate diagram to help coaches and players understand this numbering system.
Many systems use different numbering systems with weak and strong-side numbers, but I’ve found that a single numbering system such as this eliminates any possible error of who the defenders must cover.
To reduce errors, we also use the opponent’s initial formation to determine pass responsibilities — shifts and motion do not change the numbering system.
In our normal alignment, the strong and weak corners play outside receiver on the LOS (No. 1, 4, or 5), regardless if they are aligned as a TE or WR.
The Mike LB most often has to cover the No. 3 (usually FB) but could still cover No. 2 in some formations.
The Will LB and Strong Safety have the No. 2 or 4, depending on which side of the formation they align.
We only play man coverage when the offense uses crossing or pick routes — then we zone until they make their final break and then cover them man-on-man.
On crossing routes, we try to knock the crossing receivers down to the ground before they can get 5 yards off the LOS.
Zone pass defense didn’t work well for us, as the goal line demands tight coverage.
I also really try to match up my players against receivers — this is the biggest adjustment we make based on scouting and during practice. I was determined to get the most favorable match-up possible because really good passing teams can present a real problem if they have time to throw or if your pass coverage is slow to react.
Formation Adjustments
With the basic rules, alignments and keys for my players established, I decided that we needed to establish guidelines to handle any formation we would face and set up rules for option responsibilities, while making sure that our pass coverages would still work.
After some tinkering during practice, we decided that when we are in the goal-line defense, we would match up with receivers based on our scouting report and the defender’s individual coverage skills.
Against some teams, we adjusted our personnel to get the best possible players matched up against the opponent’s tendencies.
I also came up with three alignments to cover most formations we would see during a game.
] Double-tight, 3-back set.
] 3-receiver, 2-back set.
] 4-receiver, I-back set.
I have included diagrams for each type of formations and any special adjustment rules (see Diagrams 1 to 6). We have never faced a no-back situation (with 5 receivers) on the goal-line, but our special motion rules for 4-receiver, 1-back cover this possibility.
Adjustment Rules
There are at least 5 possible adjustment rules needed for this defense.
Rule 1: You must develop option responsibilities and rules. Diagram 6 details our list of option responsibilities and a switch adjustment.
Rule 2: Decide who will cover any motion by your opponents. Usually, we have the player who is responsible for an offensive player in pass coverage follow the motion player in a trail technique.
This is an area that I study during scouting to make sure we’re not forced into a poor 1-on-1 match up.
Rule 3: You need to have an unbalanced-line adjustment plan. Diagram 4 details how you handle this formation. Shifts should not cause any real problem for this defense, as the man who shifts should have a player already responsible in the base plan and that man moves or shifts with him.
Rule 4: Develop special adjustments for a bunch-receiver formation. Diagram 6 shows how you handle this situation.
Rule 5: If the QB is in the shotgun (usually a 2-back, 3-receiver set or a 4-receiver, 1-back set), we’ll vary our techniques. If both RBs block to take away the blitzing ends, we’ll blitz both LBs.
If just one back blocks, we usually spy the QB with the Mike LB since I have at least one unblocked end blitzing, and am expecting some type of option with the QB keeping the ball.
All of these special adjustments are decided during our scouting phase. Our goal is to get the most favorable match ups and put pressure on the offense so it does not score.
DIAGRAM 1: 6-5 Vs. Double-Tight (3-Back Set). This defense handles the full house, wishbone, power-I and long-I sets.
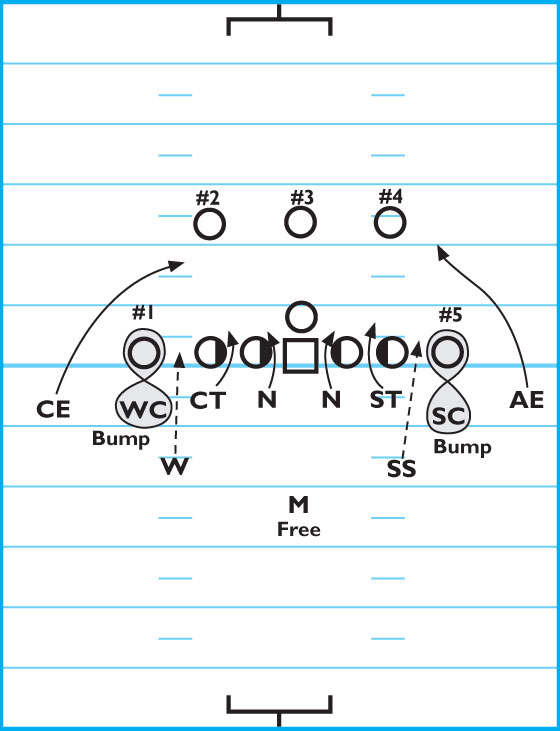
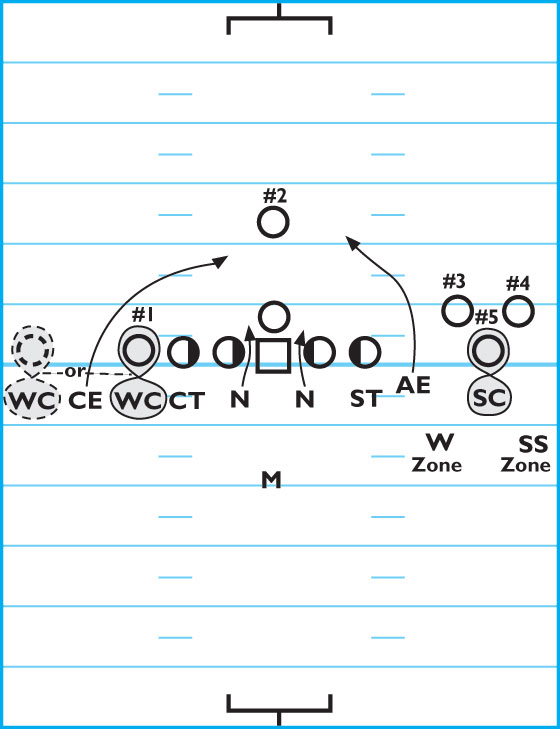
DIAGRAM 2: 6-5 Vs. Doubles (4-Receiver, 1-Back Set). This defense handles the spread, trips, double-flanker, double-slot, double-twins and double-wing formations.
There are several special motion rules for this set. If the No. 3 receiver goes into motion, either the DE on his side covers man-to-man or the LB covers. This is a decision that’s made on a team-by-team basis.
Against some teams, we move a LB to a vacated end position to go after the QB from both sides, especially if they are in the shot gun.
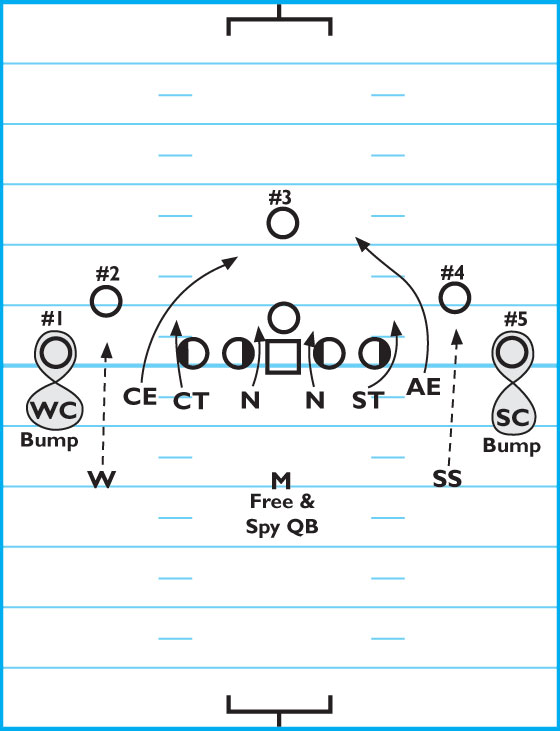
DIAGRAM 3: 6-5 Vs. Pro Formation (Good Against Any 3-Receiver, 2 Back Set). This defense handles pro, slot, flanker, tight slot, twins or wing formations.
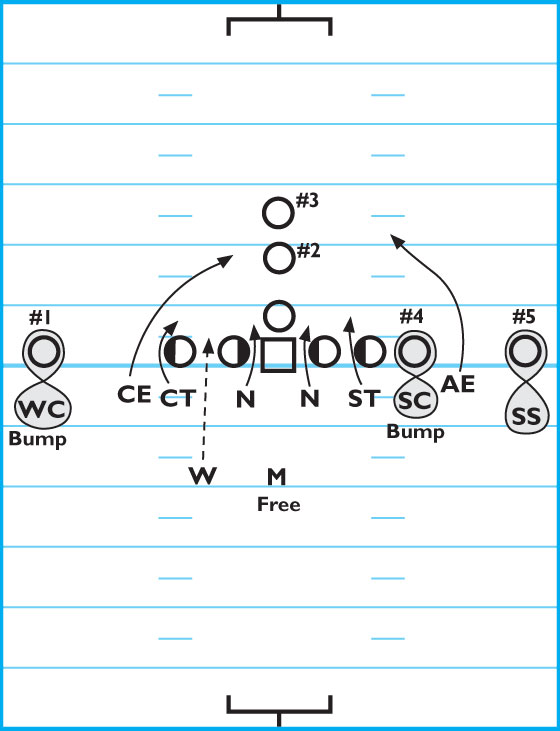
DIAGRAM 4: Unbalanced-Line Adjustments. The strong side is always on the unbalanced side regardless of the ball location.
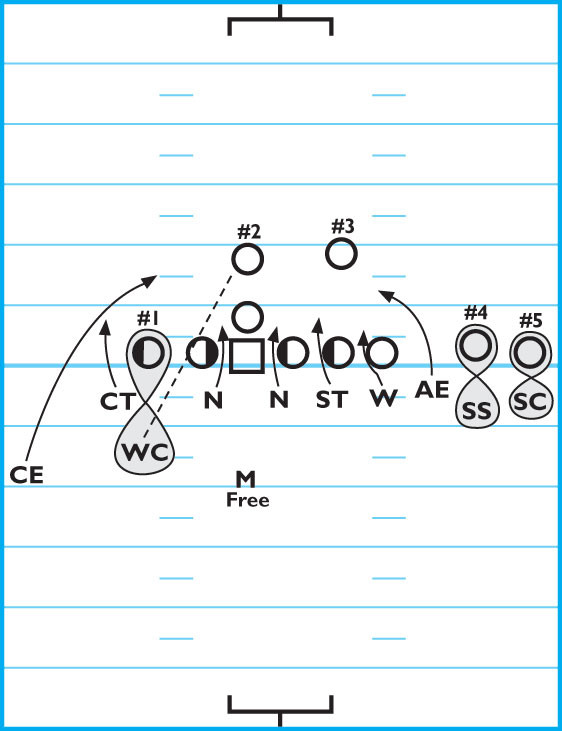
If the No. 1 receiver releases, the CE keys the No. 2 and has no other help besides from M.
If the No. 3 receiver goes into motion, the AE keys the No. 2 receiver.
There are a few other special rules for unbalanced-line situations.
< WC: Keys 1 to 2. If the No. 1 receiver releases, he must cover man-to-man. If there’s no TE release, he should key on No. 2.
< M: If the No. 2 or 3 receiver goes into motion, he covers man-to-man.
< W: Keys the No. 3 receiver after defeating the block of the covered TE (ineligible).
DIAGRAM 5: Option Special Rules. All players defend the option if the QB attacks level 1 — parallel to the LOS.
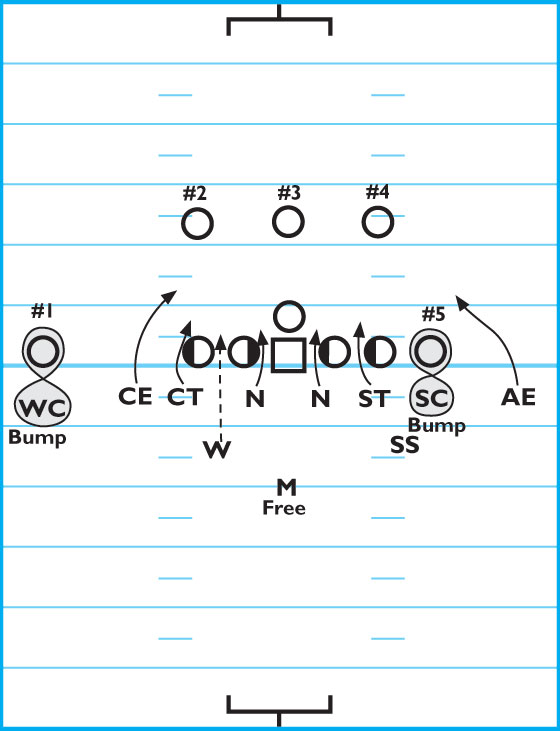
If it’s a dive play, the CT, W, both Ns and ST play the dive (usually the No. 3 receiver) or penetrate and get the QB.
W: Plays the dive only if the B-gap on his side (weak side) is threatened.
AE, CE: Play the pitch.
W: Defends the QB (unless the dive is in his gap).
M: Plays the QB. If the side is loaded, he must defeat the lead blocker and take the pitch back.
SC, WC: Bump receivers No. 1 and 5. If it’s a TE, deny the inside release and support against the delayed pitch. If No. 1 and 5 release, cover man-to-man.
M, SS: Covers the QB unless positive that it’s a dive play. If the QB turns to the strong TE side, the SS or weak-side trailing player (either the FS or SS) plays the QB to pitch.
This scheme requires penetration by the d-line to disrupt the dive back and force the QB off the LOS.
Switch Calls: Use a switch call if the QB is the most dangerous threat. Use special rules if the pitch back is the most dangerous threat.
On switch calls, it changes to where the AE/CE cover the QB and the M, W or SS play the pitch.
DIAGRAM 6: Goal-Line Bunch Assignments. The SC bumps the No. 4 receiver and plays trail technique man for man.
The W and SS play zone until the No. 3 and 5 declare. They then go man-to-man against the most dangerous receiver to their side.
The defenders must be patient and watch for picks and rubs. Expect quick throws because the DEs are bringing the heat!
Use motion rules that are the same as shown in the 6-5 Vs. Doubles (4-Receiver, 1-Back Set).
Risk vs. Reward
Do not lose sight that this defense can be effectively used all the time. This is a high-risk defensive concept. As one of my former head coaches used to say, “You live by the blitz, you die by the blitz.”
The relevant risk of this defense are:
If any player does not control his gap, or at the very least, achieves a standoff, the offensive will win.
If you can not successfully play man coverage — even though there is a reduced vertical field area — a good passing game can be tough to stop when using this scheme.
If there is no chance of pursuit — and if the offense breaks through your first line of defense, seldom will anyone be able to catch it.
I have a vivid example of when this defense should not be used. One season, we were 8-0 going in to the final regular game of the season. We gave up a long TD (a 55-yard run) against an option team in this game. We had no reason to play a risky goal-line defense in that situation, but the coaches wanted to see if it would work all of the time (I was out-voted on this decision).
In the red zone, if you are not stopping opponents, you really do not have much to lose using this concept due to the reduced area in which the offense has to operate.
Results of the Goal-Line Scheme
The first time we ever used this scheme in a game was against the defending state champions in the opening game of our 2001 season. They used a 4-receiver, 1-back set offense.
We were ahead 26-6 (their only score came when a DB picked up a mishandled hand-off and ran in for the score) with 4 minutes to go. They were on the 20-yard line and moving in for a game-tightening score.
In this situation, I preferred to hide my new defense, but the head coach instructed me to switch into my goal-line formation.
The results of the following 4 plays after the switch were as follows — 2 sacks, a tackle for a loss on the RB and an incomplete pass. They never threatened to score again.
During the remainder of the regular season, we gave up only one score in the air and, most importantly, no one ever scored running the football when the first team defense was in the game and defending the red zone.
This defense was a very important reason why we won a state championship and went 13-0 that season.
Special Scouting Preparations
The only special preparations I make for the goal-line defense is to use the Red-Zone Defensive Strategy Worksheet. This form can be found in the book I wrote for Gridiron Strategies called Football Forms for the Winning Coach (Form 10.12, pages 134 & 135).