THE 3-3 STACK DEFENSE has become a popular defense in the past couple of years and our program has adopted this scheme for many reasons.
First and foremost, it fits our defensive personnel. We had few true defensive linemen and an abundance of linebacker and strong safety types. These athletes might be a little undersized, but they are very aggressive.
Secondly, we like to be aggressive in our scheme. This means that we often utilize blitzing linebackers and stunting defensive lineman. The 3-3 stack gives us a multitude of possibilities when it came to developing our defensive pressure schemes.
The reason we have gone to a zone blitz scheme out of the 3-3 stack is two-fold. It allows us to blitz but be “safe” when we do it. In our zone blitz scheme we are not gambling with one-on-one coverage. We also felt that we would be better at stopping the run because in zone coverage, all 11 defenders are keyed into the ball, lessening the chance of us giving up a big run.
Using The Cover-3
To fully understand our zone-blitz package, we must first take an in-depth look our base defense. Our base zone coverage out of the 3-3 stack is Cover-3 and we play a 4-underneath, 3-deep zone. Our base alignment in this package is shown in Diagram 1.
DIAGRAM 1: Base Alignment. Our Lion and $am LBs align to the tight end side and the Will and Rover LBs align away from the TEs. In this defense, you don’t want your LB’s to be static. You want them to “prowl” around until the ball is snapped.
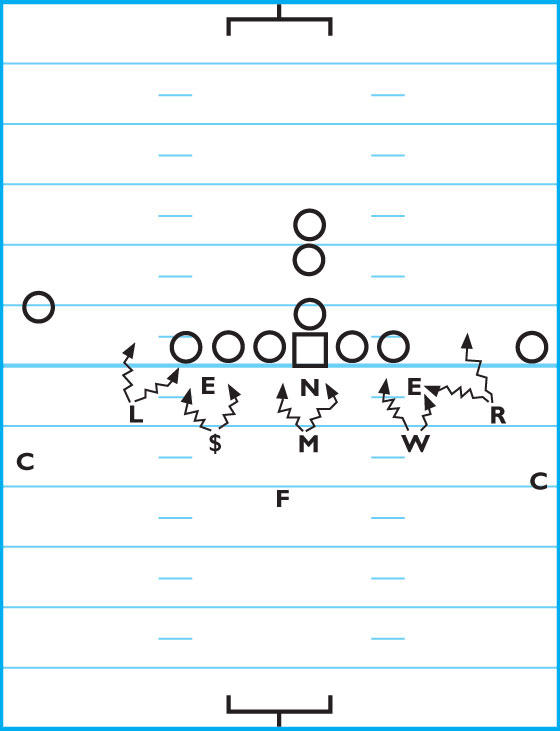
Because we blitz often, our movement before the snap helps us disguise the blitz. We want to show blitz all the time so that the offense won’t be able to figure out which defenders are blitzing and which ones are in coverage.
This strategy also helps us cheat closer to the gap or pass responsibility when the ball is snapped.
DIAGRAM 2: Toy Cover-3 Call. Our first call is Toy Cover 3. A “Toy” call tells our front to slant to the Y (the TE). The rover knows that in Toy, he is aligned away from the TE and must blitz the D-gap as a contain blitzer.
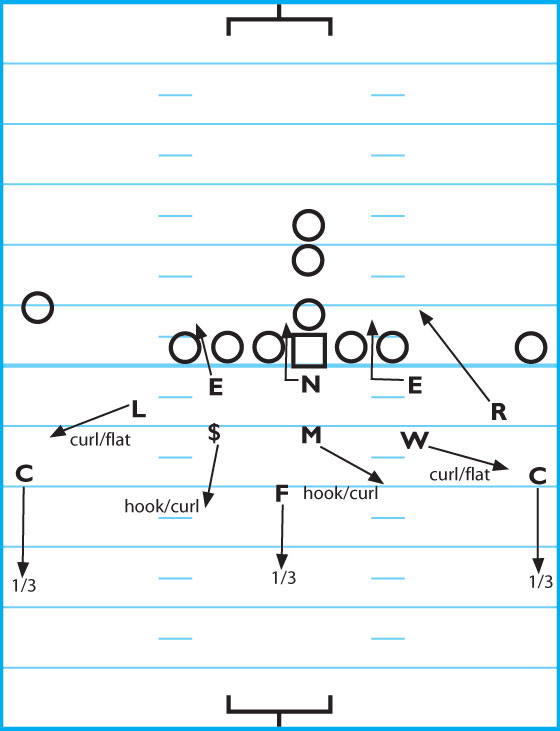
The Lion is to the TE side, so he’ll be in coverage as a curl or flat defender. The Lion gives a “Lucky” call to the $am LB, telling him he is playing the curl or flat outside of him. The $am LB now knows he is a hook or curl player.
When the Mike LB hears the Lucky call he knows he will be a hook or curl player away from the Lucky call.
The Will LB knows he is a curl or flat player to his side because he does not get a call from the Rover who is coming off the edge.
In the secondary, our two corners have responsibility for the deep outside thirds of the field and the free safety has the middle third of the field.
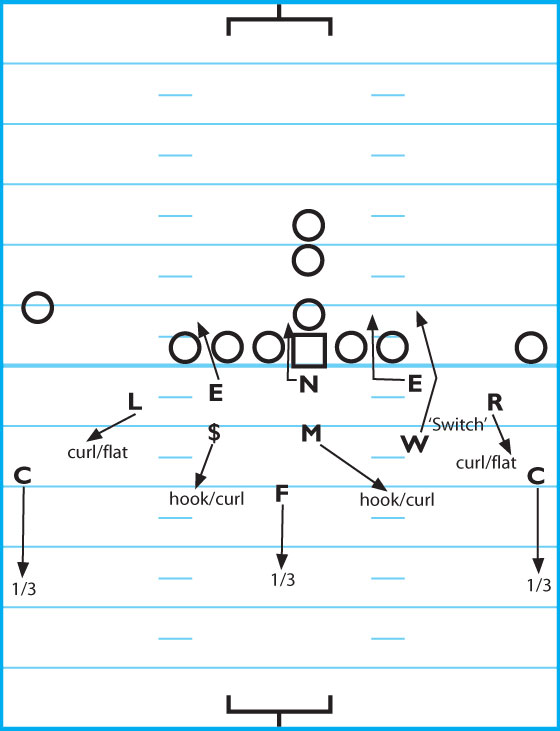
DIAGRAM 3: Away Cover-3. Our second call is Away Cover-3. The “Away” call tells your front to slant away from the Y (the TE).
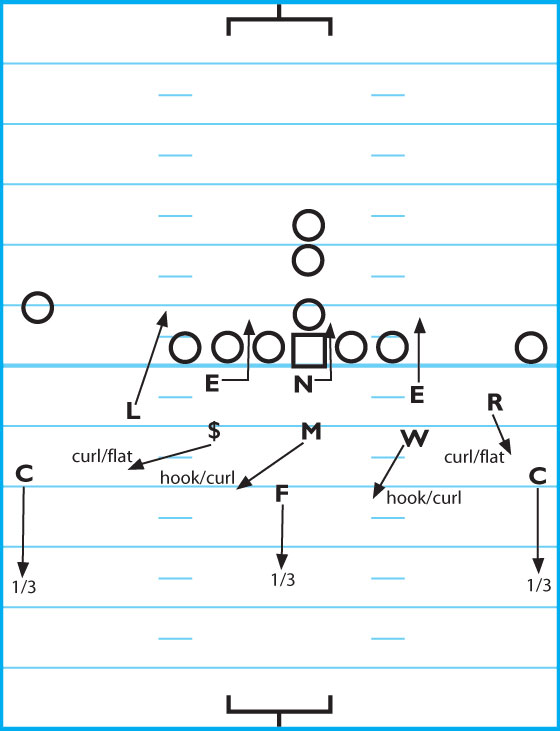
The Lion LB knows that in Away, he is aligned to the TE and must blitz the D-gap just like the Rover LB does in Toy.
The Rover now gives a “Ringo” call to the Will LB telling him that the Rover is the curl or flat player and the
Will is a hook or curl player to his side. The Mike LB is the hook or curl defender away from the “Ringo” call and the $am now is the curl or flat defender to his side.
The biggest adjustment that has to be made in this defense is when we get a No. 2 receiver removed (see Diagram 4 and 5).
DIAGRAM 4: Away Cover-3 Adjustments (A).
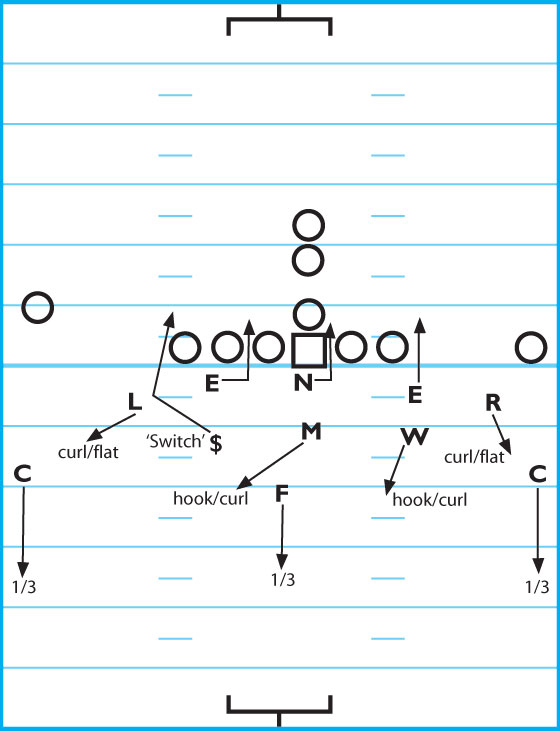
DIAGRAM 5: Away Cover-3 Adjustments (B).
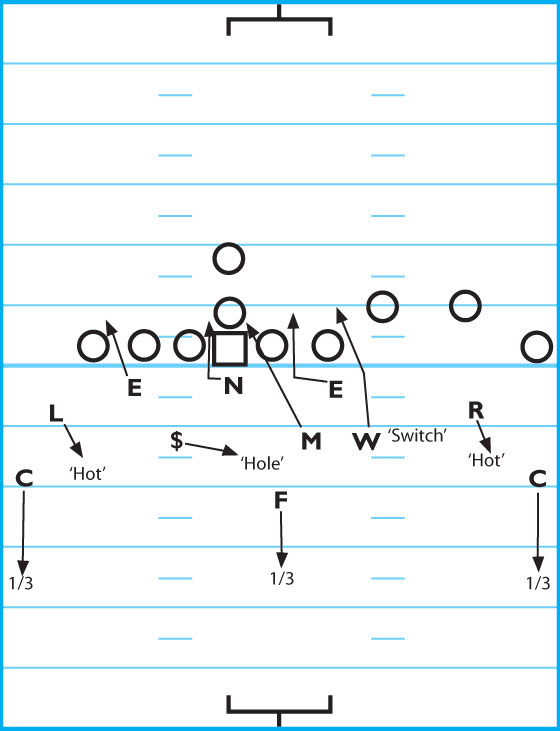
If the No. 2 receiver is removed to the side, then we are sending the Lion or Rover and that player must communicate with the $am or Will LB to his side. They must give a “Switch” call to the $am or Will. The
Switch call tells the Lion or Rover to play a curl or flat technique off the No. 2 receiver and the $am or Will
LB must then blitz the D-gap.
“3 Fire” Scheme
Once our base Cover 3 scheme is installed we then move into our Zone Blitz scheme.
Our primary zone blitz scheme — the “3 Fire” — is a 3-underneath, 3-deep coverage. The basic concept of this package is that we’ll be sending two of our five LBs on a blitz and the three remaining LBs must play the three underneath zones.
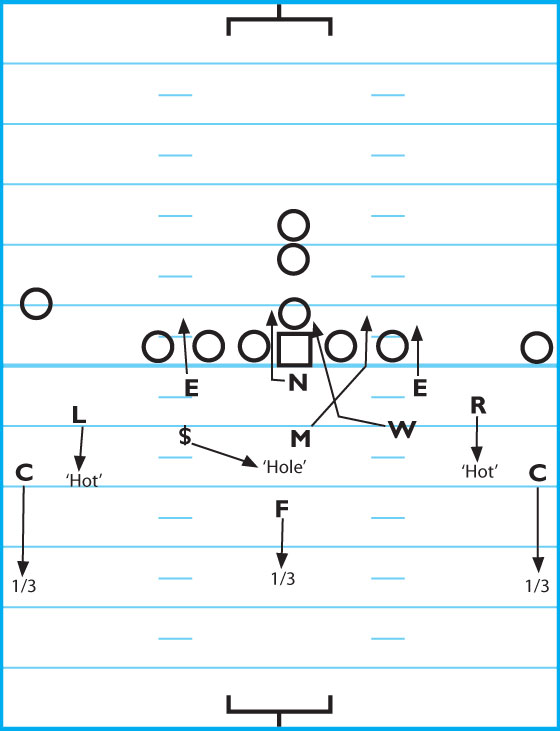
The three underneath zones are characterized by two outside “hot” players and one inside “hole” player (see Diagram 6).
The nice thing about this package is that once you teach the LBs the two underneath zone techniques (hot and hole) the players become automatically interchangeable.
DIAGRAM 6: “Hot” And “Hole” Designations. The two “hot” players are taught to take away the hot route first from the No. 2 receiver. We tell them to read the eyes of the quarterback as they take away the inside part of No. 2 and get into the throwing lane. If there is no hot route from the No. 2 receiver, they become curl or flat defenders.
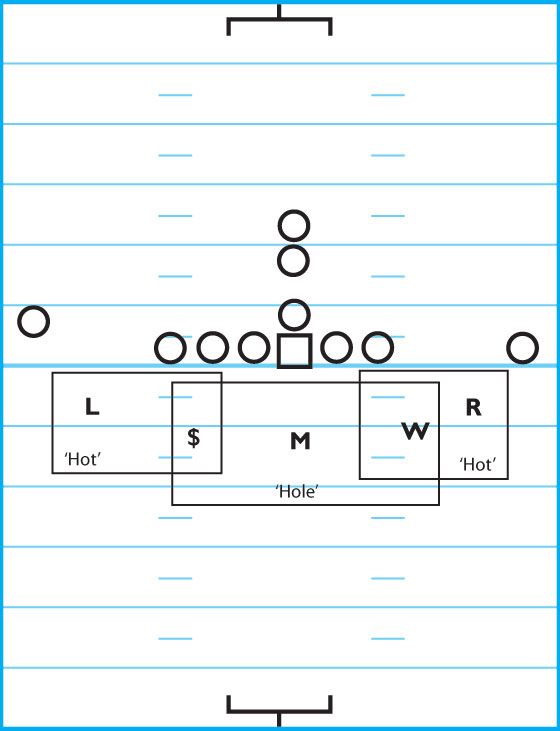
The “hot” defenders can be either the Lion or $am LB to the TE side or the Will or Rover LB to the split side, based on the blitz called.
The “hole” defender is to play the hot route off of the No. 3 receiver. If there is no hot route from No. 3, they become a hole defender. The hole defender will either be the Mike, $am, or Will LB, based on the blitz called.
There is no new teaching for the secondary in this coverage. They are playing 3-deep coverage just as they do in our base Cover-3 as mentioned earlier.
2-Second Rule. In addition, we also have a designated “2-second rule.” In this rule, we tell our pass rush and blitzing LBs that they have 2 seconds to get to the QB. We can not allow him to have more than 2 seconds to throw the ball.
If the QB has more than 2 seconds to complete a pass we have a problem with our blitz — not the coverage.
Zone Blitz
The first zone blitz comes off our base defense and is called “Toy Mike Arrow 3 Fire.”
DIAGRAM 7: Toy Mike Arrow, 3 Fire (A). The Rover blitzes the D-gap in Toy and the Mike blitzes the A-gap. The Mike must know the direction the front is slanting so he does not take the same gap as the Nose Tackle.

The Lion and Will are “hot” players and the $am is the “hole” player.
DIAGRAM 8: Toy Mike Arrow, 3-Fire (B). If we get the No. 2 removed, our “switch” call would be used, telling the Rover to play “hot.”
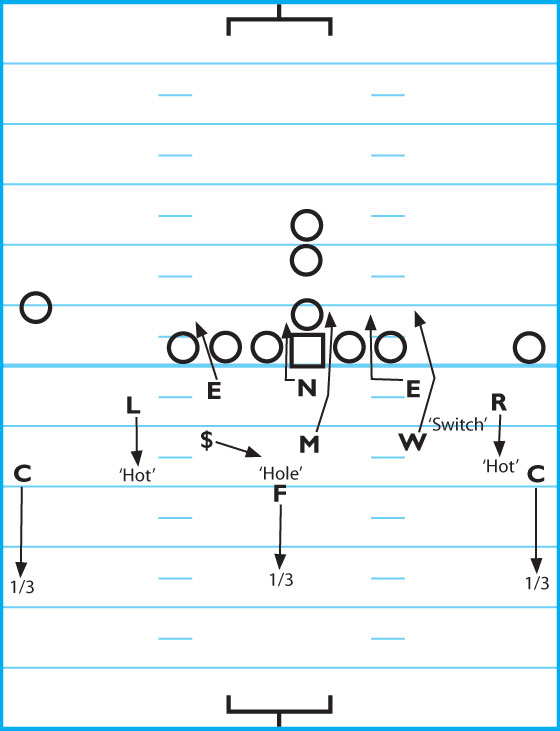
DIAGRAM 9: Toy Mike Arrow, 3-Fire (C). If we get a 3-on-1 offensive set, then the $am LB has to push hard to the No. 3 receiver if he is away from him.
If the $am LB is prowling before the snap, as mentioned earlier, he should be able to get closer to the No. 3 receiver before the snap.
The Lion also has to prowl to a position where he can play “hot” off the No. 1 receiver.
The beauty of this zone blitz package out of the 3-3 stack is that there are numerous blitz combinations as long as you teach your LBs the two underneath zone techniques.
As long as your LBs know when they are blitzing and when they are in coverage, your blitzes can be very creative.
The Diagrams 10-14 are a number of other highly effective zone blitzes we use out of our 3-3 zone blitz package.
DIAGRAM 10: Away Will Blast 3 Fire.
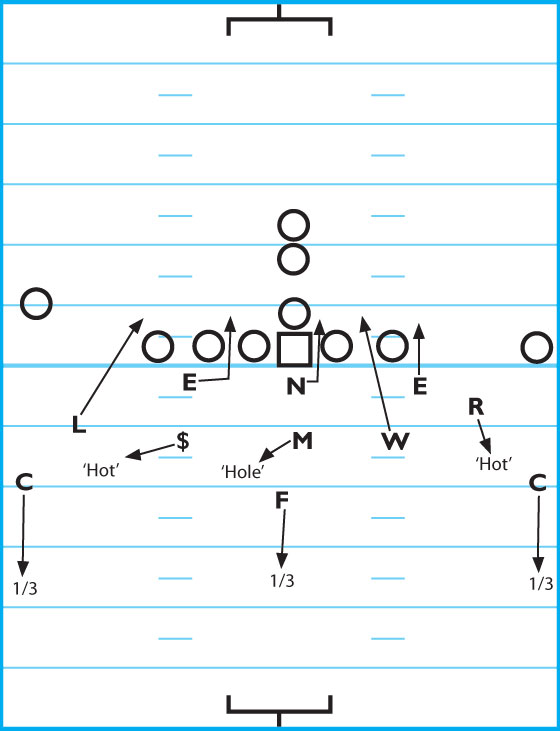
DIAGRAM 11: Ohio 3 Fire.
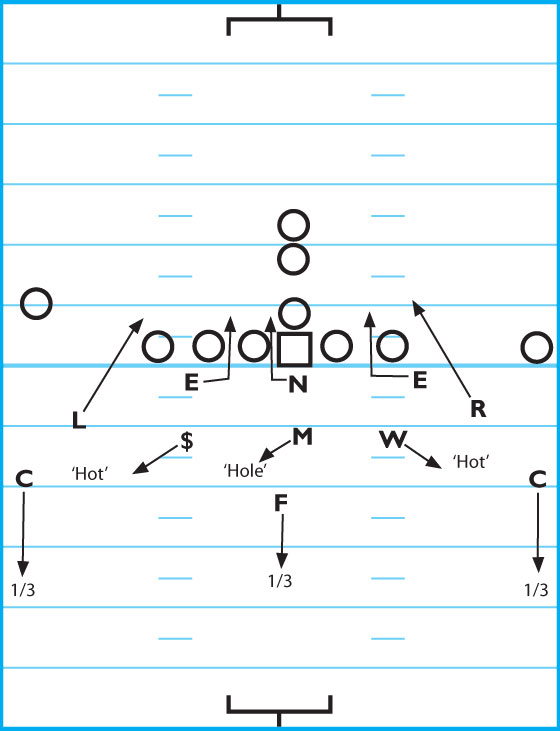
DIAGRAM 12: Toy Lion Dog 3 Fire
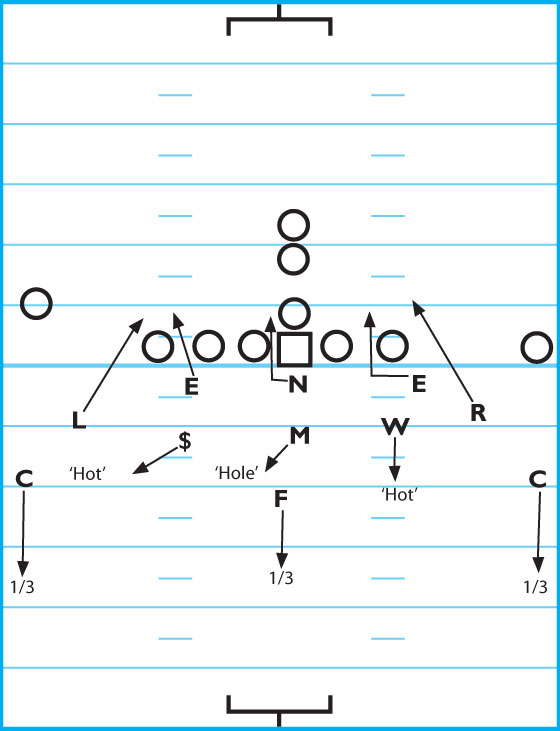
DIAGRAM 13: Illinois 3 Fire.
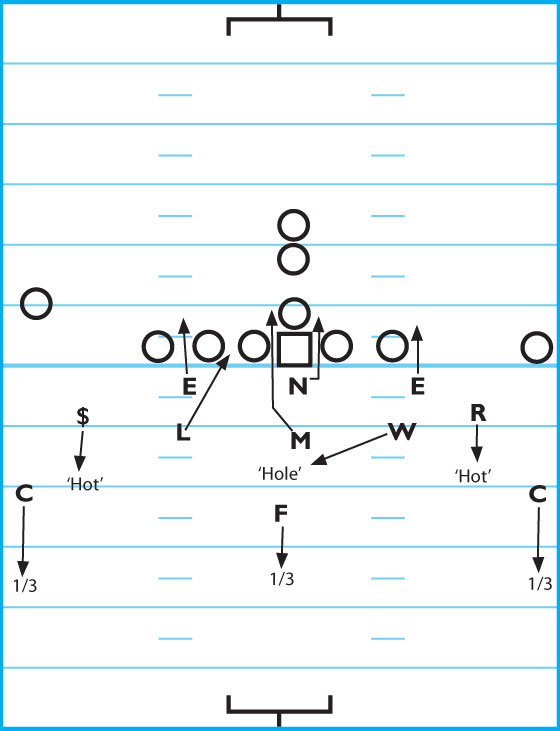
DIAGRAM 14: Idaho Wk 3 Fire.