IN THE 40 YEARS that I’ve coached high school football, I’ve worked with teams that were undefeated and those that won but a single game. Always, team’s that were strong defensively did exceptionally well in the win-loss column.
Those teams were generally blessed with superior talent. However, from time to time I’ve helped coached teams with mediocre talent that still performed well defensively. To try to bridge the talent gap, we designed a defense called the Octopus. The Octopus, with its eight “tentacles” reaching out in all directions, is predicated on confusing blocking assignments, outnumbering offensive blockers and harassing the quarterback.
Bridge The Size Gap
At its inception the Octopus was developed to offset a tremendous differential in physical size. During the years we used this defense, our front eight averaged less than 150 pounds. Tackles weighing 140 pounds were the rule, rather than the exception.
The element of surprise helps greatly in the success of the Octopus. If your team is undersized and under talented, you might want to give this defense a try. If you don’t want to use it as your basic defense, it would still be beneficial in goal line and short yardage situations and could be of great value in harassing opposing QBs during passing situations.
Blitzing Linebackers
There are two parts to the Octopus:
1. “62” look without blitzing linebackers.
2. “62” look with blitzing linebackers.
It’s imperative that you keep the offensive team guessing whether or not you’re going to send your LBs. Your LBs need to jab toward the line of scrimmage from time to time in order to confuse the offense (sometime jab and go and sometime jab and stay).
An important coaching point to remember is that if your gap defenders are having problems with angle blocks they can line up initially in a head-up position and slant to their designated gaps.
Except for the “62” regular, the defensive call will tell the guard where to align (“62” inside, A-gap; “62” over, head-on the guard; and “62” outside, B-gap).
Read, React Situations
Diagrams 1 through 4 represent the non-blitzing part of the defense. The down linemen must crowd the line of scrimmage and move on the ball or the movement of the offensive lineman. We try to impress on our linemen to play deaf on defense; they should pay no attention to the voice inflection of the quarterback. Also in our pre-season practice, we stress going on different cadence counts. We feel this helps both the offense and the defense.
If your defensive philosophy is one that employs stemming, you could play your guards and tackles in a head-up position and stem to their appropriate gaps on the pre-determined call.
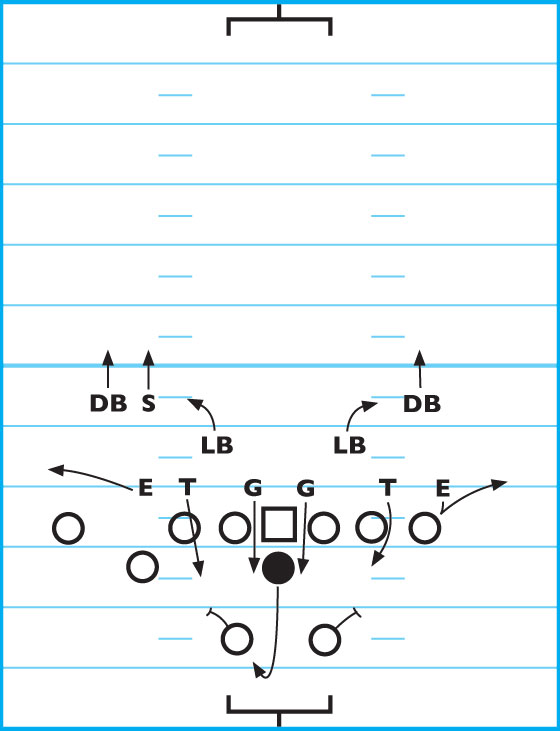
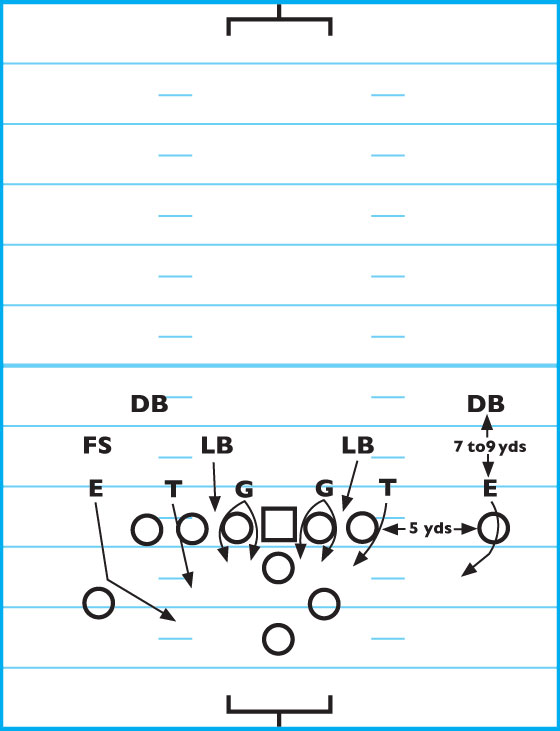
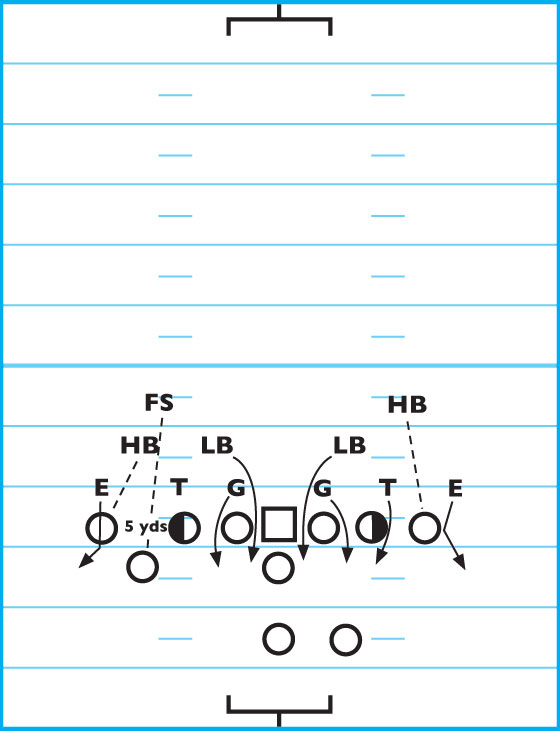
DIAGRAM 1: “62” Regular.

Defensive Guards: Line up in the A gap. Play QB sneak first. If not blocked, be prepared for a possible trap block.
Defensive Tackles: Line up half-man to the outside of the offensive tackle (go through his outside shoulder). Close down to the outside the further the tackle splits (if he splits more than 3 feet, move head up with him). Basic responsibility is the off-tackle hole.
Defensive Ends: Same basic responsibility as in a conventional “62.”
LBs: Line up in B gap (2 to 3 yards off LOS). Be alert for a middle screen. Be in a hitting position with shoulders parallel to the line. Keep the shoulders parallel as you move down the LOS.
Free Safety: If there are no flankers, the slot man or the man in motion are your responsibility. Play 8 to 10 yards deep, favoring the strong side of the formation. If you’re aware (through scouting reports) of an excellent receiver, help double cover.
Defensive Backs: Key on the end to your side. If the end moves through the backfield, alert teammates to possible end-around situation. If your end blocks, come up with caution. Be alert for the end blocking and releasing or falling down and immediately getting back up and running a pass pattern.
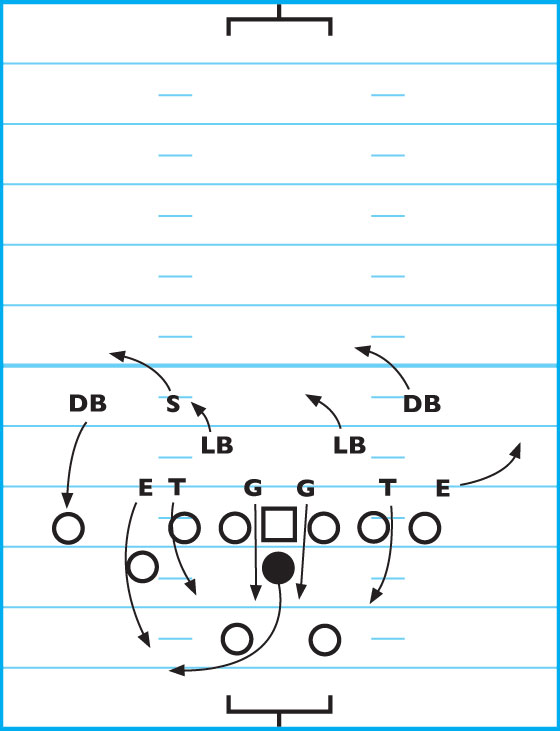
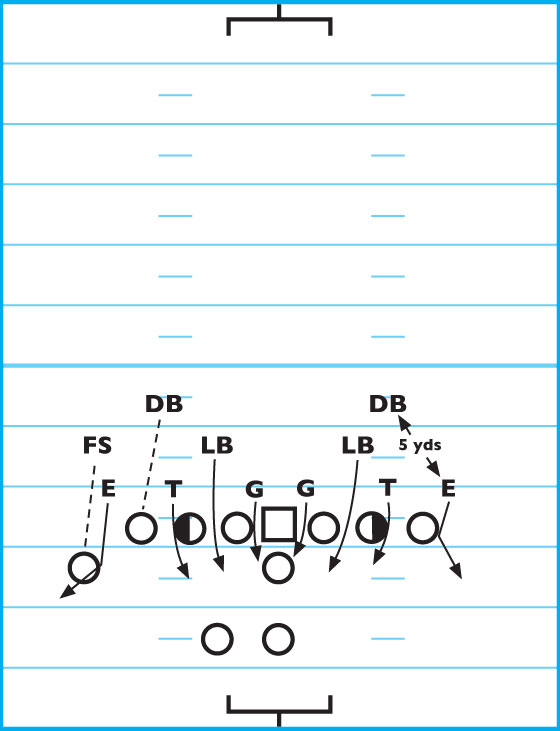
DIAGRAM 2: “62” Inside.
DGs: Line up in the A gap. Play the QB sneak first. Most comfortable stance. Use the stance from which you move the best and is most effective for you. If not blocked, stay low, turn to brace yourself for a trap block. Play run first, pass second.
DTs: Line up in the B gap. Get a quick penetration into the backfield (approximately 1 yard). Fight pressure, if blocked. If not blocked, look for trap block or end blocking down. Use your most effective stance.
DEs: Use a two-point stance with the inside foot forward. If the offensive end stays in tight, play half-man to his outside shoulder.
On the snap, step into the end, but key the QB. Box initially on penetration. On the option, force the play to the inside (play the pitch man). If the end is split, stay half man to the outside until the end splits 5 yards. At 5 yards, line up head on. Beyond 5 yards, move inside (on a pitch to your side be ready for a crack back block when you turn). Stay at home. Do not chase the play through the backfield. Use proper pursuit angle once the ball carrier breaks the LOS.
LBs: Use a two-point stance and get into good hitting position. Shoulders parallel to the LOS, 1 to 2 yards off the line. Don’t get so close to the line that you can’t move laterally. Keep shoulders parallel to the line as you move. On an option, your man is the QB. Be aggressive. Occasionally fake a blitz.
FS: Pick up flankers, slot backs and men in motion (if you don’t have coverage). Play 7 to 9 yards off the line. If there are no flankers or slot players, you will play center field or double cover the best receiver (this will be determined by scouting reports).
DBs: Play 7 to 9 yards off. Key end to your side. If the end blocks, come up with caution. Be alert to the end blocking and releasing.
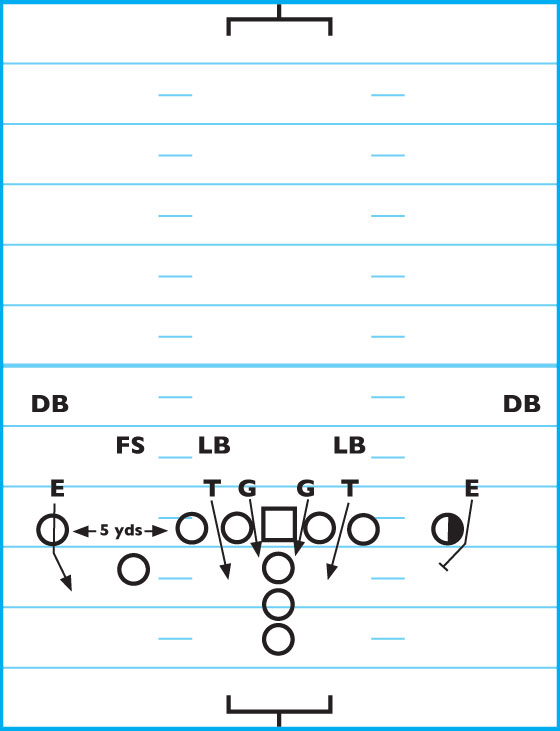
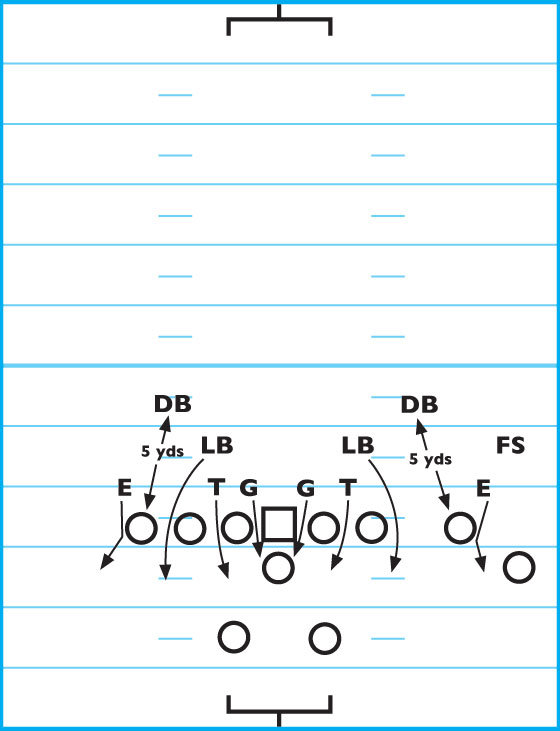
DIAGRAM 3: “62” Outside.
DGs: - Line up in B gap. You’re responsible for off-tackle runs. If not blocked, stay low and be prepared for a trap block or an end blocking down. Explode through tackle’s outside shoulder. Play run first, pass second.
DEs: Same responsibility as “62” Inside.
LBs: Line up in gap A (1 to 2 yards off the line). You are initially responsible for runs up the middle. Keep your shoulders parallel to the LOS when moving laterally. On the option play, go aggressively for the QB. Make him pay for running the football.
FS: Same responsibility as for “62” Inside.
DBs: Same responsibility as for “62” Inside.
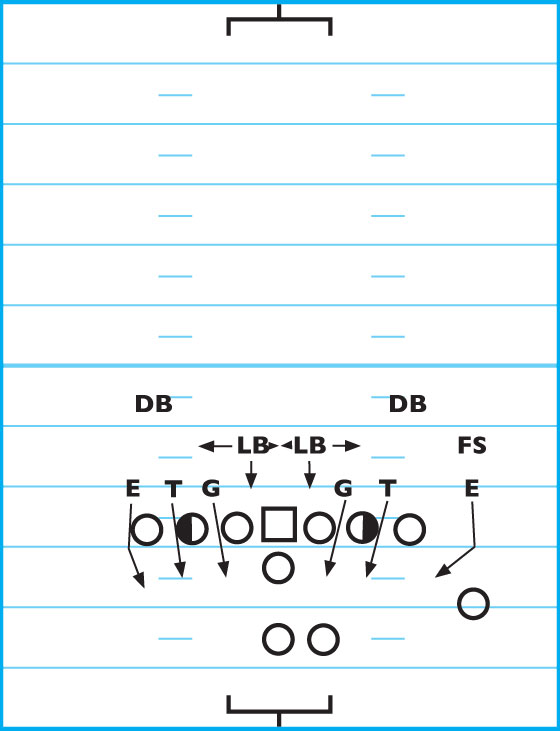
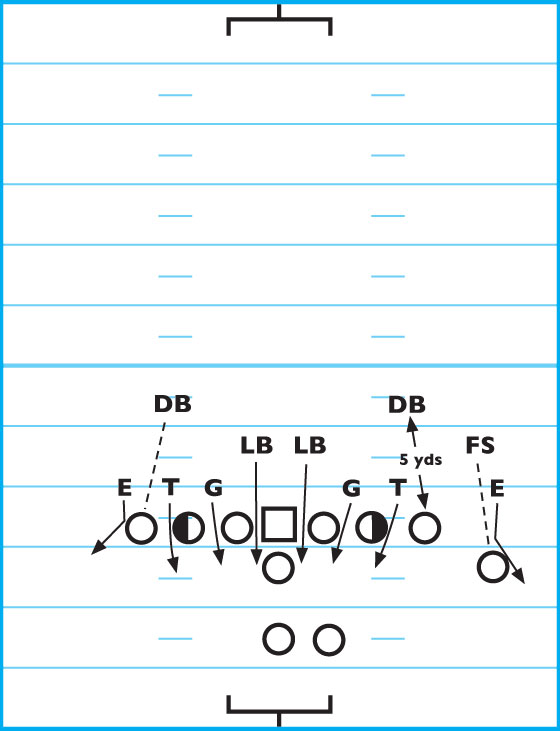
DIAGRAM 4: “62” Over.
DGs: Line up head-on with the offensive guard (if the guard splits up to 3 feet, move to the inside gap (A gap). Your basic responsibility is to stop running plays through A gap and to assist in B gap.
DTs: Line up in C gap. You are responsible for off-tackle plays. The farther the end splits, the closer you get to the tackle. If the end splits more than 2 yards, line up just off the tackle’s outside foot. If not blocked, look for trap block or end blocking down.
DEs: Same responsibility as “62” inside. Play head-up on a flanker until he splits 3 or more yards (then move inside).
LBs: Line up in B gap, 2 to 3 yards off the LOS. Same basic responsibility as “62” inside and “62” outside.
FS: Same basic responsibility as “62” inside and “62” outside.
DBs: Same basic responsibility as “62” inside and “62” outside.
Blitzing Octopus
Diagrams 5 through 8 represent the blitzing part of the Octopus package. This is the part of the defense that will be very exciting for your players. It lets them attack the offense. It’s not part of a reading and reacting defense.
DIAGRAM 5: “62” Regular - Double Plug.
DGs: Line up in A gap. Play run first, pass second.
DTs: Line up half man to the offensive tackle’s outside shoulder (C gap). On the option play, you are the linebacker. Go for the QB.
DEs: Same responsibility as “62” inside-double plug.
LBs: Line up in B gap (2 to 3 yards off the line). Blitz on the snap of the ball. Be sure not to overrun the ball.
FS: Same responsibility as “62” Inside-Double Plug.
DBs: Same responsibility as “62” Inside-Double Plug.
DIAGRAM 6: “62”
Inside-Double Plug.
DGs: Line up in the A gap. Squeeze QB. Be alert for a middle screen, especially if you only meet token resistance. The QB dropping extra deep could also indicate a middle screen. Use the stance from which you can execute the best. Hit any back coming through the line whether he has the ball or not. You must prevent him from getting into the secondary.
DTs: Line up in B gap. Get quick penetration into the backfield (approximately 1 yard and find the ball). Fight pressure when blocked. If not blocked, be prepared for a trap block. Hit any back coming through the line. You must prevent him from getting into the secondary.
DEs: Jam the end and step to the outside (you should be in position to stop runs around your end). You have several very important responsibilities. They are as follows:
1. Jam end if tight — use hands.
2. Play the pitch man on the option.
3. Be responsible for any screens in your flat.
4. Pick up any flare backs to your side.
5. Stop end runs — you cannot let one man block you successfully. You must be aggressive.
6. Do not rush the passer. There are times when this takes discipline, as the rush looks inviting.
LBs: Stack behind defensive tackle. Blitz through C gap. Hit any back coming through the line (use your hands). He is a potential blocker as well as a potential pass receiver.
FS: Pick up flankers, slot men, motion, etc. Move up to a depth of 5 yards unless the flanker or slot man is extremely fast.
DBs: Move up to a 5-yard depth to take away the quick slant or look-in pass. Move slightly to the inside. In man coverage, your man is the end.
DIAGRAM 7: “62”
Outside-Double Plug.
DGs: Line up in B gap. You’re responsible for runs coming through that area. If not blocked, be prepared for trap block. Hit any back coming through the line. If you get minimal blocking be alert for the middle screen.
DTs: Line up on tackle’s outside shoulder (C gap). You are responsible for any runs in the area of C gap.
DEs: Responsibility is the same as for “62” inside-double plug.
LBs: Blitz through A gap. Play under control. Hit any back coming through the line (with or without the ball). Prevent him from getting into the secondary. Play run first, pass second. Do not give the blitz away. Preserve the element of surprise.
FS And DBs: Same as “62” Inside-Double Plug.
DIAGRAM 8: “62”
Over-Double Plug.
DGs: Line up head on with the OG. Slant through B gap. Don’t lean.
DTs: Line up a C gap (on OT’s outside shoulder). You are responsible for runs in the area of C gap. On the option, the QB is your responsibility.
DEs, FS and DBs: Same as “62” Inside-Double Plug.
General
Coaching Points
- DTs and DEs need to make their adjustments when they take particularly wide line splits.
- LBs need to be close enough to the LOS to make plays, but not too close that they get caught up in any LOS “garbage” pile ups.
- The FS must pick up flankers, slots, and men in motion when a blitz is called.
- DEs must “stay at home” and use the proper pursuit angle when the runner breaks the LOS.
- DGs should be in a head-up position on the OG or in the A gap. Always play QB sneak first.
- If DGs aren’t blocked initially, they need to react to any possible trap blocks.
Blitz Package Tips
- Always play run first, pass second.
- DGs should always be alert for a middle screen. If they are blocked passively, they need to stop rushing and back up looking for the middle screen.
- DGs, DTs and LBs should always jam backs (with or without the ball) coming through the line.
- DBs should crowd the LOS to help prevent a quick slant pass.
Editor’s Note: To see how the Octopus is effective in zone coverages, check out the “Feature Articles” page on the Gridiron Strategies Web site at: www.gridironstrategies.com.