THE 3-3-5 DEFENSIVE PACKAGE is easy to install, stays in a beneficial odd front and keeps your fastest players on the field. This especially is important if you do not feature a lot of bigger players on your defense.
By aligning in an odd front, it allows you to angle and slant to get into reduction. Plus, you do not tip to bubble, so offenses can’t read what you are doing. Your coverage is three deep. Most importantly, you are keeping your defense simple and fast. Out of the 11 players on defense, nine know exactly what their assignment is when the defense is called. Only two players make adjustments and only one player checks. No matter what the offense does, your defense is ready. The offense does not dictate to you what your defense is going to do.
Why go from 3-4 to 3-3?
The easy and most important answer to this question is simple: speed. In a 3-4 defense, the Sam linebacker typically is over the tight end. With the advent of the spread offense, that Sam LB (who is possibly one of your bigger LBs) now has to cover a wide receiver who is faster and more athletic. Being in a 3-3 gets at least five players in your secondary to defense a potential spread offense.
Also, in a 3-3, the front three players do not have to learn anything new from a basic 3-4. The responsibilities do not change much at all, which keeps it simple for those players.
Another advantage is the front always is balanced so there is no bubble to check to. This means the offense is unable to predetermine your coverages. You are giving the illusion that you could have a safety open or safety closed.
Basic 3-3-5 formation
The 3-3-5 Bomber Defense all starts from the basic formation with adjustment from the base. The key to the defense is the “Adjuster” who should be the most complete player on your team
.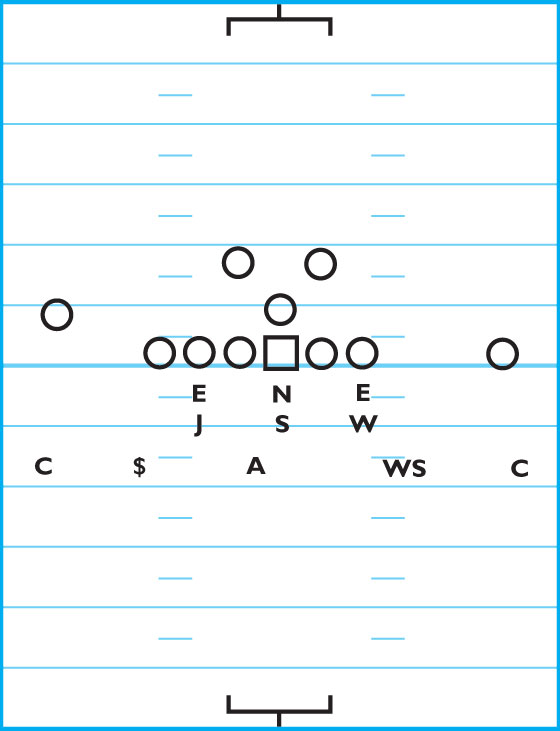
DIAGRAM 1: Basic 3-3-5 Formation. The player alignments for the 3-3-5 Bomber Defense follow:
Ends: Both ends align head-up in a 4 alignment on the offensive tackle in front of them. They never reduce down and the only time they might get wider is in an empty backfield passing situation.
Nose Tackle: Lines head-up on the center in a 0 alignment.
Stack Backers: The three linebackers are Jet (strong side), Sam (middle) and Will (weak side). They line up 3 to 4 1/2 yards directly behind the defensive linemen. If you are thinking the play definitely is a run, have them line up at 3 yards and in a passing situation keep them back closer to 4 1/2 yards.
Safeties: Both line up 7 yards deep with an outside shade of the tight end or the imaginary TE (on weak side). Against a slot receiver, the safety uses inside shade and still is 7 yards deep. As for hash rules, the safety never lines up more than 3 yards outside or inside the hashmark.
Corners: Line up with an outside shade of their specific receiver. They also are 7 yards deep to create an illusion that your defense is playing a 5-across secondary. The corners have a 6-yard sideline rule meaning if the WR lines up 6 yards from the hash, the defender goes to an inside shade.
Adjuster: This player moves around quite a bit. He aligns according to the game plan. In the basic formation against a two-back set, the Adjuster is 7 yards deep and aligns on the strong-side offensive guard.
Front adjustments
While our team uses the basic (Stack) defensive alignment 80 percent of the time, there are other alignments to use, which helps confuse the offense.
DIAGRAM 2: Spread Alignment. The Spread takes the Jet and the Will LBs and move them to the line to give the look of a 5-man front.
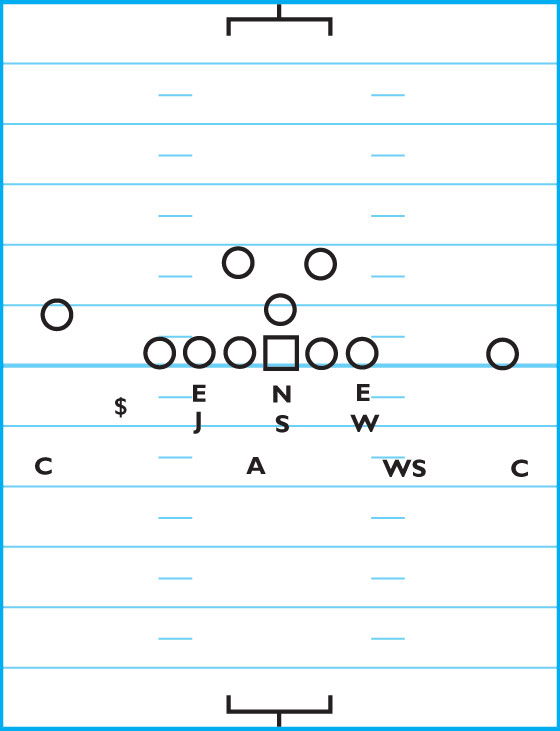
DIAGRAM 3: Sparrow Alignment. In Sparrow, the strong safety aligns in the box. He sets up 3 yards by 3 yards outside the TE.
DIAGRAM 4: Bluff Alignment. In Bluff, both the strong safety and the weak-side safety align in the box. The strong safety once again is 3 yards by 3 yards from the TE. The weak-side safety is 3 yards by 3 yards from the last man on his side of the line of scrimmage.
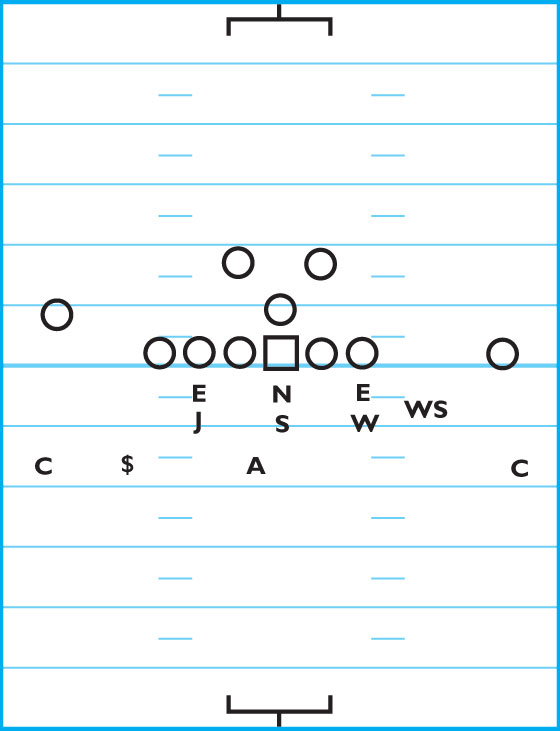
DIAGRAM 5: Ninja Alignment. This is the opposite of Sparrow. The weak-side safety aligns in the box in the same position as Bluff. The strong safety remains in his basic alignment.

The adjuster
As mentioned, the Adjuster is the key to the defense and finds himself lining up and moving all over this defense. If the Adjuster is set to blitz, the defense must sling its coverage.
DIAGRAM 6: Adjuster On Line. When the Adjuster is aligned at the LOS, the weak-side safety must rotate toward the center of the field to cover the middle third.
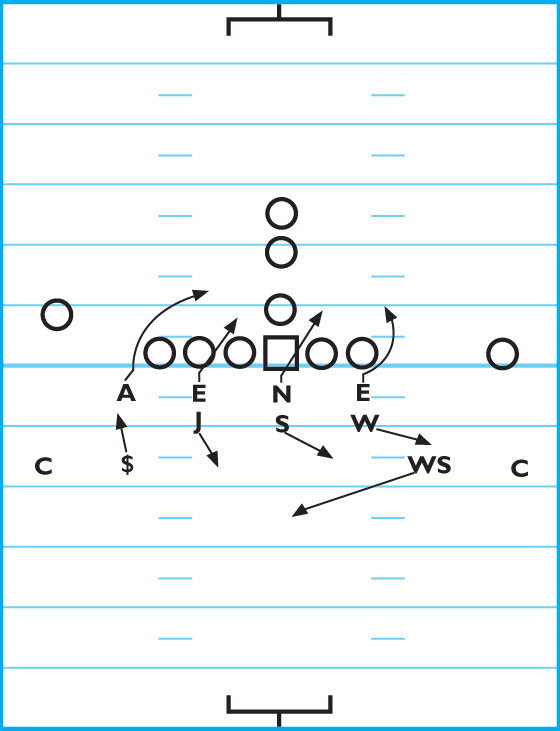
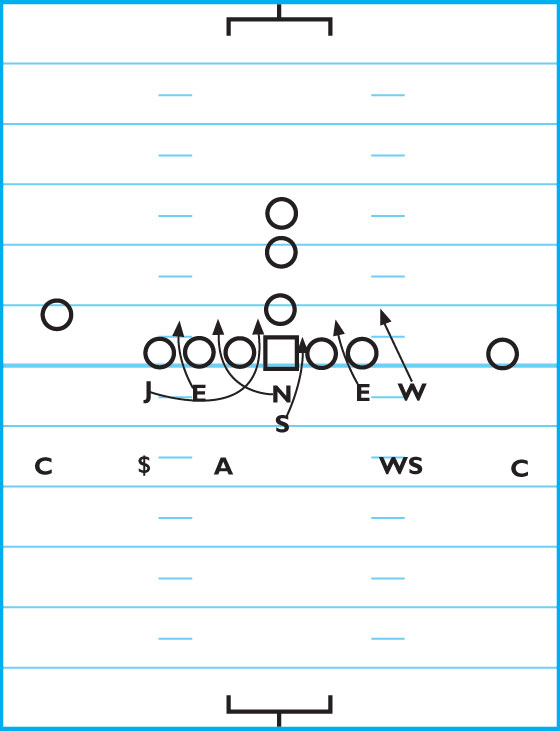
DIAGRAM 7: Strong Flash Storm. One specific way to get the Adjuster and your defense moving is to use a Strong Flash Storm call. This has the Adjuster on the strong side and blitzing. The strong-side DE loops the B-gap. The NT loops the weak-side A-gap. The weak-side DE loops the C-gap to contain the rush. With a “Storm” call, your coverage is 4 under, 3 deep. The Sam and Jet LBs play hook to curl.
The weak-side safety covers the deep middle third of the field. The strong safety and Will LBs handle the seams.
DIAGRAM 8: Weak Flash Storm. The same call can be made to the weak side. The Adjuster lines up on the weak side (3 yards by 3 yards from the end man on the LOS) and blitzes. The weak-side DE penetrates the B-gap. The NT penetrates the A-gap. The strong-side DE penetrates the C-gap to contain the rush. The secondary goes into a sling coverage, just as in the previous diagram.
adjuster replacement
Instead of being a blitzer, the Adjuster also can replace a blitzer. In this case, it is called Falcon.
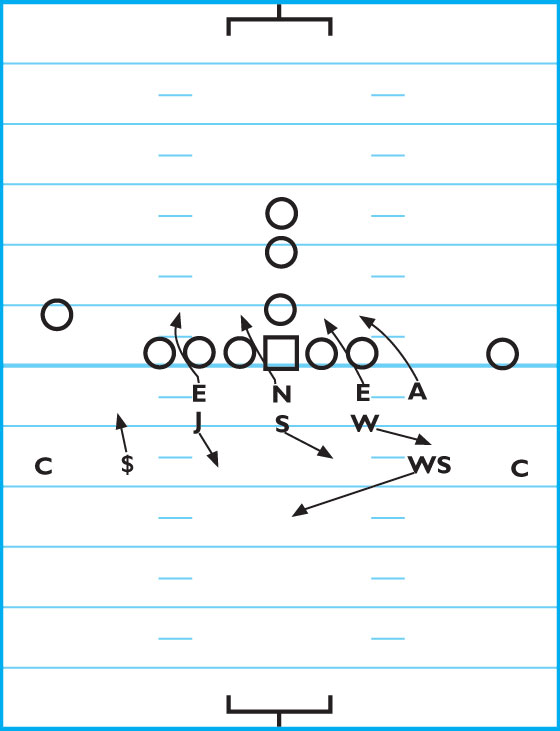
DIAGRAM 9: Strong Loop Storm (Falcon). In this instance, you are looping the gaps and playing a Storm coverage. Falcon means the Adjuster is replacing a blitzer. The strong-side DE loops into the C-gap. The NT hits the B-gap. The Jet LB blitzes the A-gap. The Adjuster replaces the Jet. If the play is a pass, the Adjuster plays the seam and the strong safety covers the deep middle of the field. The Sam and Will LBs play hook to curl. The weak-side safety plays the seam.
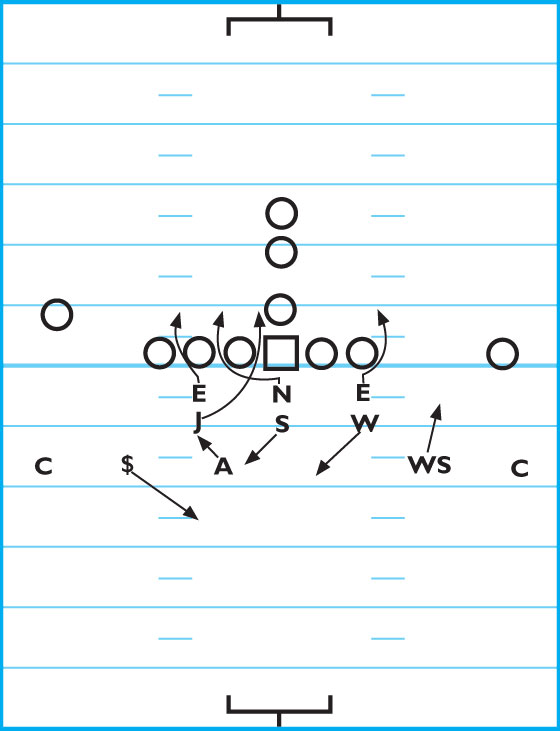
DIAGRAM 10: Strong Loop X Fire (Falcon). By adding an “X”, you are sending another blitzer, this time it’s the Sam LB. To cover the vacated spot, the Will rotates to play the hole left by the Sam. The strong safety again goes to the deep middle third of the field.
The same two defensive calls can be made to the weak side as well.
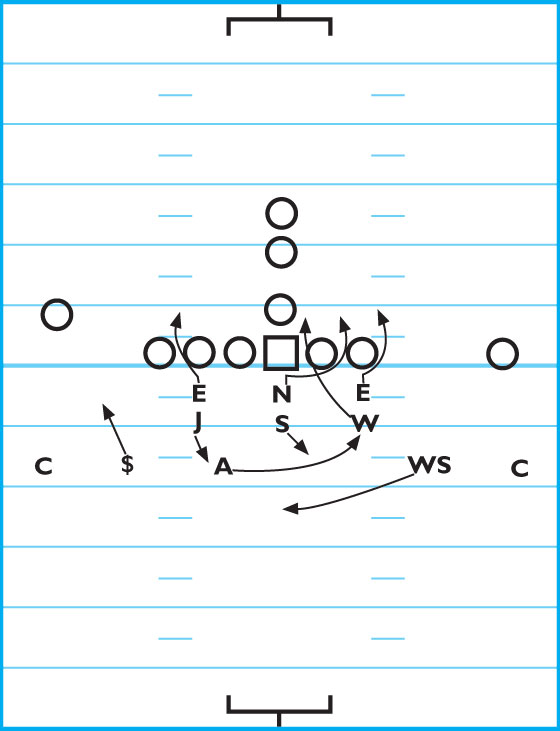
DIAGRAM 11: Weak Loop Storm (Falcon). This time the weak-side LB (Will) blitzes and the Adjuster replaces his position. The Adjuster covers the backside seam. The weak-side safety plays the deep middle third of the field. The strong safety takes the seam on his side of the field. The Jet and Sam LBs are responsible for the hook to curl. The DE responsibilities remain the same with the strong-side end hitting the C-gap and the weak-side end does the same. The NT penetrates the weak-side B-gap in this instance.
DIAGRAM 12: Weak Loop X Fire (Falcon). Adding the “X” means another LB is blitzing. In this case the Sam attacks the strong-side A-gap. The Will attacks the weak-side A-gap. The DEs both hit their C-gaps again. The NT loops into the B-gap. The Adjuster replaces the Will’s position and plays the seam to that side of the field. The Jet comes across the alignment to replace the Sam’s position. The weak-side safety rotates to the deep middle third of the field. The strong-side safety comes down to cover the seam.
Movements Within Adjustments
After tinkering with the movements and calls out of the basic set, there also are adjustments that can be made in the Sparrow, Bluff, Ninja and Spread calls.
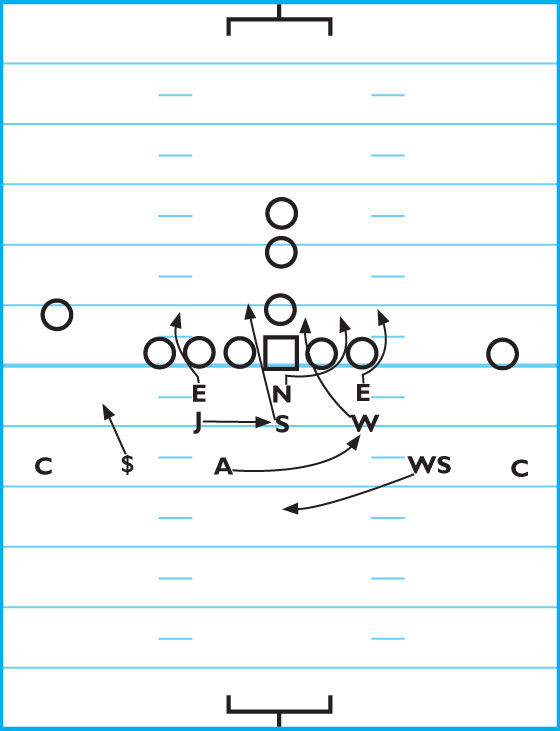
DIAGRAM 13: Strong Loop Storm (Sparrow). In the Sparrow, the strong-side safety moves into the box when the Jet LB blitzes. This safety also can prealign in the box if he chooses, to present the offense with yet another look. This safety, no matter where he aligns prior to the start of the play, is the seam defender on that side of the ball. The DEs hit the C-gaps again, the NT goes to the strong-side B-gap and the Jet blitzes through the A-gap on the strong side.
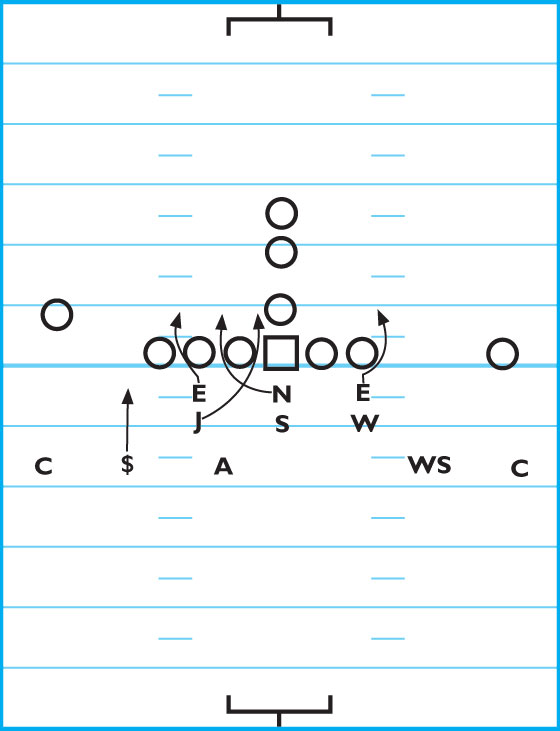
DIAGRAM 14: Strong Loop Storm (Bluff). As explained earlier, the Bluff call means both the strong safety and the weak-side safety are aligned in the box. Both safeties drop back and play the seam on their respective sides of the field. The Adjuster drops back to cover the deep middle third of the field. The DEs again hit the C-gaps with the NT hitting the B-gap on the strong side of the formation. The Jet blitzes again through the strong-side A-gap.
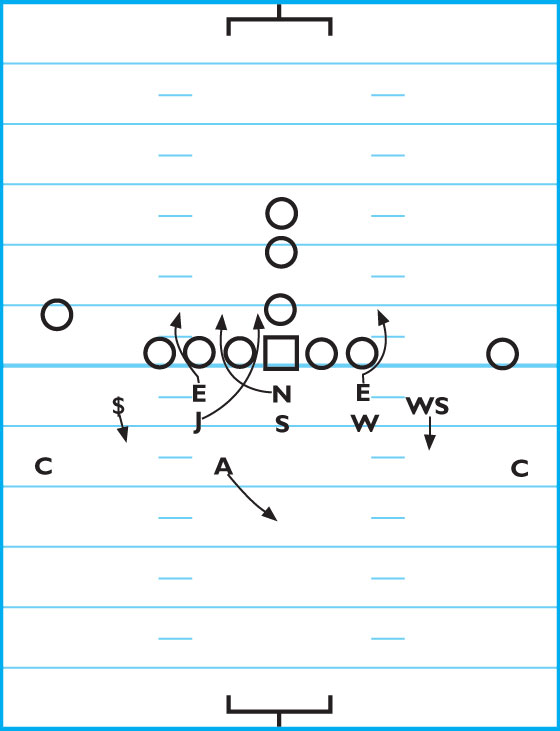
DIAGRAM 15: Strong Loop Storm (Ninja). Ninja features the weak-side safety aligning in the box. The strong-side safety comes up and covers the seam on his side of the ball. The weak-side safety drops back to cover the seam on the other side of the field. The front three linemen have the same gap responsibilities as in the previous two diagrams. The Adjuster, once again, drops deep to cover the deep middle third of the field.
The Spread look offers a couple of opportunities to confuse the offense with alignments and responsibilities.
DIAGRAM 16: Spread Strong Loop Storm. In this spread look with both the Jet and the Will LBs on the LOS creating a five-man front, your defense hides its blitz a little bit better than in other calls. The DEs and NT have the same responsibilities as the previous three diagrams, as does the Jet, who is blitzing through the strong-side A-gap from his position at the end of the LOS. The Will drops back to play the hook and curl. The Sam, in the middle of the field, shifts to play the hook and curl on the strong side of the field. The strong safety shifts forward to cover the seam. The weak-side safety steps up to cover the seam on his side as well.
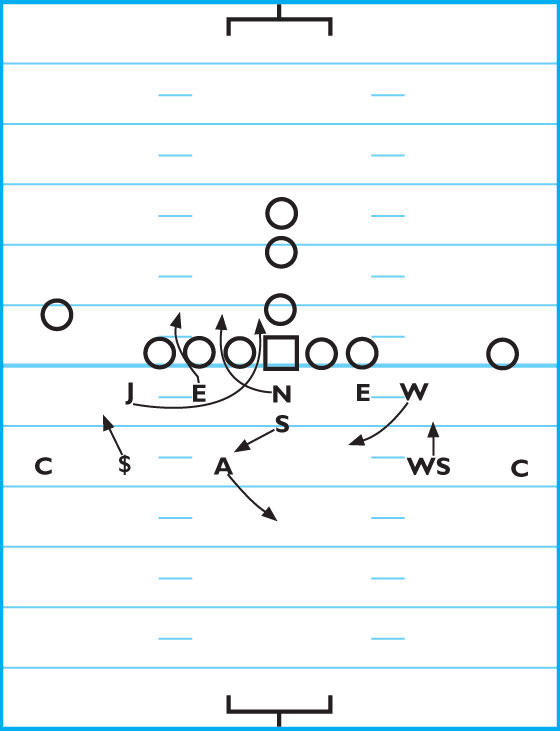
DIAGRAM 17: Spread Strong Loop Storm (Bluff). The call from Diagram 16 also can be used in a Bluff call. In this case, both the strong safety and weak-side safety have moved into the box. The strong safety took the place of the Jet, while the weak safety replaced the Will. To keep strength in the middle of the formation, neither safety has to line up 3 yards by 3 yards out from the LOS. By pinching in, the middle is plugged.
defending the box
With the movements and alignments set, start concentrating on the players in the box to perfect the 3-3-5 Bomber. Keeping the box in tact helps your defense stop the run.
To keep the box in tact, the front three linemen and the three LBs who align behind them must work in tandem. This means when one goes to one gap, the other hits a different gap (called a Read Scheme). This is predicated on how the specific offensive line players attempt to block your defensive linemen.
DE & Jet (Will): If the strong-side offensive tackle goes with a down block on your DE, then your DE squeezes to fit the B-gap and the Jet LB steps in to fit the C-gap. If that same OT goes with a base block, then the DE must be strong enough to power-step inside to cover the B-gap. Once again, the Jet would cover the C-gap. In the case of a loop block from the OT, the DE steps and secures the C-gap. The Jet works opposite and secures the B-gap. The same holds true on the weak side of the ball with the DE and the Will LB.
NT & Sam: For the NT, predetermine which A-gap he is to cover. Usually, the NT covers the strong-side A-gap. So, the Sam LB then covers the weak-side A-gap. The Sam can change this call anytime he wants by alerting the NT prior to the play. The two players then simply switch A-gap responsibilities.
However, the box responsibilities change when you are in a spread front because the Read Scheme is not viable. To stop the run from the spread front, you could make a Bluff call, putting the strong safety and weak safety in the box (specifically into the vacated stacker backer positions). However, this takes time as the play develops and makes your defense slower. Our solution is to go with a stunt scheme as shown in Diagram 18.
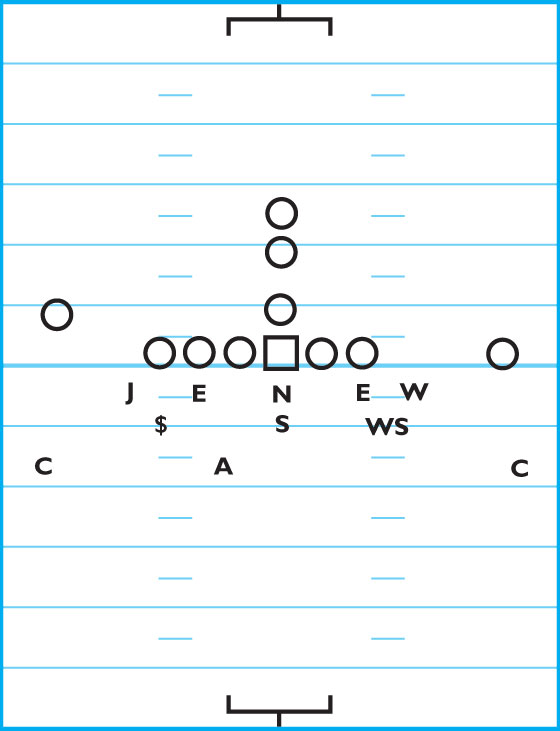
DIAGRAM 18: Spread Front. Stunting works well from the spread against the run. Both DEs plug their respective C-gaps. The Jet and the Will plug their respective B-gaps. The NT hits the strong-side A-gap, which signals the Sam LB to plug the weak-side A-gap.
Another option is to go with a loop scheme as shown in Diagram 19.
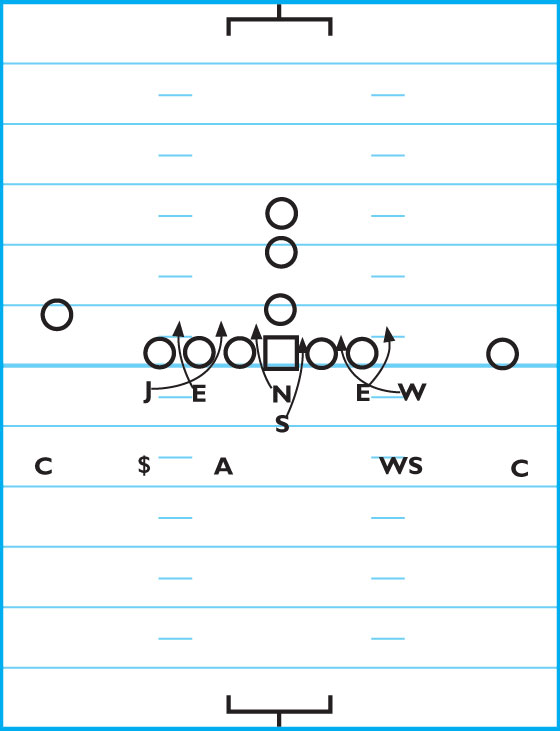
DIAGRAM 19: Strong Loop Weak Edge. In this case, the strong-side DE loops into the C-gap with the NT moving into the B-gap. The Jet loops around into the open strong-side A-gap. The weak-side DE hits the B-gap with the Will LB in the C-gap on the weak edge. The
Sam LB plugs the weak-side A-gap.