THE SPREAD PUNT is the most volatile phase of kicking. How many times have you seen games been decided by a bad snap, block, punt return or by pinning an opponent deep? A spread-punt unit must be the most trained and disciplined phase of the kicking game. The philosophy of the spread punt is detailed here.
The splits are 6 inches for the center and offensive guards, while the splits are 12 inches for the OG and offensive tackle. Wings are “thatched” meaning the inside foot of the wing is directly behind the outside foot of the OT and he is able to grab the belt loop of that player. The stance must allow for speed in the vertical set. With the inside foot forward and a slight lean-in by the player to break the belt line of the center.
The set is vital to the success of the spread punt. Players must never leave their wing man. Make sure the splits a player has when he starts is the same as when he initiates contact.
Spread-punt protection is a zone match-up concept. Though players should never chase opponents, depth in vertical set as well as alignment should allow the protection to see stunts and games occur and enable to match-up once they have declared.
The spread punt can be extremely effective, but it also demands the most practice time and commands maximum concentration from your players in order to be successful.
The Sacred S’s
The help players remember the key points for protection in the spread punt, we’ve developed the “Sacred S’s.”
- Splits. Keep your splits consistent and maintain proper spacing. Don’t give the defense the advantage by using poor splits.
- Stance. Bend at the knees.
- Set. Use a vertical set that complements the constant split relationship.
- Strike. Punch and be physical on the snap of the ball.
- Sprint. Apply heavy pressure on the returner.
- Spread Out. Stay in your lanes and use designated landmarks inside and in front.
- Stick. Create a spark on special teams. Be a great tackler!
DIAGRAM 1: Spread-Punt Formation.
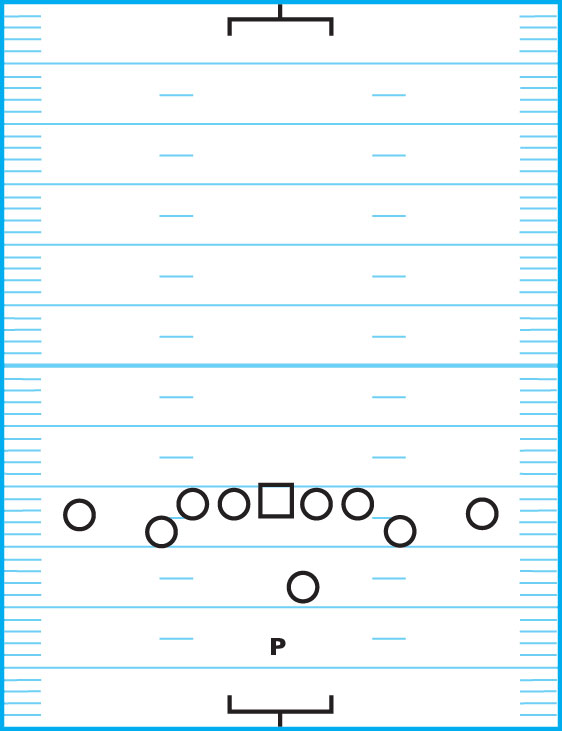
If mules (also called gunners) are in the middle of the field, they should align on top of the numbers.
If the punt takes place from one of the hashmarks, the boundary side mule (gunner) aligns at the bottom of the numbers and the field side mule (gunner), aligns half way between the hash and the top of the numbers.
Mules must never align closer than halfway between the hashmark and the top of the numbers.
Mule (Gunner) Coaching Points:
- Get as far back as possible, create space from the opposing players.
- Have a forward lean to break the center’s beltline with your helmet.
- Use a staggered stance in a heel-toe relationship with the inside foot up with the weight.
- Place the “V’s” (thumbs and index finger) on your thigh board.
Vertical Set
Players must set off the line of scrimmage on a vertical line to a depth of 3 yards depending on the rusher’s closing speed. The key to success is a player’s “get off” which includes speed, footwork and his kick step. Instruct blockers to keep their weight on the inside foot and keep the hands pinned back as they move – “load your guns.”
Punch Technique, Release
Instruct blockers that when they can, they should step on the defender’s toes. They must brace themselves on their inside foot, plant the back foot and throw a 2-hand punch (with the thumbs out and elbows in). Make sure they punch from low to high. Blockers should also try to have an inside presence with their hands, without turning their shoulders.
The goal is to dominate your man to a side, rip and release. Ideally, the blocker should try to take his man to the outside, but as long as he delivers a blow and redirects the defender’s movements, it should be sufficient to help the punt be successful.
Constant Split Relationships
The splits should remain the same after the vertical sets. Always stress to your players that they must never leave their wing man.
DIAGRAMS 2A, 2B: Constant Split
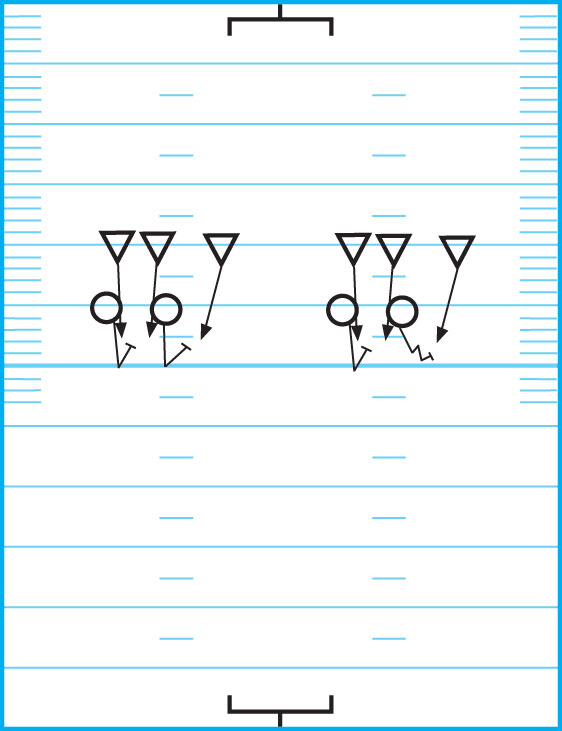
Relationship. If the OT blocks outside-and-away (on a diagonal line) from the OG, he forces the OG to block more area (zone) than he is capable of blocking because he left his wing man. In other words, the OT has lost constant split relationship with the OG. Failure in this regard compromises the integrity of the kicking pocket.
Protection Concepts
For the spread punt, you must utilize match-up zone concepts and each player is responsible for a specific area. Match up to the defenders according to the alignments in the box. Each player must identify and count all rushers prior to the snap.
The zone extends from a player’s zone to the nose on the man to his outside, to the far number of the rusher coming through his zone.
Even-Protection Looks
The following diagrams illustrate the blocking responsibilities for the spread punt during even-protection calls against various rushes.
DIAGRAM 3: Even Protection Vs. Straight Gap Rush.
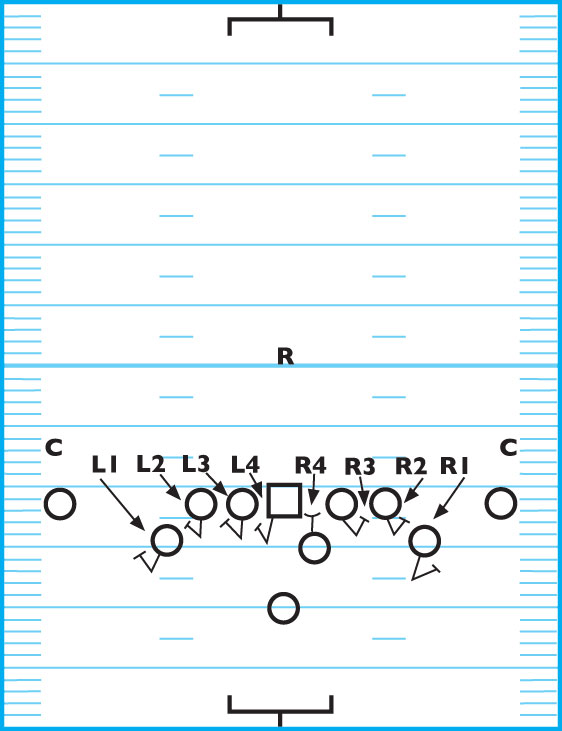
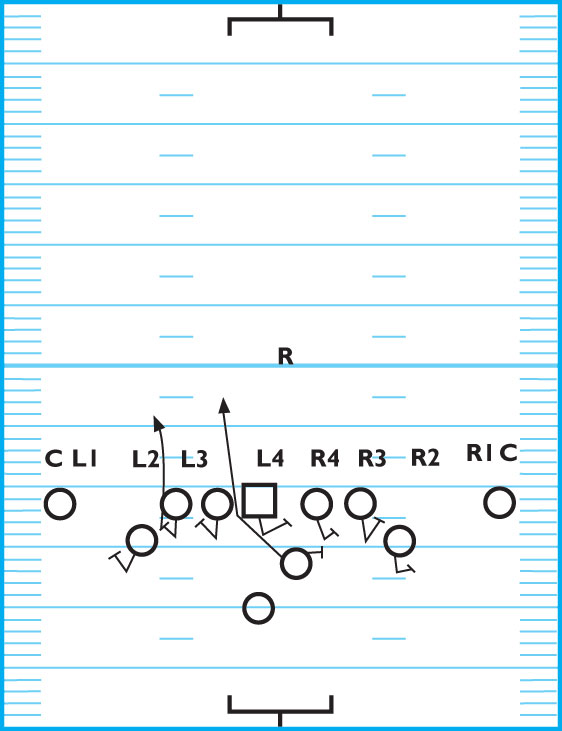
DIAGRAM 4: Even Protection Vs. 4 Pick. In this look, the center works to the left initially and tracks his man back to the right as he creates load on the snap. He must pick up the penetrator. The personal protector (PP) picks up the looper.
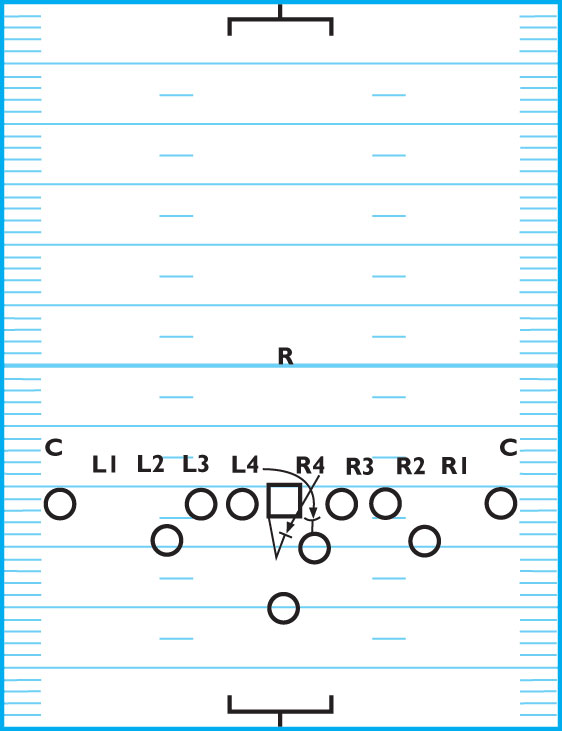
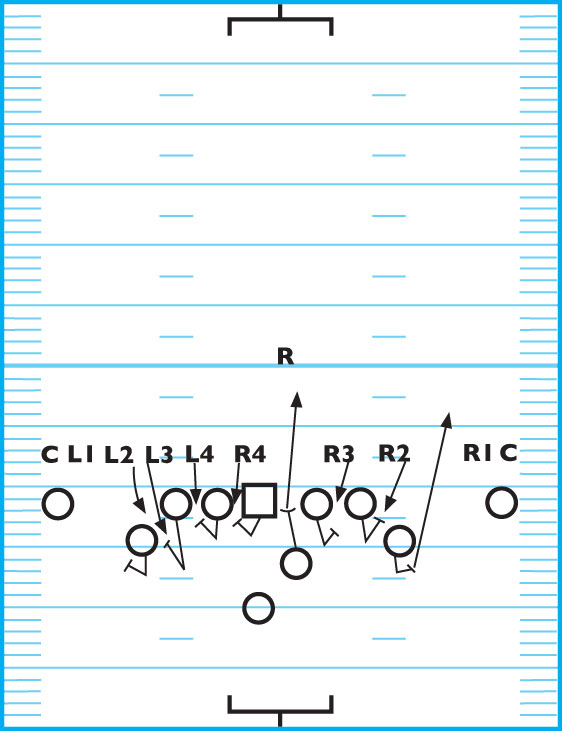
DIAGRAM 5: Even Protection Vs. Wide. In this look, use a deeper vertical set to cut off the rusher. It’s critical that the blockers use constant split relationship to ensure integrity on the protection.
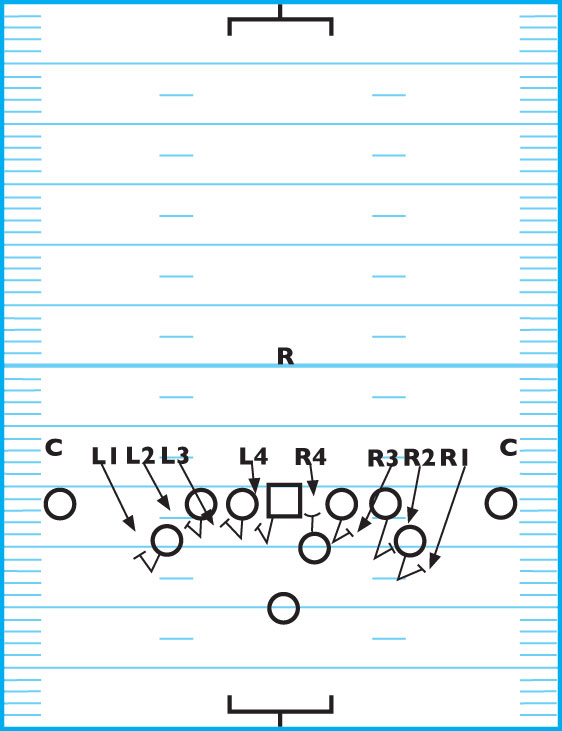
DIAGRAM 6: Even Protection Vs. Twists.
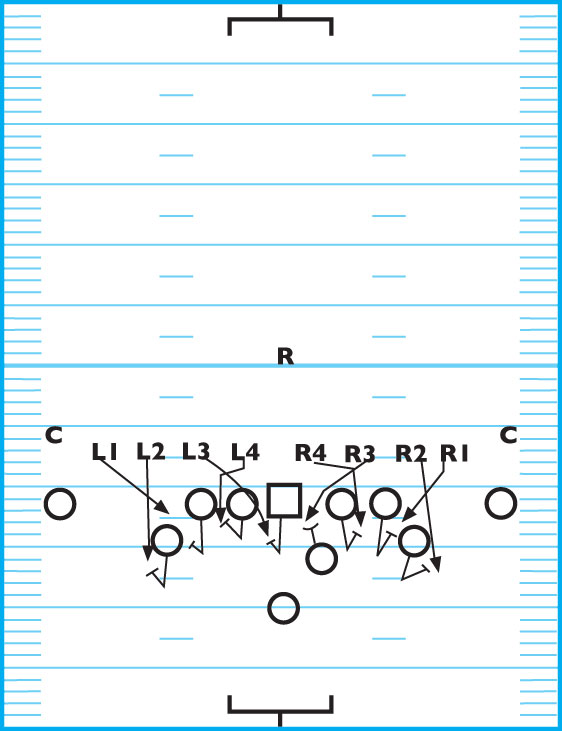
DIAGRAM 7: Even Protection Vs. Stacks. Identify stacks on the line and let the stacks divide before initiating contact.
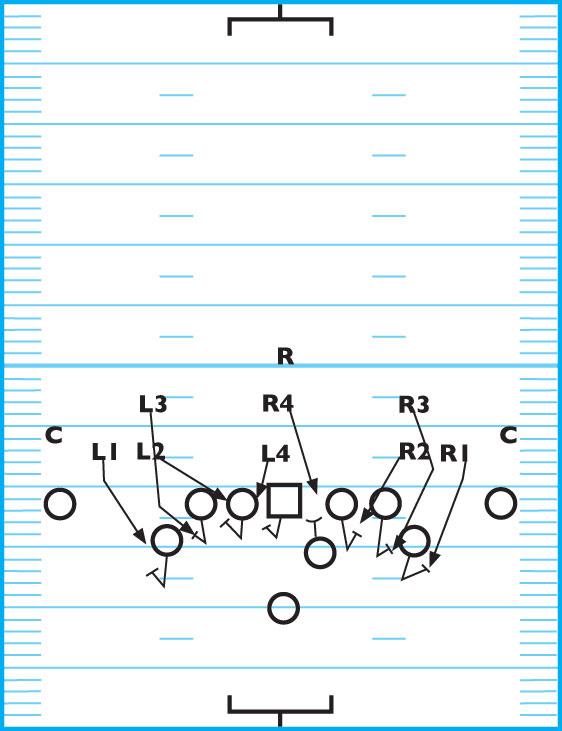
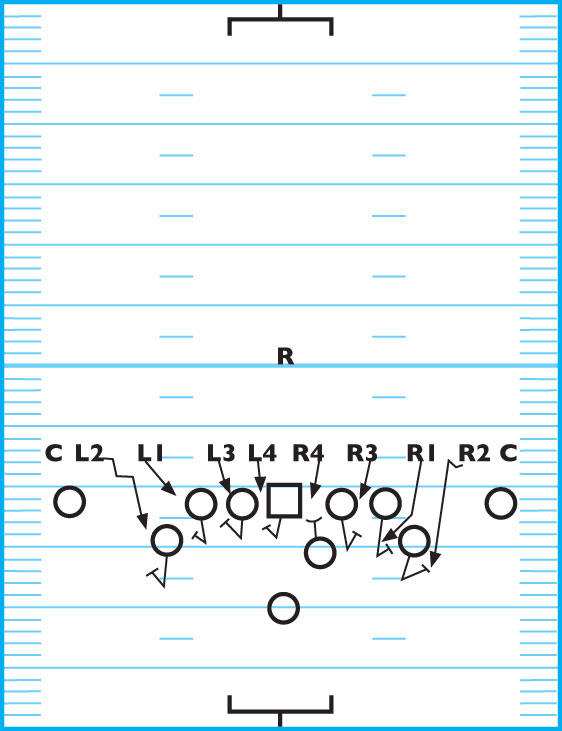
DIAGRAM 8: Even Protection Vs. Extra Wide. Deep vertical sets usually result in increased width of the potential rushers.
Load-Right Protections.
The following diagrams illustrate the blocking responsibilities for the spread punt during load-right protection calls against various rushes.
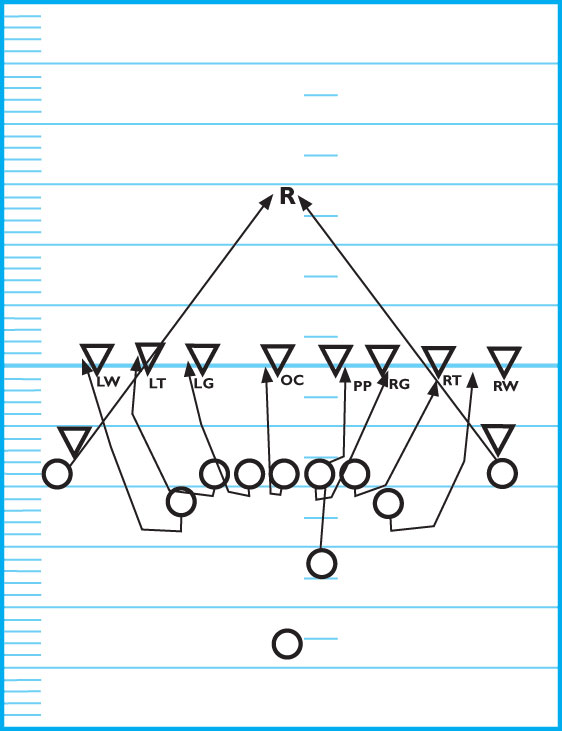
DIAGRAM 9: Load-Right Protection Vs. 5 Rushers To A Side (Head-Up On Center). In this call, the center works the right A-gap, while the PP scans for stress points in the blocking. Blockers opposite the load side use man protection.

DIAGRAM 10: Load-Right Protection Vs. Load With Creeper. The center works the right A-gap, the PP scans for stress points in the blocking and the right wing blocks the creeper.
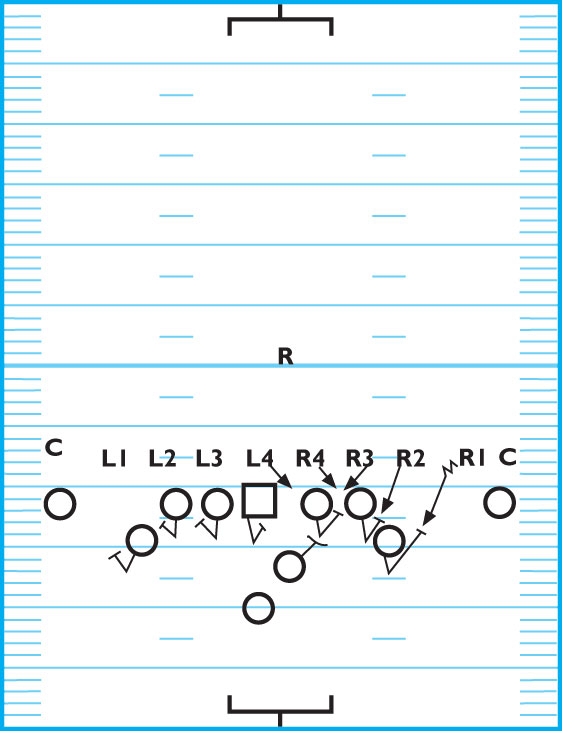
DIAGRAM 11: Load-Right Protection Vs. Load With Double-Creeper. The center works the right A-gap, the PP scans for stress points and picks up the looper back to the left. The wings are responsible for each creeper.
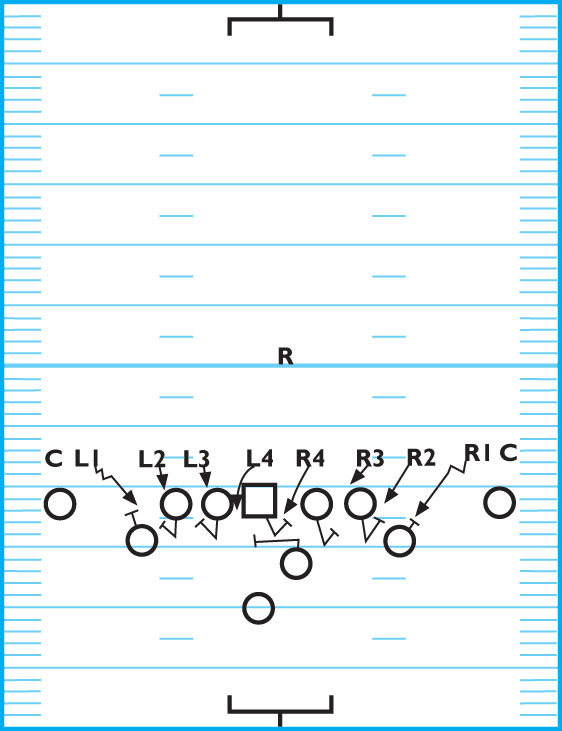
DIAGRAM 12: Load-Right Protection Vs. 5 Rushers To A Side (Crossing Center’s Face). The center works the right A-gap, the PP scans for stress points and picks up the looper back to the left. The players opposite the load side must not chase the stunt, they must use zone-blocking principles.
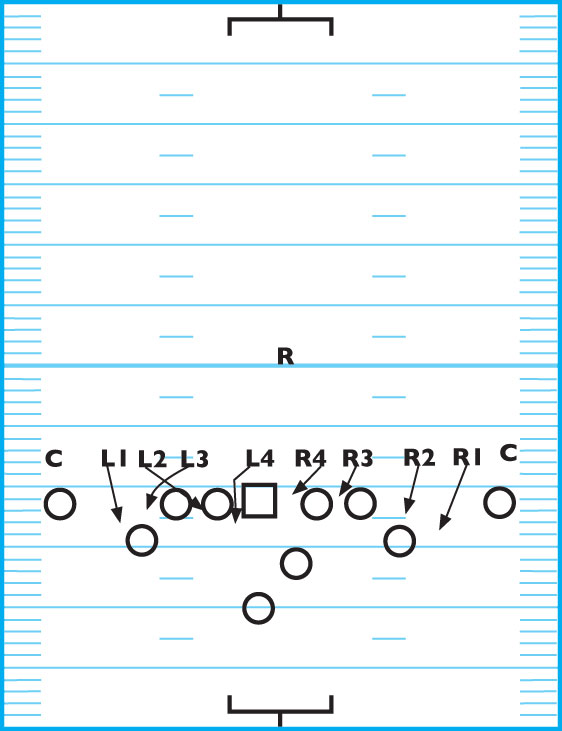
DIAGRAM 13: Load-Right Protection Vs. Load With No Creeper. The PP scans for stress points and releases downfield into coverage.
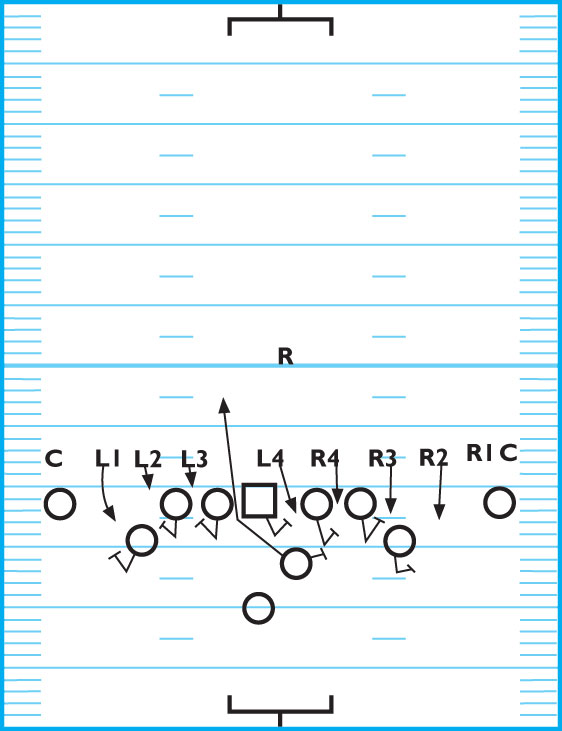
DIAGRAM 14: Load-Right Protection Vs. Load With No Double-Creeper. The center works the right A-gap, while the PP first checks the wing with his inside hand and then releases downfield into coverage.
Load-Left Protections.
The following diagrams illustrate the blocking responsibilities for the spread punt during load-right protection calls against various rushes.
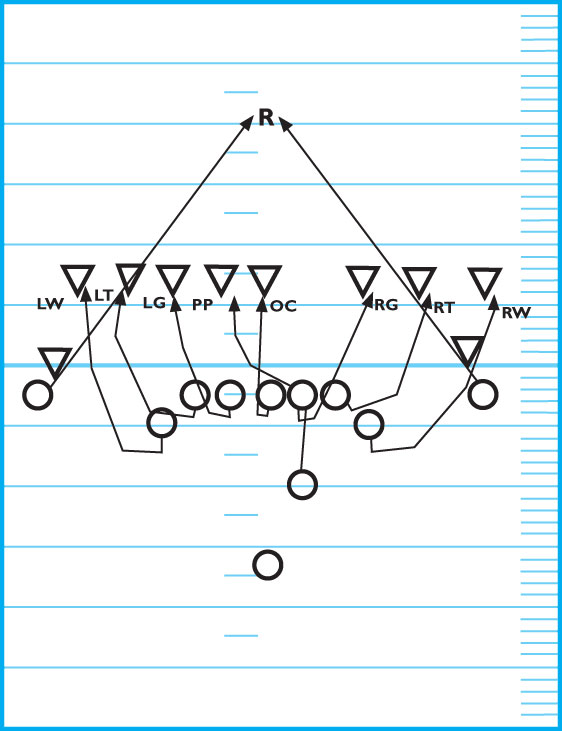
DIAGRAM 15: Load-Left Protection Vs. 5 Rushers To A Side (Head-Up On Center). The center works the right A-gap, while the PP scans for stress points in the blocking. The blockers opposite the load side utilize man protection.
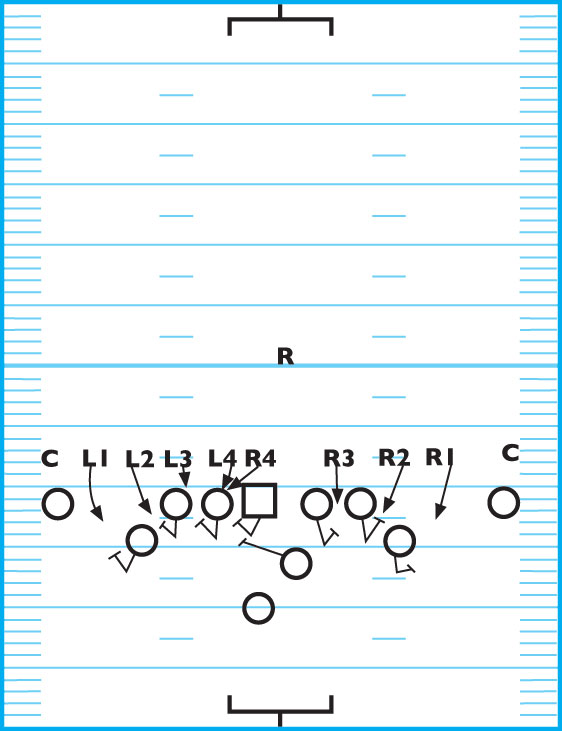
DIAGRAM 16: Load-Left Protection Vs. Load With Creeper. The center works the right A-gap, the PP scans for stress points in the blocking and the left-wing blocker has responsibility for the creeper.
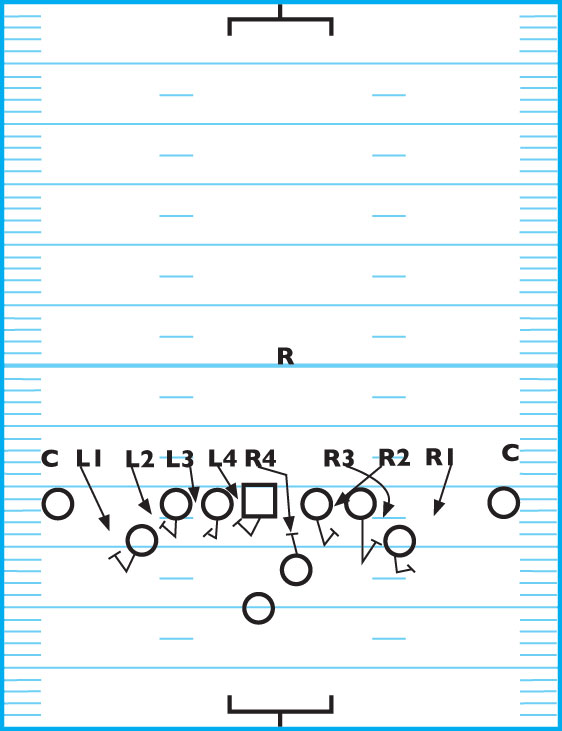
DIAGRAM 17: Load-Left Protection Vs. Load With Double-Creeper. The center works the right A-gap, the PP scans for stress points in the blocking and then picks up the looper to the right. Both wings pick up the creepers.
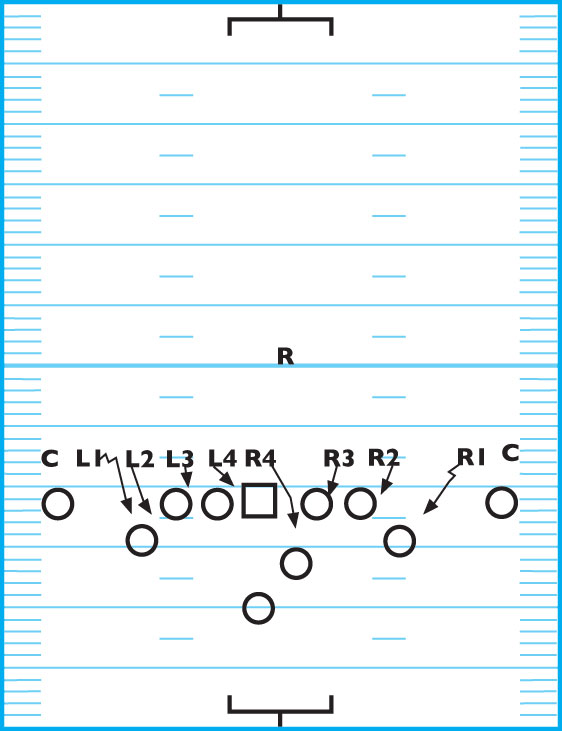
DIAGRAM 18: Load-Left Protection Vs. 5 Rushers To A Side (Crossing Center’s Face). The center works the right A-gap, the PP scans for stress points in the blocking and then picks up the looper to the right. The blockers opposite to the load side must not chase the stunt, but should instead use zone-blocking principles.
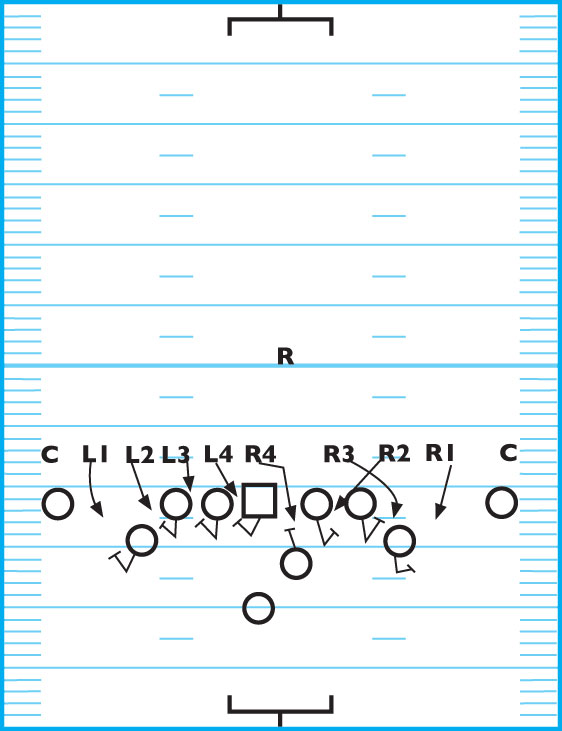
DIAGRAM 19: Load-Left Protection Vs. Load With No Creeper. The center works the right A-gap, while the PP scans the blocking for stress points and releases downfield into coverage.
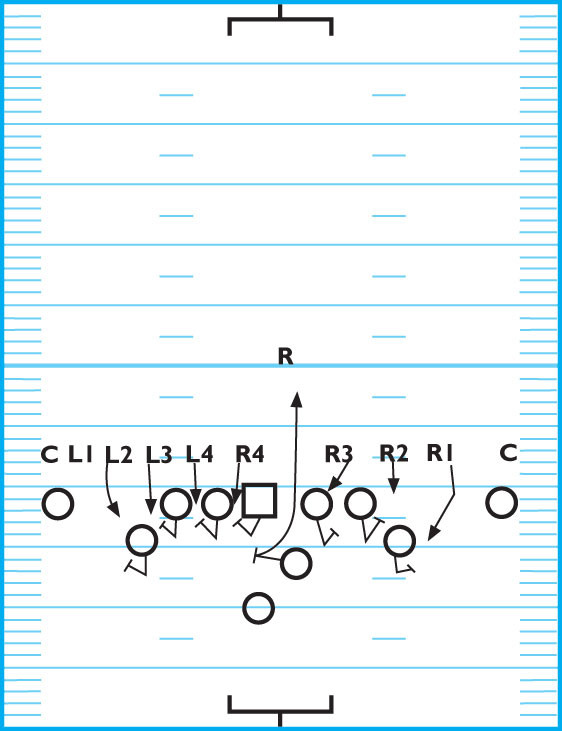
DIAGRAM 20: Load-Left Protection Vs. Load With No Double-Creeper. The center works the right A-gap, while the PP scans the blocking for stress points and releases downfield into coverage. No one in the gap should release into coverage — they must always check the wing man first with their inside hand.
Spread-Punt Coverage Lanes
Middle Of The Field
DIAGRAM 21: Coverage Lanes (Middle Of The Field).
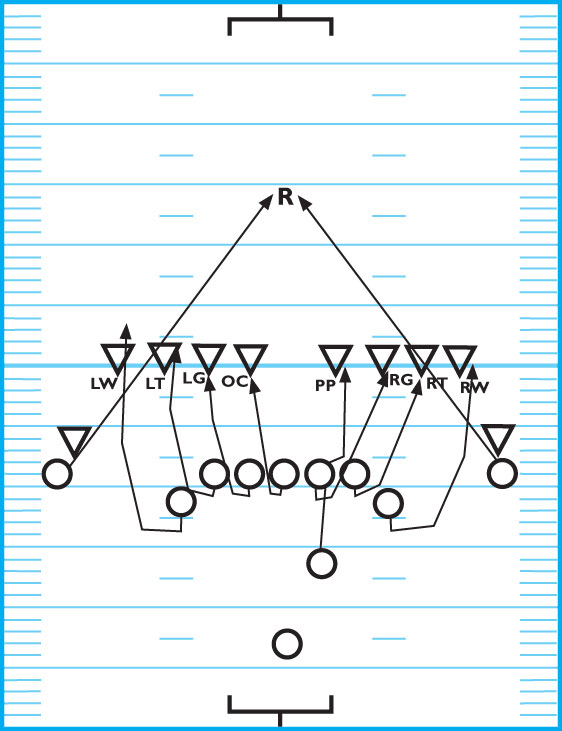
Mules: Must align on top of the numbers and try to hit the man with the ball. Mules must try to create a spark!
Wings: At 10 yards, the landmark is the top of the numbers. Contain the return man.
Tackles: At 10 yards, they must split the difference between the numbers and the hash. Force to and fold away.
Guards: At 10 yards, the landmark is inside the hash. Play interior coverage. They must keep the ball inside and in front of them.
Center: At 10 yards, the landmark is the left goal post. Maintain interior coverage. Keeps the ball inside and in front of him.
Personal Protector (PP): At 10 yards the landmark is the right goal post. He must keep the ball inside and in front of him.
Punter: Gets off a good punt and watches the return man. Is the safety player in case of broken coverage.
To The Left Hash
DIAGRAM 22: Coverage Lanes (Left Hash).
Mules: The boundary side mule maintains a 6-yard rule and the field-side mule splits the numbers and hashmark directly to the ball. Mules must try to create a spark!
Wings: At 10 yards downfield, the boundary-side wing must be at 6 yards, while the field-side wing splits the number and the hashmark. Contain the return man and folds away.
Tackles: At 10 yards downfield, the boundary OT should be at the bottom of the numbers while the field-side OT is inside the hash.
Guards: At 10 yards downfield, the boundary OG splits the numbers and the hash, while the field-side OG uses a landmark of the right goal post. He must keep the ball inside and in front of him.
Center: At 10 yards, the landmark is the hashmark. Plays interior coverage and must keep the ball inside and in front of him.
Personal Protector (PP): At 10 yards, the landmark is the left goal post. Plays interior coverage and must keep the ball inside and in front of him.
Punter: Gets off a good punt and watches the return man. Is the safety player in case of broken coverage.
To The Right Hash
Mules: The boundary-side mule maintains a 6-yard rule and the field-side mule splits the numbers and hashmark directly to the ball. Mules must try to create a spark!
Wings: At 10 yards downfield, the boundary-side wing must be at 6 yards, while the field-side wing splits the number and the hashmark.
DIAGRAM 23: Coverage Lanes (Right Hash).
Contain the return man and folds away.
Tackles: At 10 yards downfield, the boundary OT should be at the bottom of the numbers while the field-side OT is inside the hash.
Guards: At 10 yards downfield, the boundary OG splits the numbers and the hash, while the field-side OG uses a landmark of the left goal post. He must keep the ball inside and in front of him.
Center: At 10 yards, the landmark is the hashmark. Plays interior coverage and must keep the ball inside and in front of him.
Personal Protector (PP): At 10 yards, the landmark is the right goal post. Plays interior coverage and must keep the ball inside and in front of him.
Punter: Gets off a good punt and watches the return man. Is the safety player in case of broken coverage.
Spread Punt Coaching Points
The little things can’t be overlooked with the spread punt.
Attention to detail is what makes this an extremely effective special teams formation.
Be detailed in what you want to accomplish with this formation and communicate the goals thoroughly to your players.
Take the time to train and coach each position separately — punters, snappers, wings, linemen, personal protectors, mules, etc. — to develop technique and to be sure that players develop each skill properly.
If you treat the punting game like an afterthought, you’ll end up asking yourself why it cost you a game!