THE OUTLAW SERIES is not used as our base offense. But it’s extremely effective as a “sudden change” play or good to use right before the half so that the opposing team is forced to spend the 20-minute halftime period trying to figure out how to defend it.
In seasons when you have two good quarterbacks, this innovative formation allows you to put both of them on the field at the same time and create havoc for the defense. This is also a fun series for the players and fans, and takes up only a limited amount of practice time.
We’ve also used this series as a goal-line offense to put added pressure on the defense in determining how to best defend its unique alignment and look.
Outlaw Series:
Basic Formation
The following diagram shows the basic formation for the Outlaw Series set up to the right side (called “Outlaw Right”).
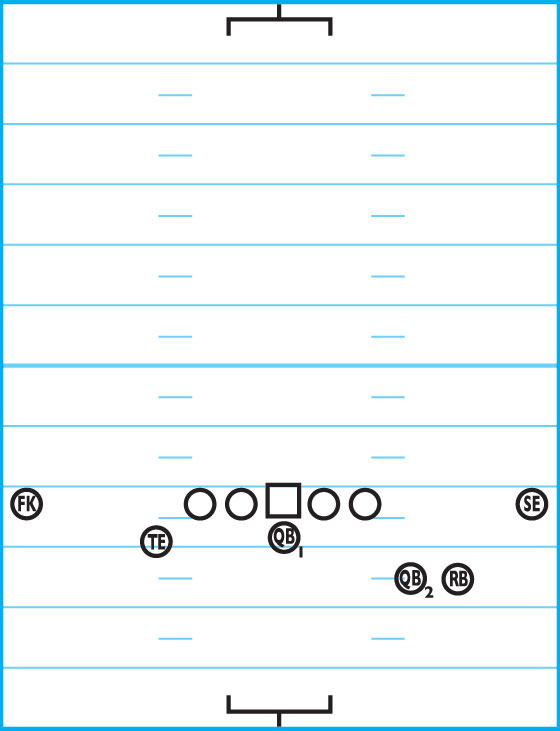
DIAGRAM 1: Outlaw Right (Basic Formation). In the basic formation, the player alignments are as follows:
- Offensive Linemen: Align in their normal splits and will use cup protection.
- Split End: Aligns split to the side of the formation’s call-side (for example, to the right side on “Outlaw Right”).
- Flanker: Aligns split and away from the formation’s call-side, on the line of scrimmage.
- Tight End: Aligns away from the formation’s call-side and is off the LOS 1-and-1 (1-yard off and 1-yard back).
- QB No. 1: Aligns under center and reads the defense.
- QB No. 2: Aligns 5-and-5 (5-yards off and 5-yards back) off the LOS to the formation’s call-side.
- Running Back: Aligns to the outside of QB No. 2 in a FB-HB relationship set-up.
QB No. 1 Reads
The following diagrams outline QB No. 1’s reads and progressions for this series.
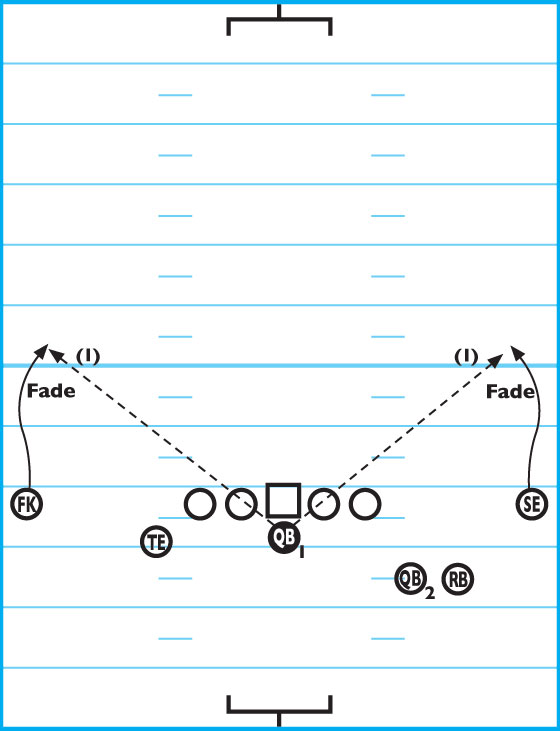
DIAGRAM 2: QB No. 1 —
First Read. QB No. 1’s first read is the two outside receivers (SE and FK), who are both running deep fade routes.
Prior to the snap, QB No. 1 reads the type of coverage that’s being shown and if either receiver is open on the fade route, he’ll try to throw a quick TD pass deep.
DIAGRAM 3:

QB No. 1 — Second Read. The second read is toward the TE who’s in the slot formation and running a seam route. If the safety or LBs shift to the formation’s call-side, the TE should be open for a big gain as he releases on the seam route.
DIAGRAM 4:
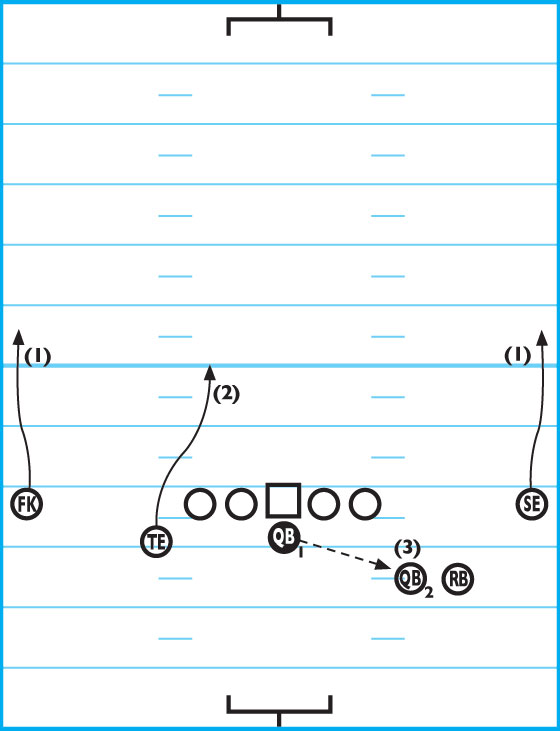
QB No. 1 — Third Read. The third read is a quick toss back to QB No. 2. Immediately after securing the snap, QB No. 1 turns to the formation’s call-side and laterals directly to QB No. 2.
QB No. 2’s Reads, Options
After receiving the pass from QB No. 1, QB No. 2 has three possible reads and options.
DIAGRAM 5:
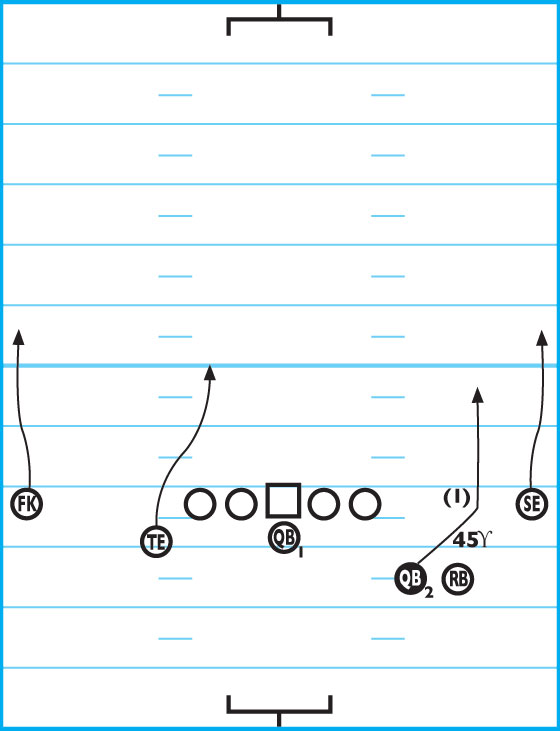
QB No. 2 — First Option. QB No. 2’s first option is to secure the ball, read the defense and run the option to the call-side (right side in “Outlaw Right”). If the “victory lane” is open, he takes off and runs an option route on a 45-degree angle to the LOS.
DIAGRAM 6:
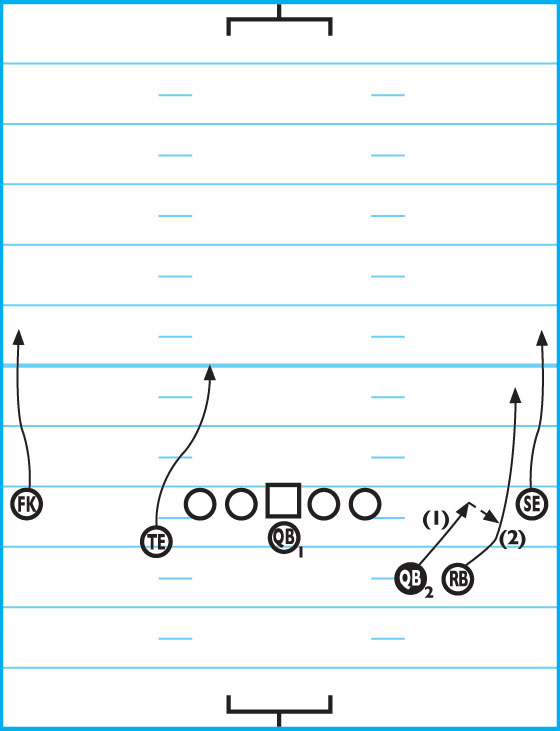
QB No. 2 — Second Option. While running the option route (at the 45-degree angle to the LOS), if QB No. 2 sees that the “victory lane” closes up, he checks to see if the option pitch is clear. If so, he pitches the ball to the RB, who’s running behind QB No. 2 on the option path. The RB secures the option pitch and heads upfield.
DIAGRAM 7:
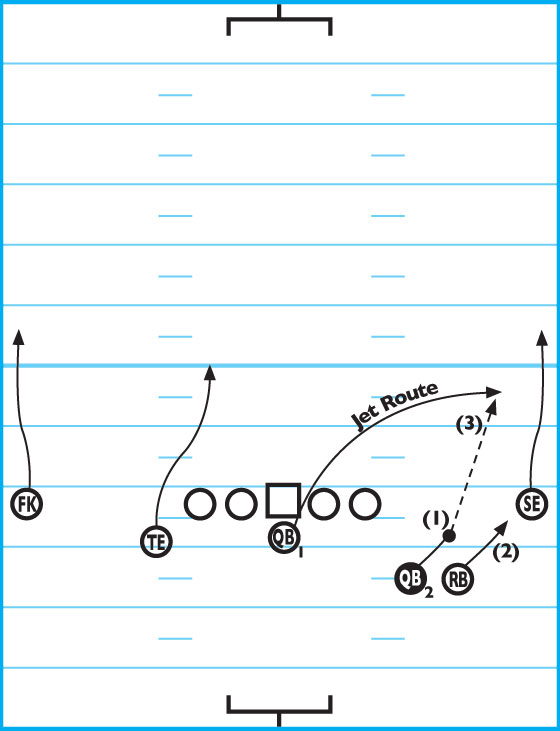
QB No. 2 — Third Option. If the defense comes up and successfully stops the option from developing, QB No. 2 can throw to QB No. 1 who’s releasing and running on a Jet route.
Tell QB No. 2 to also keep an eye on the call-side cornerback. If that CB comes up hard and leaves the deep outside clear and open, QB No. 2 looks to throw to the SE streaking downfield on a fade route.
Possible RB Plays
If the RB receives the option pitch and his running lanes quickly close, there are several choices he has the freedom to make during the Outlaw Series.
DIAGRAM 8:

RB Throwing Options. The RB has the option — as long as he’s behind the LOS — to make three possible throws. The RB can throw to:
A. QB No. 1 releasing and running on a Jet route.
B. The TE running a seam route.
C. The SE running deep on his fade route.