EVERY COACH NEEDS an arsenal of plays that he can call upon during the times when his team is at the goal-line, needs a 2-point conversion or has a short-yardage situation that calls for a critical first down.
The following plays have been effective for us in these situations. The first three plays come from our short yardage-throwing package on the goal line. Two are standard plays, but “50 Crossers” has become a great play for us.
The second series of plays in this article deals with how we handle overtime situations when we know we must score a touchdown. Practiced every Thursday during our walk-throughs, this package features plays from a formation that’s not normally used with our base offense.
Goal-line Throwing Package, 2-Point Series
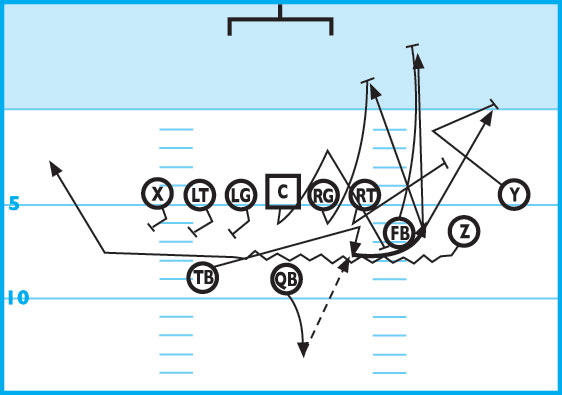
DIAGRAM 1: Trips Right Tight, 80 Pick (Banana).
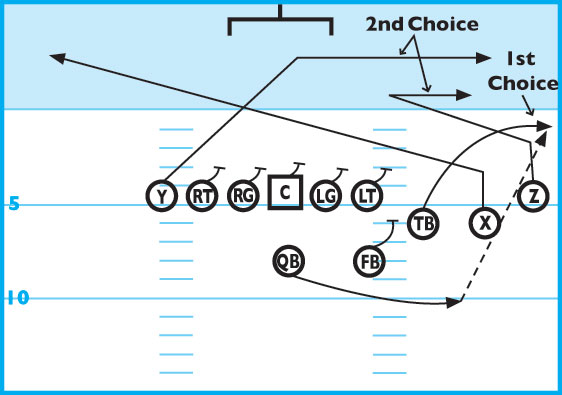
For this play, the offensive line executes 80-sprint blocking. If you’re on the goal line, instruct the offensive line to cut down their splits to better stop blitzes.
The fullback executes 80-sprint blocking, attacking the last man on the line of scrimmage, while the tailback drives into the flat off the natural rub or pick of the two slant routes. The height of this route peaks around 3 yards. Remind the TB that he must have at least one foot in the end zone for the catch to be a touchdown.
The X receiver drives up 1 yard and breaks on a hard slant, aiming at the opposite back corner of the end zone. The receiver must avoid the linebacker and set his throw-back route off 80-sprint blocking. As X runs his drag route, he must find the Y receiver and break underneath his route, using Y’s route as a natural rub. The Z receiver drives up 1 yard and breaks on his slant route. Once he gets over the original alignment of the TB, he pivots toward the flat and finds a hole in the zone. Against man coverage, Z keeps running to the flat.
The Y receiver aligns in a tight-end position and runs a crossing route toward the back opposite flag. If you’re on the goal line, instruct Y to run a route 1 yard from the back of the end zone. Anywhere else on the field, he will run the cross as a maximum of 10 yards.
The quarterback runs a sprint right and his first read is the TB in the flat. If the flat is covered, he then looks for either the Z or Y receivers running the replace and crossing routes. The QBs last option is to run for the near touchdown marker. If the play is a 4th down or 2-point play, the QB must avoid a sack. He must give the play a chance by throwing the ball into the end zone.
Note: When going for a 2-point conversion, we ask the official to spot the ball on the left hash mark if we have a right-handed QB and on the right hash if he’s left-handed.
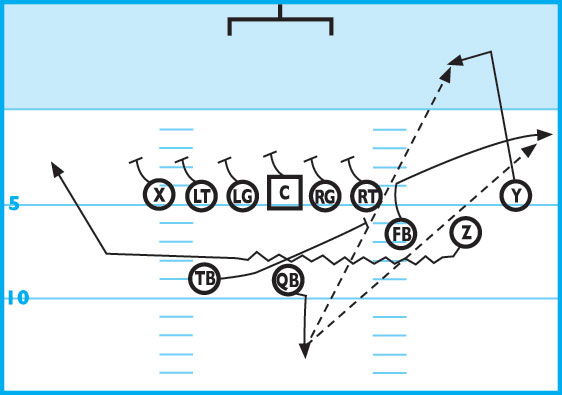
DIAGRAM 2: Trips Right Tight, 80 Throwback (Orange). The FB executes 80-sprint blocking, attacking the last man on the LOS. The TB drives into the flat off the natural rub or pick of the two slant routes. His route will peak around 3-yards, however, he must have at least one foot in the end zone for the catch to be a touch down.
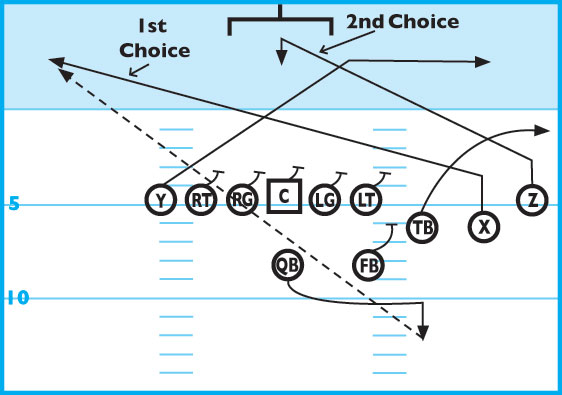
X is the primary receiver on this play. The second receiver (Z) drives up 1-yard and breaks on a hard slant, aiming at the mid-point of the goal-posts the end zone. The receiver must avoid the linebacker and set his throw-back route off 80-sprint blocking. As the X runs his drag route, he must find the Y receiver and break underneath his route, using X’s route as a natural rub to lose his defender.
Z receiver drives up 1-yard and breaks on his slant route. When Z gets to the middle of the goal post, he pivots and make himself “tall.” He’s the default receiver if the throw-back route is taken away. Z should be a player who’s a great jumper and must be able to win the “jump-ball contest” in the end zone.
Y (TE) runs a crossing route toward the back opposite flag. On the goal line, he’ll run 1-yard from the back of the end zone. If the offense is positioned anywhere else on the field, he’ll run the crossing route at a maximum of 10 yards.
The QB runs, selling sprint-right action. This action is effective and deceiving in the fact that the QB gives the illusion of running wide, when really he is running more backward than sideways and buying himself more time for both him and the X receiver to get open. He sprints right 4 or 5 steps, sets his right foot and plants to throw the ball back to the crossing receiver. Instruct him to put a little air under the ball. If the throw back is well covered, he should find the Z receiver under the goal post and throw the ball to him.
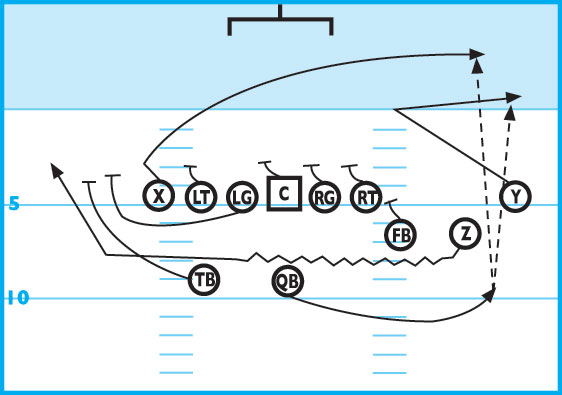
DIAGRAM 3: Spread “50 Crossers.” This play has been our most effective goal-line play in this package.
X and Z (split end in this play), line up along with the slots in a tight formation, putting the ends no more than 5 yards from either tackle. They execute crossing routes, meshing 2 yards over the center. Each receiver avoids the inside LB and both must expect to receive the ball once they clear the tackle box. The key for both these players is to remember that the left crosser (X) sets the depth with the right crosser (Z) setting the mesh.
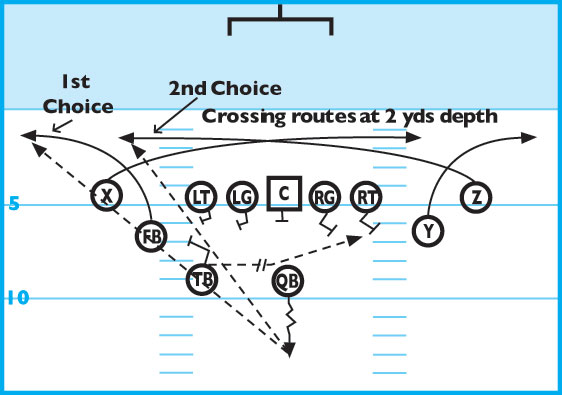
FB and Y (the slot receivers) align to split the difference between the split ends and each OT. When the ball is snapped, the slots attack each flat, using arrow routes. They must look while running and get their head turned toward the QB to see if the ball is coming their way in case of a blitz from the defense. The top of their route should take them 3 to 4 yards deep, while making sure that when the ball is thrown, they’ll have at least one foot in the end zone. The slot backs must get both depth and width as they run to the flat.
The QB executes a quick 3-step drop. He must — with the help of a pre-snap read or pregame planning — choose one side or the other and work to make his reads toward that side. His first look is to throw to the slot back in the flat. If the flat is covered, he tries to find the crossing split end and hits him as he clears the tackle box. The QB must always be aware of blitzes.
Overtime Series: 4 Downs To Score!
Each season we try to go into our games with at least one series of plays used only in conjunction with an overtime series. Many times this series is made up from our regular offense with exotic twists added into the mix.
The following plays are practiced every Thursday during our walk-through period. It’s important that our players know that we have a plan for every aspect of the game, so that they’ll keep their cool if we’re forced into an overtime situation.
Our first series of plays revolves around our Jet Sweep series. This series of plays are run when we know that we must score a touchdown to win or tie the game. With this mentality, we know before our first offensive snap that we have four downs to score. The extra down allows us to vary our play calling, knowing that we only need 2.5 yards per play instead of the normal 3.3 yards needed in three down territory.
Our Jet Sweep series features the following plays, with trips-right formation shortened to “TRT.” Note: When you see the letter “L” or “R” used in conjunction with another word, it tells your RBs that there will be a Jet-Sweep fake to the left or right before running the actual play called.
DIAGRAM 4: TRT “Red.” This play is our standard Jet Sweep. To begin the overtime we’ll ask the official to place the ball on the right hash mark. Everything in the overtime package is set up off our Jet Sweep play. We run it to the TE side as long as the defense doesn’t align more than 2 defenders outside of the TE. If this occurs, the QB checks off to a play either to the inside or toward the trips side. The goal to condition the defense to stop the Jet Sweep to the left flank.
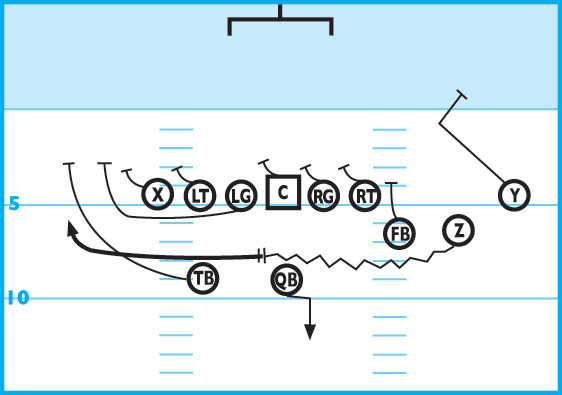
DIAGRAM 5: TRT “L South.” This is the main play in our offense. With the defense usually overloading to the trips side, many times the defense is weak in the B-gap. In a short-yardage situation such as on the goal line, the QB must only check to this play if the offensive guard has a player in a 1-technique with the offensive tackle having a player in a 3-technique on him. The QB must give a good ride to the Jet Sweep fake and handoff to the TB, who dives into the hole hard.
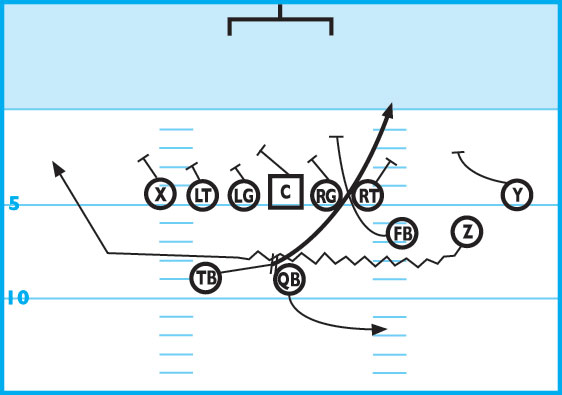
DIAGRAM 6: TRT “L Russia.” Of all the plays in this series, this play serves as our exotic play because of the challenging ball handling by the play back and the QB. This play can be run at any time, but we especially love to use it when the defense locks up in man coverage and runs with our Jet-Sweep fake. This leaves you with solid run numbers to the backside, pulling the center or backside OG, depending on which one is uncovered. The QB must provide a good fake to the jet back and then — without looking — hands the ball back with his left hand to the TB, who takes the ball and drives outside for the front-side cone in the end zone. The TB must run hard and strive to finish the play, following forward. We feel this play has a chance to score every time we run it.
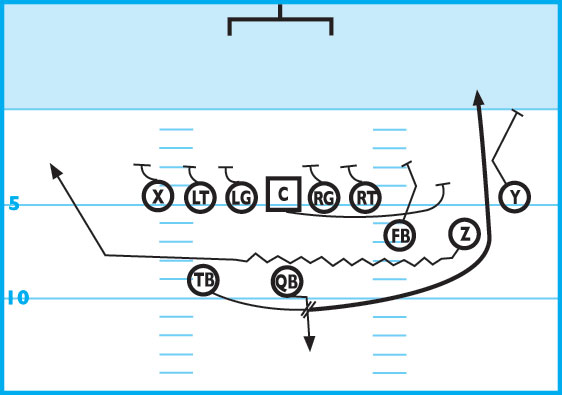
DIAGRAM 7: TRT “L Rambo.” This play is the first of our two play-action passes and the one we like the most because of the ability of the play to get the QB on the corner quickly with a run or pass option. The QB sells the fake with a good ride and boots deep to the right, looking first for the Y receiver who has driven his man inside and is now running to the depth 1-yard inside the right flag of the end zone.
X runs a drag route 1 yard in front of the end line of the end zone, works his way across the field and aims for the back right flag. One key coaching point for the Y receiver is that his route must always be 1 yard deeper than the goal line — if he catches the ball, he must score!
The QB must know the down-and-distance and make a throw to one of his receivers. If both receivers are covered, he must run for the corner flag with his mind made up to score. If all else fails and the play is run on fourth down, a QB run will not work. He must toss the ball at either the front or back flag where your receivers have a legitimate chance at making a big play and catching the ball.
DIAGRAM 8: TRT “L North.” This play is used in conjunction with our south play, the only exception being that the QB is now the runner and the TB serves as the lead blocker.
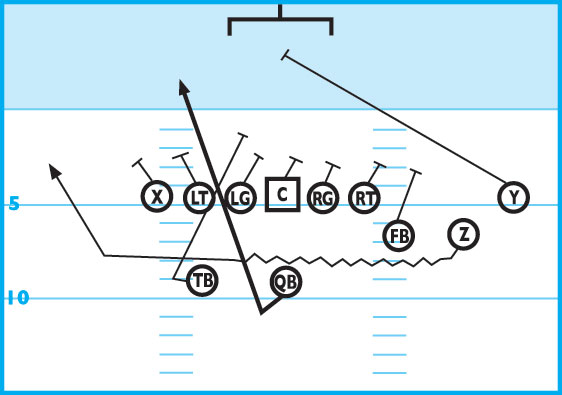
DIAGRAM 9: TRT “L Tornado.” This play is run only when the defense is blitzing hard through every gap. The QB makes a quick fake to the jet back and takes a 3-step drop to separate himself from the on rushing defense. All our screens are run with a non-verbal “three count.”
The TB must do his best to avoid the defensive linemen as he arrives at his screen position behind the original position of the FB. The QB must do a great job of drawing the defense toward him and helping to create separation for the screen to work.
DIAGRAM 10: TRT “L Carol.” This is our second play-action pass off our jet series. This play must be blocked with drop-back pass protection. After the QB makes the fake with the jet back, he takes a 3-step drop and reads the strong safety or No. 2 receiver to the trips side. If the safety drives on the flat route, the QB delivers the ball to the curl route. If the safety drops under the curl route, the ball must be delivered to the flat.
To ensure better protection the jet player (Z), blocks anyone coming off the left edge to the TE side. To the other side, the TB, blocks anything coming off the right edge to the FB side.
Note: This play is not set up to work against man coverage. If the QB thinks man coverage exists on his pre-snap read, he should audible to another play.