WIDE OPEN OFFENSES have come back into vogue the past few years with many teams going to a shotgun formation as their primary offense. Although these offenses use spread receivers, few use spread offensive linemen to go along with the spread receivers.
Although it may be difficult to use the “Unbalanced Spread Offense” discussed in this article as a base offense, it can definitely be used at strategic times during a game.
The following play is an example of some of the creative things that can be done out of this type of offense.
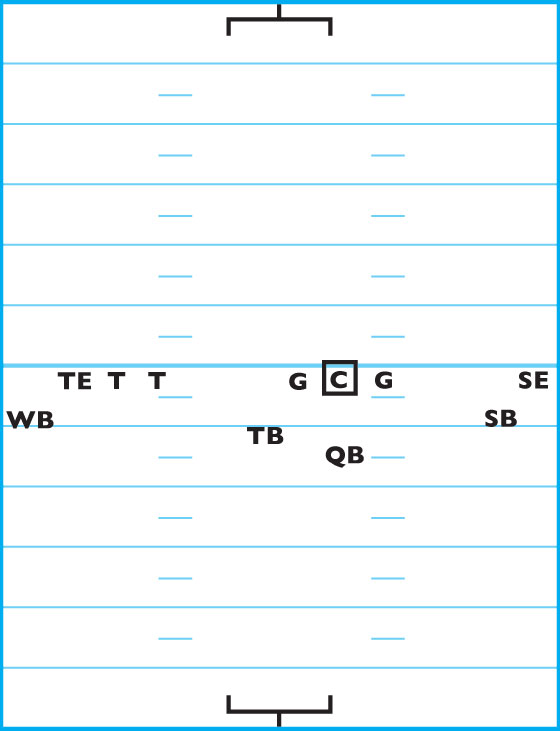
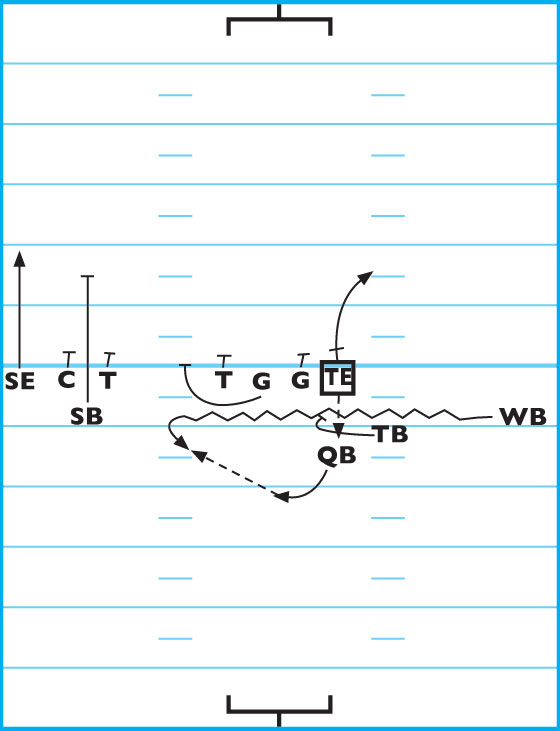
DIAGRAM 1: Strong Left, TE Screen Pass/Double Pass. The SB and SE run their defenders off, while the WB runs short motion and forms part of the wall. The TE runs 2-yards downfield, pushes hard off his outside foot and runs to a position behind the offensive tackles, TB and WB.

The QB sprints out and throws a screen pass to the TE behind the wall. Upon receiving the ball, the TE can run behind the wall or even throw a pass to the SB or SE.
Coaching Point: You may want to slip your backup QB into either the WB or TE positions on this play.
Some of the ideal instances in which this offense can used include:
- The opening play of an offensive series. On the first play of the game, defenses generally have yet to settle into the flow of the game and you may catch them off-guard by using this unorthodox offensive attack.
- Immediately following a big-gaining offensive play. After broken plays that result in long gains by the offense, defenses tend to be down and on their heels.
- For brief periods as a base offense. Since there are 6 basic formations to the Unbalanced Spread Offense, it can be used for a sustained period of time as the base offense (as long as the formations are interchanged).
- Just prior to halftime. Going into the Unbalanced Spread Offense right before halftime, gives the opposing team something else to worry about and make adjustments to during the intermission.
- A late-game surprise tactic. If you want to catch the opposing team off-guard, you could come out of your conventional formation and shift into the unbalanced spread.
- For 2-point conversion attempts. Similar to the “muddle-huddle” formation that’s effective on 2-point conversion, you could shift into the unbalanced spread and catch the defense off-guard.
Unbalanced Spread Rules
There are several critical rules that must be adhered to for achieving success with the Unbalanced Spread Offense.
1. There must be at least 7 players on the line of scrimmage. There may be as many as 10 total.
2. Eligible receivers must be in the backfield or on either end of the LOS.
3. There are 6 eligible receivers. If the ball is passed, you temporarily only have 5 receivers and then the man who passed the ball can become an eligible receiver, so long as the pass is behind the LOS or if the receiver downfield returns to a position on or behind the LOS.
4. Eligible receivers must be wearing jerseys numbered from 1 to 49 or 80 to 99.
5. Any number of passes can be made from behind the LOS before the ball is passed downfield.
6. Teams defend the spread offenses differently. One common factor to most spread coverages is that the receivers are covered man-to-man.
7. Of the 7 or more players on the LOS, at least 5 of them must have jersey numbers 50 to 79.
As with any offense, eligible receivers should run pass routes to work on beating their defenders — whether they’re the primary receiver or whether or not the play is a pass play.
Unbalanced-Spread Formations
The following 6 base formations are used within the Unbalanced-Spread Offense. For an even greater variety of formations, you can mirror the strong-left formations with comparable strong-right formations and vice-versa.
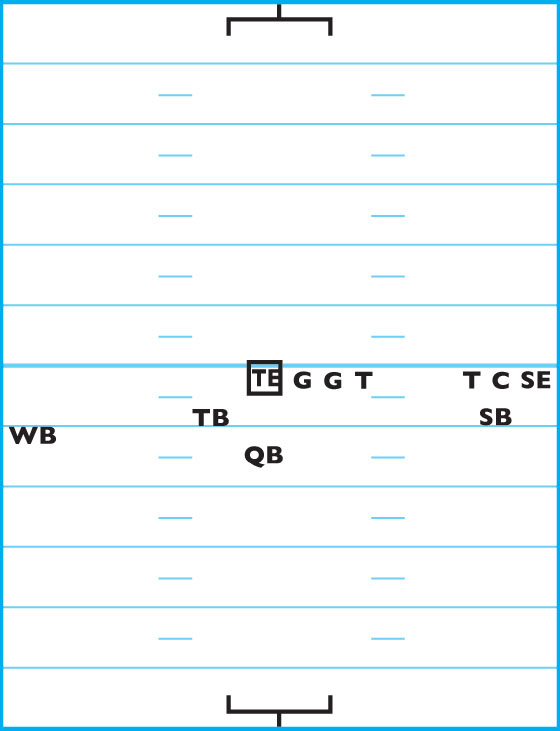
DIAGRAM 2: Strong-Left, Formation A. The SE is aligned 10-yards from the OG and the SB is set up 8-yards out and 2-yards deep. The QB is in the shotgun, set up 4-yards deep.
For the linemen, the OGs and center are spaced 1-yard apart. The OTs and OGs are spaced 10-yards apart from one another. The WB is spaced 12-yards out and 2-yards deep. The TB is spaced 5-yards out and 3-yards deep.
DIAGRAM 3: Strong-Right, Formation A. The same basic positioning is used as in “Strong-Left, Formation A.”
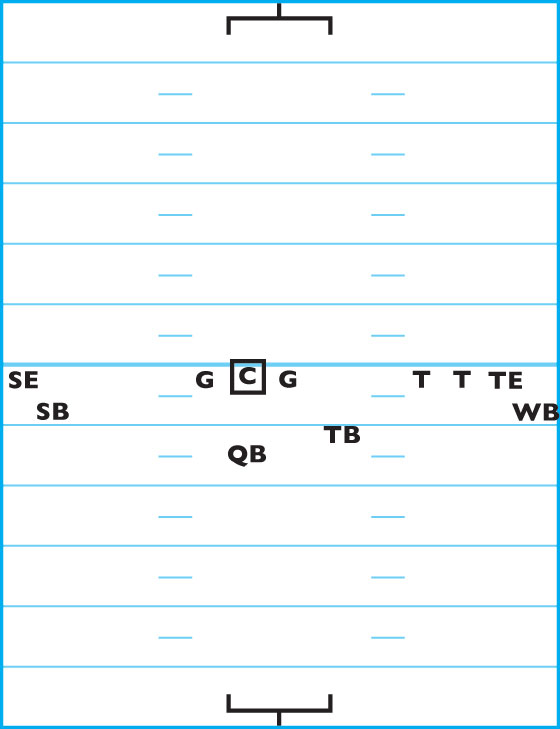
DIAGRAM 4: Strong-Left, Formation B. The SE aligns with a split of 10 yards from the left OG. The QB sets up in the shotgun, 4-yards deep. The TB sets up 5-yards out from the left OT and 3-yards deep.
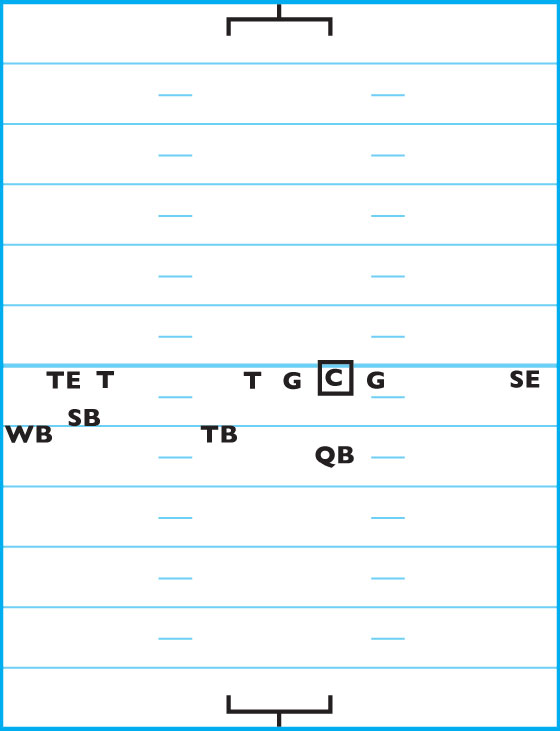
The right OT is set up 10-yards apart from the left OT. The TE has a 1-yard split from the right OT. The SB splits the right OT and TEs alignment and is set up 1-yard deep. The WB is split 4-yards from the TE and is 2-yards deep. The interior linemen have 1-foot splits.
DIAGRAM 5: Strong-Right, Formation B. The same positioning is used as in “Strong-Left, Formation B.”
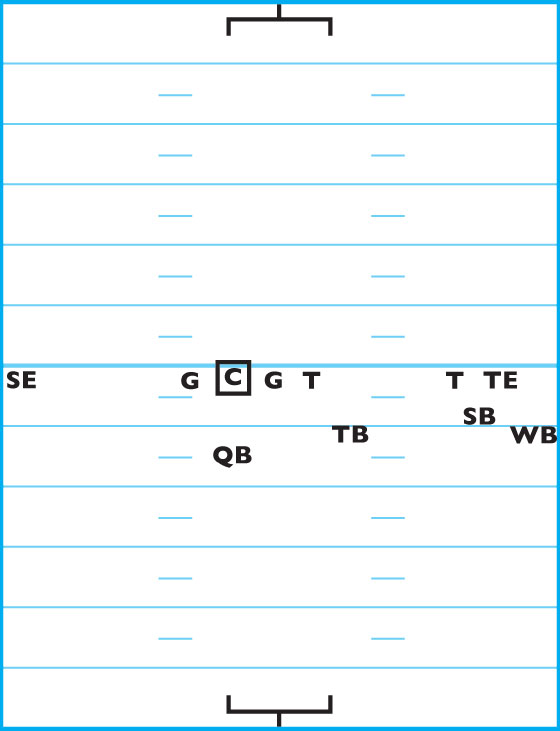
DIAGRAM 6: Strong-Left, Formation C. The WB is 10-yards left of center and 2-yards deep, while the TB is 3-yards deep and 1-yard from the QB. The QB is in the shotgun and is 4-yards deep. The interior linemen (the TE, both OGs and left OT)align with 2-foot splits.

The right OT is spaced 10-yards apart from the left OT and the SE is aligned 4-yards from the center.
DIAGRAM 7: Strong-Right, Formation C. The same positioning is used as in “Strong-Left, Formation B.”
Unbalanced-Spread Playbook
The following are all effective plays to run from the various unbalanced spread formations.
Formation “A” Plays:
DIAGRAM 8: Formation A, Strong Left, Play 1 (Pass). The SB runs “up the rail,” the SE runs a shallow post at 5-yards, the TB runs a slant, the WB goes into motion and runs a hook at 10 yards to the inside and the TE breaks into a deep-post route at 10 yards.
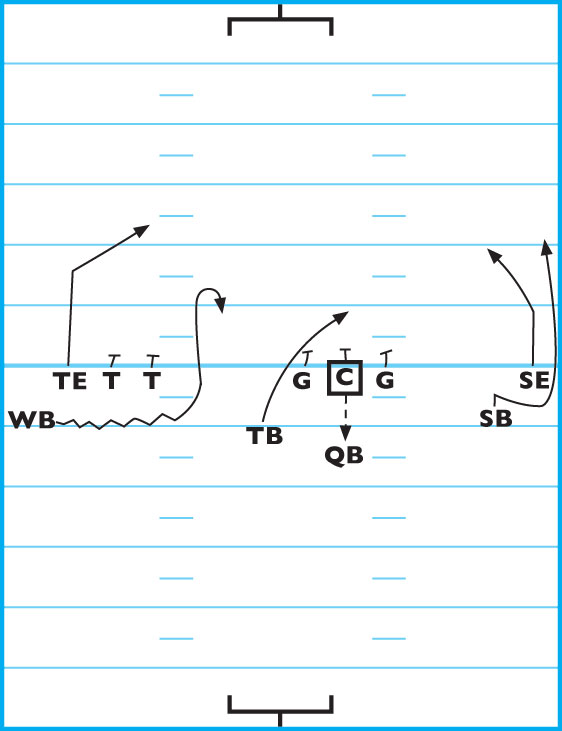
DIAGRAM 9: Formation A, Strong Left, Play 2 (Pass). Prior to the snap the SE and left OT will shift and reset. The SE picks up anyone coming off the corner. The SB goes into motion on a predetermined audible by the QB. (The QB must be sure that both the SE and left OT have set for 1 second before putting the SB into motion.) The SB runs an out at 5 yards. The WB runs vertically “up the rail.” The TE delays for a count, runs an out-pattern at 5 yards. The WR (who is the primary receiver) runs a vertical route down the middle of the field.
The key to this play is to line up quickly, shift and reset everyone without being flagged for a delay-of-game.
DIAGRAM 10: Formation A, Strong Left, Play 3 (Pass or run). On this play, the primary receiver is the QB. It’s imperative that the QB rolls back deep enough on his pass to the WB, so that it’s a forward pass rather than a lateral. On the snap, the WB takes a quick forward step (to simulate going downfield) and then peels behind the wall set up by the TB, the two OTs and the TE. The WB has the option of passing or running. If necessary, the TE can be kept in for blocking purposes. After passing to the WB, the QB runs a deep pattern down the opposite side of the field.
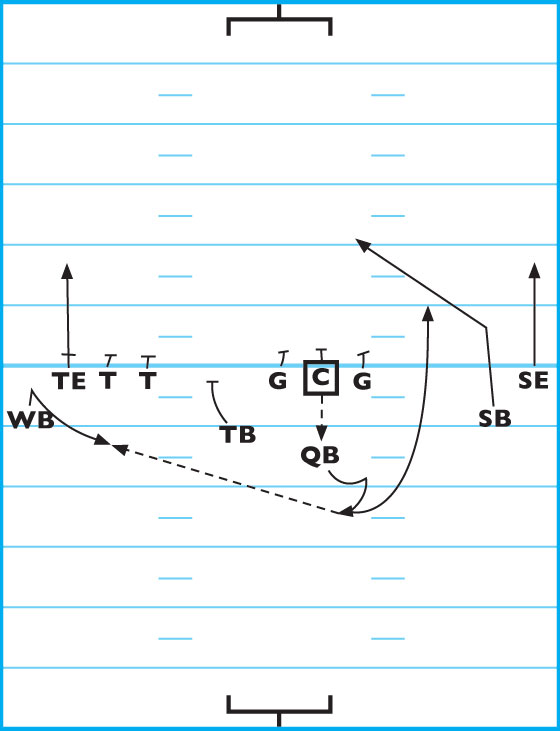
DIAGRAM 11: Formation A, Strong Left, Play 4 (TE Screen Pass Or Double-Pass). The SE and SB run their defenders off the LOS on the opposite side of the field. The TE breaks 2-yards downfield and breaks back behind the blocking wall set by the TB, WB and both OTs.The QB roll out and throws a pass to the TE. The TE can turn the reception into a screen play and run behind the wall or throw a pass to either the SE and SB on the other side. You may want to slip in a backup QB into the TE position on this play.
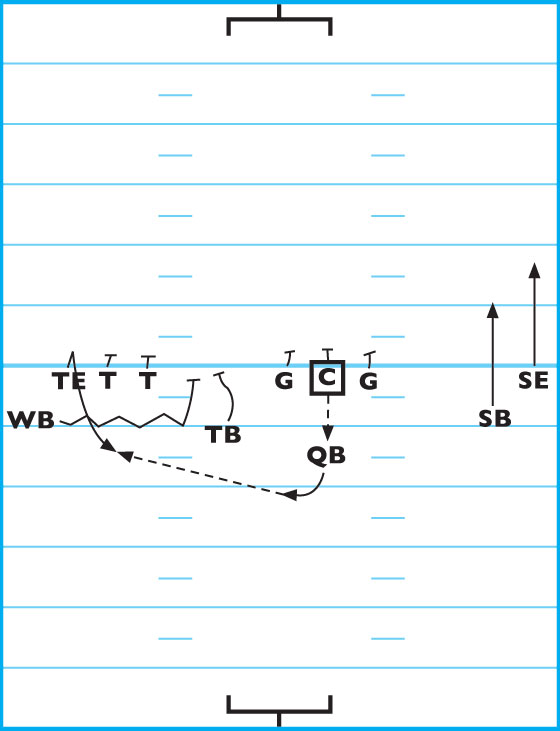
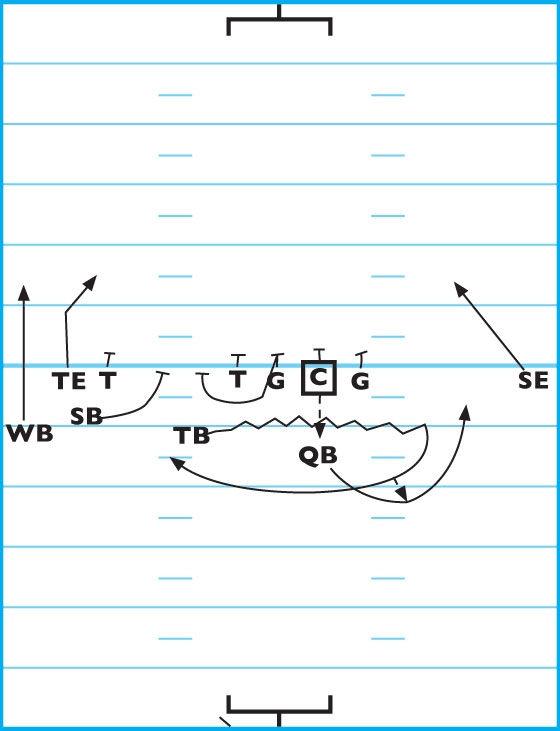
DIAGRAM 12: Formation A, Strong Left, Play 5 (QB Run). In what will probably be 1-on-1 coverage on the weak side, the QB can become a runner and run behind blocks made by the SE, SB and TB. The SE and SB must run their defenders off the LOS and stalk block them.
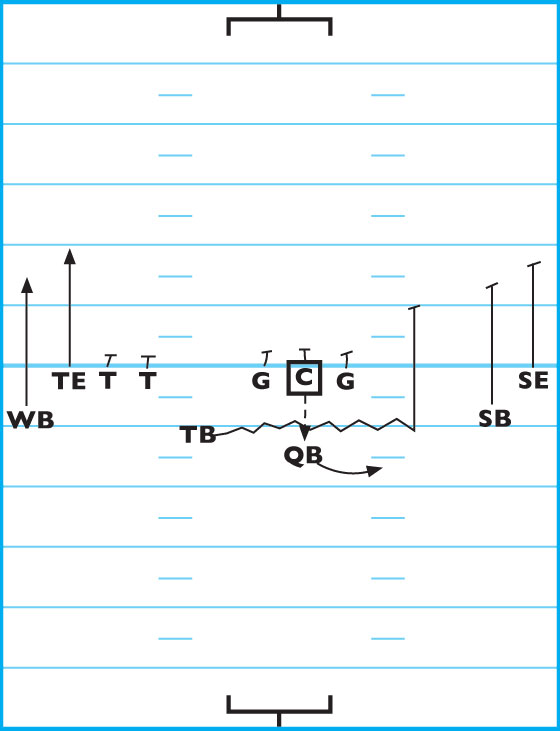
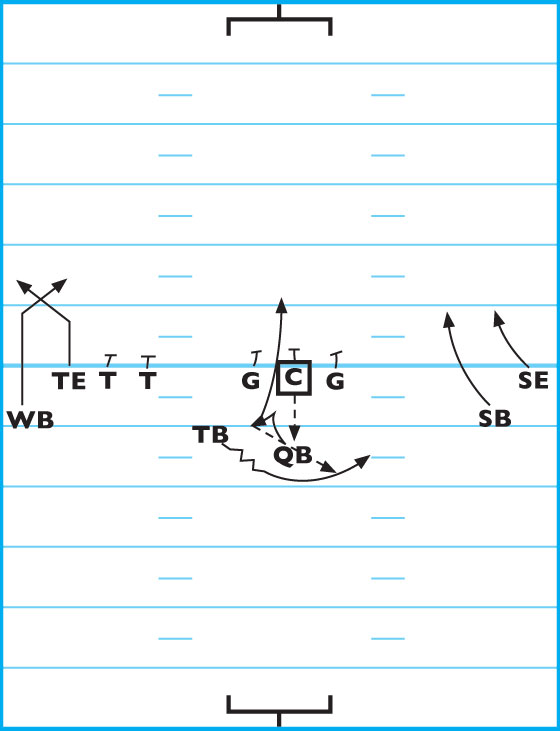
DIAGRAM 13: Formation A, Strong Left, Play 6 (Run Or Pass). Much like the old single-wing “Buck Lateral” play, you have the option to run or pass. The run is made by the QB running off either the strong or weak side A-gap. If the run isn’t there, the QB laterals the ball to the TB. The TB can run, but may also look to pass to the SE or SB. The WB and TE run crossing patterns on the opposite side.
Formation A can also be run from a strong-right formation.
Formation “B” Plays:
DIAGRAM 14: Formation B, Strong Left, Play 1 (Pass). The QB goes into motion and receives the snap. If uncovered, the right OG can pull and block on the backside.The QB looks to hit the TB, SB, TE or WB. The interior linemen must have no more than a 1-foot split on this play.
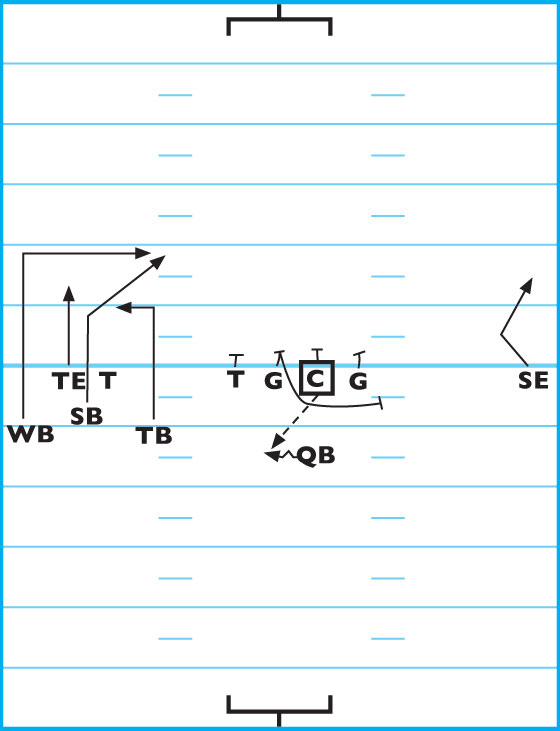
DIAGRAM 15: Formation B, Strong Left, Play 2 (Double-Pass). After receiving the snap, the QB sprints to the left, hooks back and passes to the TB (who has gone into motion). The right OG blocks for a 2-count and pulls to block the backside. The TB passes to either the SE, SB, TE or WB. The QB is a safety valve.
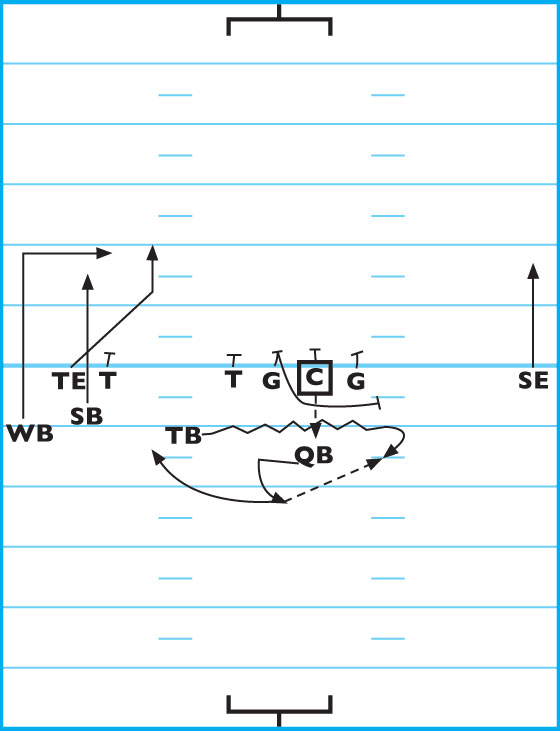
DIAGRAM 16: Formation B, Strong Left, Play 3 (QB Keep). The right OG pulls to the left and seals to the inside, while the TB goes into motion seals to the inside. The SE and WB run fly patterns to draw their defenders off the LOS. The QB secures the shotgun snap, sprints behind the blocking and finds the lane.
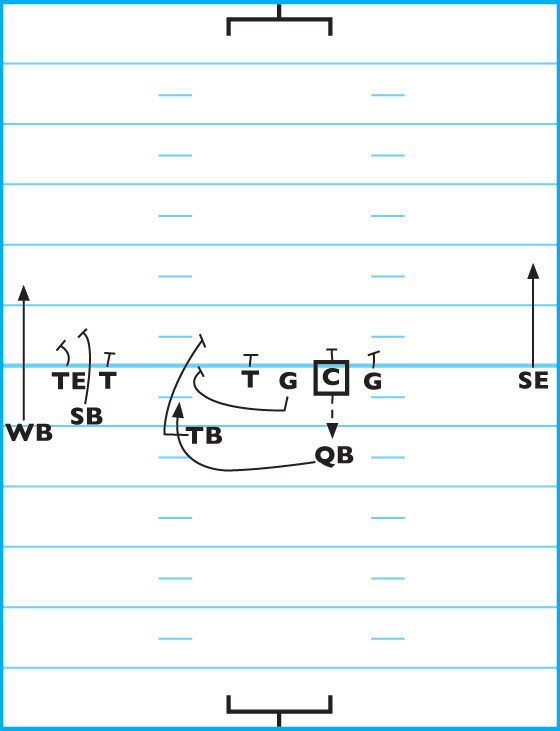
DIAGRAM 17: Formation B, Strong Left, Play 4 (Inside Reverse). The TB goes into motion and the ball is snapped as soon as he passes the QB. The QB rolls out and gives and inside handoff to the TB, who reverses, sprints to the strong side and finds a running lane behind the blocking.
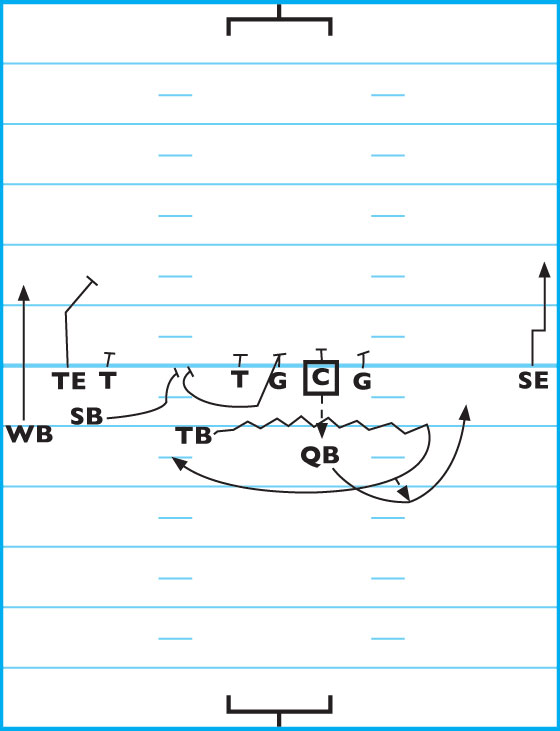
DIAGRAM 18: Formation B, Strong Left, Play 5 (Inside-Reverse Pass). This play is identical to Diagram 17, except that the TB looks to pass to the SE, TE or WB. After making the handoff, the QB continues breaking downfield and can also become a receiver.
Formation B can also be run from a strong-right formation.
Formation “C” Plays:
DIAGRAM 19: Formation C, Strong Left, Play 1 (Buck Lateral Run). The QB receives a direct snap, runs forward and hands the ball to the TB. After receiving the handoff, the TB laterals to the WB who has gone into motion. The WB secures the lateral and runs to the strong side, looking for a seam behind the blocking. The QB blocks on the weak side. The key to this play is perfecting the timing between the TB and WB.
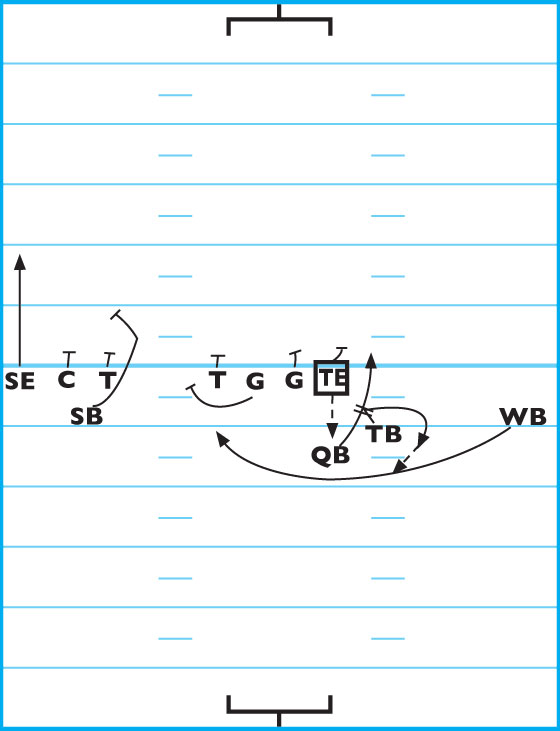
DIAGRAM 20: Formation C, Strong Left, Play 2 (Buck Lateral Pass). This play is identical to Diagram 19, except that the WB, after securing the lateral from the TB, looks to pass to either the TE (who snapped the ball on this play) streaking down the middle of the field, the TB on the backside or either the SB or SE on their crossing routes. The QB stays in to block on the backside.
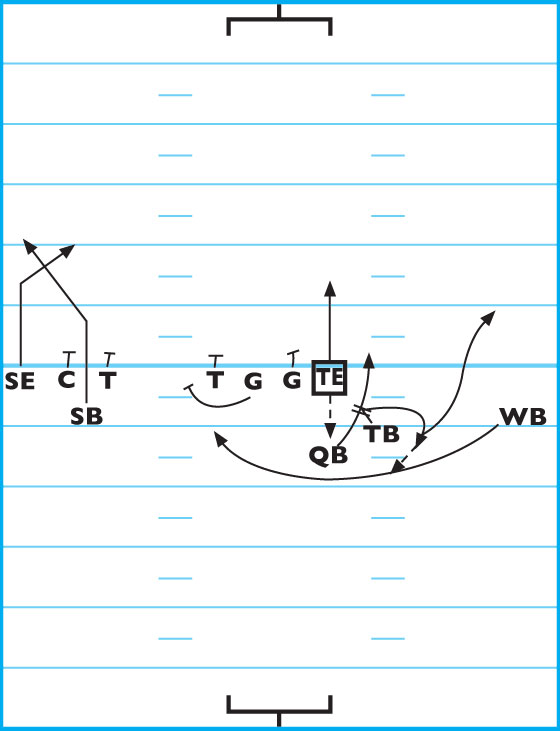
DIAGRAM 21: Formation C, Strong Left, Play 3 (Fake Buck-Lateral Run). If the other Buck Lateral plays have worked well, this play will keep the defense on their heels. The QB receives the shotgun snap, fakes a handoff to the TB (the TB sells the fake by faking a pitch to the WB who’s in motion) and runs behind the pulling left OG on the weak side. If uncovered, the right OG blocks the middle LB. The players on the strong side carry out their fakes, with receivers waving their arms and calling for a pass from the TB (who doesn’t have the ball).
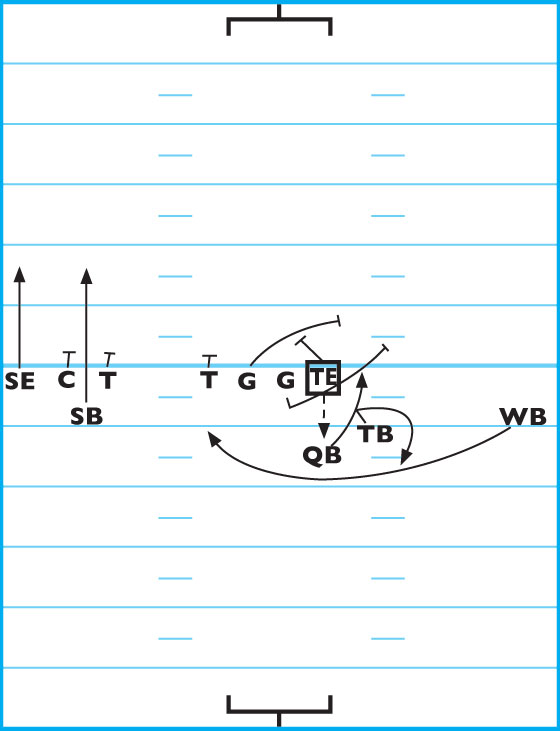
DIAGRAM 22: Formation C, Strong Left, Play 4 (Pass). The QB receives the shotgun snap (from the TE) and looks to pass. He can hit either the WB on an “up-the-rail” route, the TB (who blocks for a one-count prior to releasing) on a 7-yard vertical and square-out route, the SB on a 10 yards route across the middle or the SE running a deep post route.
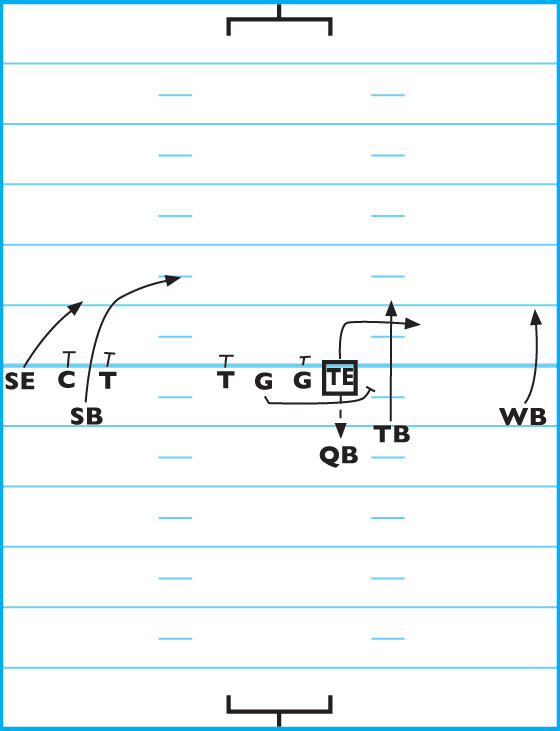
DIAGRAM 23: Formation C, Strong Left, Play 5 (Sweep Left). On this play, the TB goes into motion and as soon as he passes the QB, the ball is snapped by the TE. After securing the shotgun snap, the QB rolls to the strong side and runs the sweep. After snapping the ball, the TE blocks straight ahead. The TB turns his motion in a full sprint, gets to the corner and blocks downfield. The left OG pulls and blocks for the sweep on the front side, while the right OG blocks “on over” depending on the defensive coverage. The WB and SE run their defenders off the LOS and take them downfield. The QB reads the blocking and runs downfield.

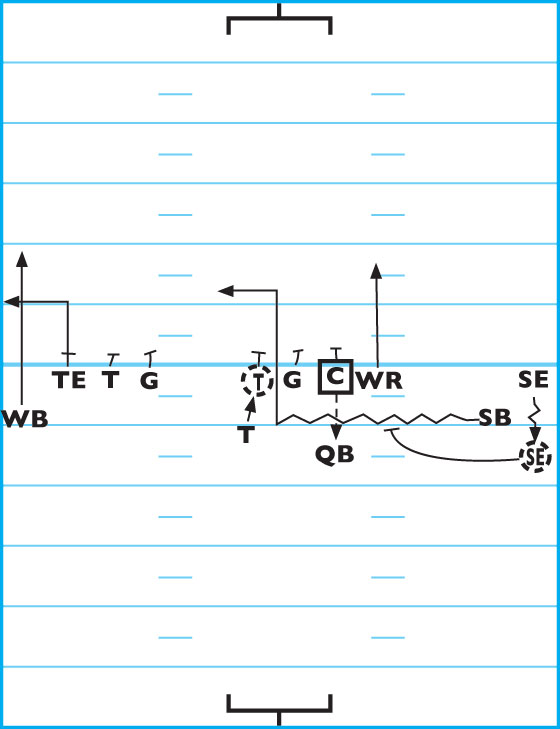
DIAGRAM 24: Formation C, Strong Left, Play 6 (WB Screen Left). The WB, who is the lone player lined up on the weak side, goes into motion. As soon as the WB passes the QB with his motion, the TE snaps the ball to the QB. The TB rolls to the strong side, stops and then provides protection on the backside. After snapping the ball, the TE blocks for a 2-count and releases downfield, calling for the ball (this should draw the middle defender). The left OG blocks straight ahead, while the right OG pulls and sets up part of the screen wall. The SB stalk blocks his defender, while the SE runs a vertical route downfield and then stalk blocks his defender. The QB rolls to the right and throws a screen pass to the WB who curls back toward the QB.
The WB secures the screen pass from the QB, reads the blocking lanes and takes the ball downfield.
Formation C can also be run from a strong-right formation.