YOUR OFFENSE MUST continually be on the attack. You must have the mindset of “We are not trying to hide and we’re not trying to trick you...here we come.” With this aggressive style of offense in mind, the following article details an extremely effective 4-wide-out set.
Or, as we like to call it, “Four wide outs, a one-back set and 5 seconds to throw.”
This high-powered set attacks you first down, second down and third down. Our job is to move the ball up the field as fast as possible. The players must always remember their player responsibilities on every drive.
Offensive Line: This unit must maintain man blocking while using slide technique and help in the blocking coverage. If the line give the quarterback 5 seconds to throw, we feel that our receivers will get open.
Running Back: The ace back must protect the QB’s blind side. It is simple team offense, do your job so 10
other players can do theirs. If we go empty backfield, the ace back is the fifth receiver.
Wide Receivers: The 4 wide receivers are our money people. These players must make the right reads of the defense. Their job is to perform the correct reads and run the right routes. If they do their job, we’ll win the game.
Quarterback: The QB’s job is plain and simple. He must make the correct reads and hit the open receiver. This is your leader and he must make the smart decisions that help move your team downfield.
Plays From 4 WR Set
The following plays, run from a 4-wide-out set have been extremely effective for my teams over the years. It’s critically important that the receivers run crisp, sharp routes.
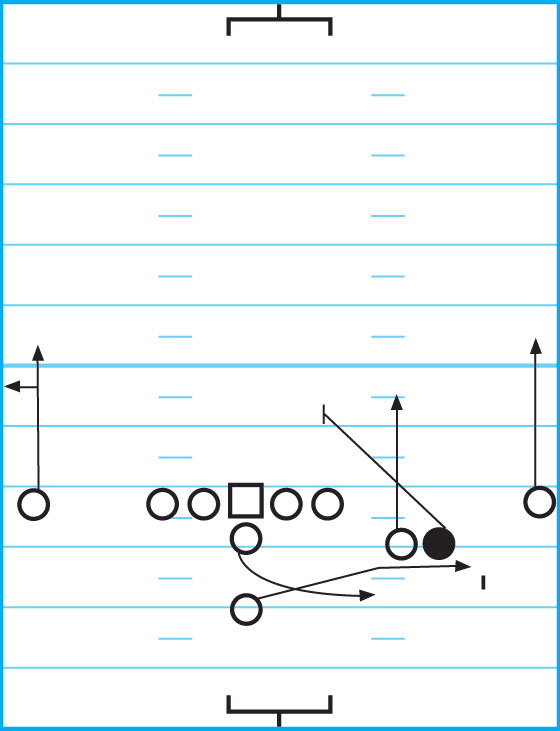
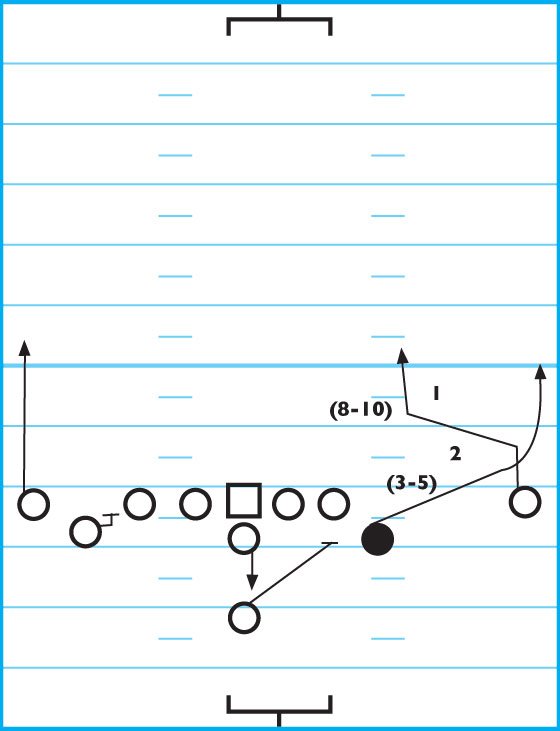
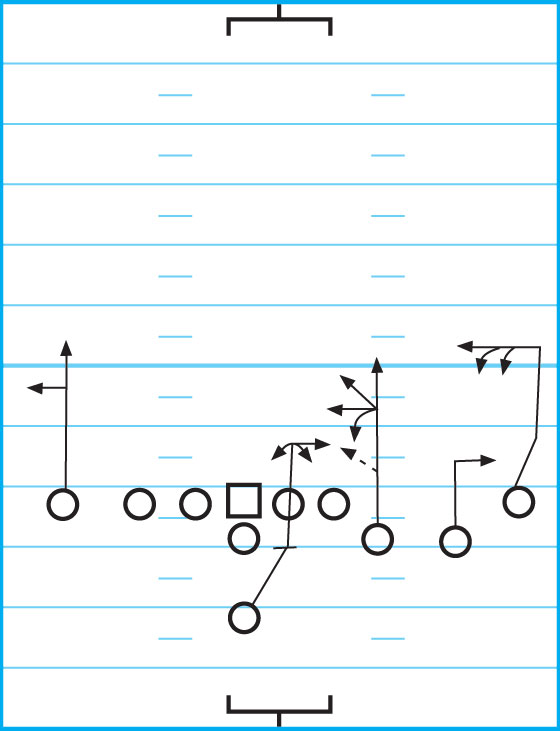
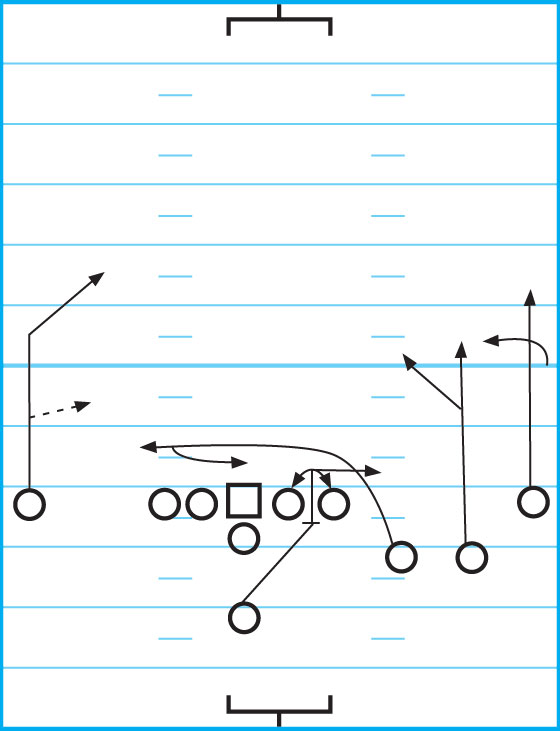
“Frank”
Receiver W: Sets up 4 yards outside the hash. Runs a take-off route.
Receiver V: Sets up 2 yards from the Z. Runs a take off.
Receiver Z: Sets up 3 yards from the tackle and executes a crack block.
Receiver X: Sets up at the bottom of the numbers and runs an adjustable take off.
Receiver S: Lines up off-set or behind the center. Runs a route into the flat.
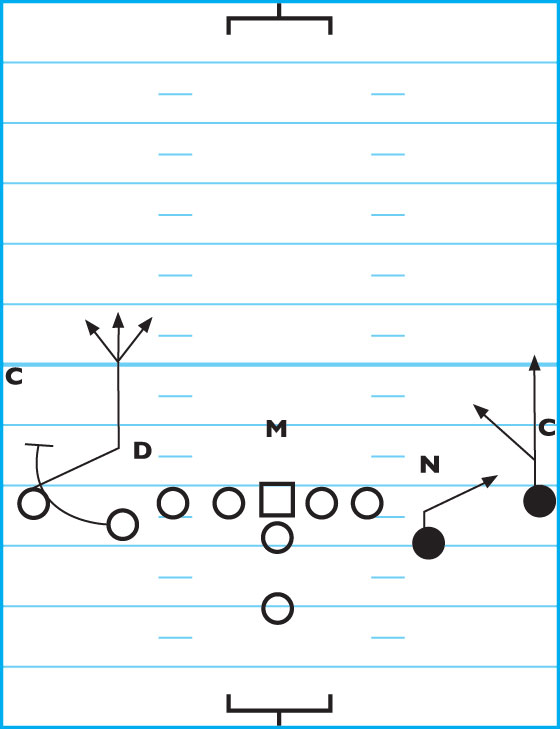
DIAGRAM 1: “Frank.” This plays is only run against man-defense teams. Z’s vertical route will defeat banjo coverage. S must catch the ball behind the line of scrimmage.
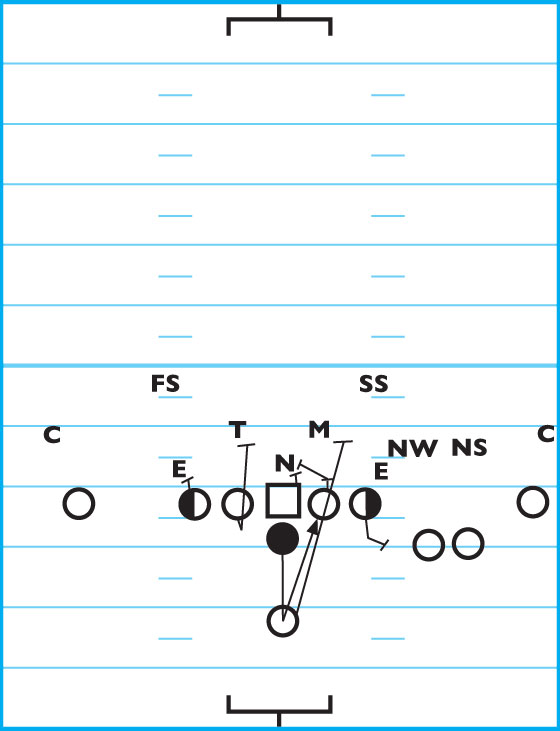
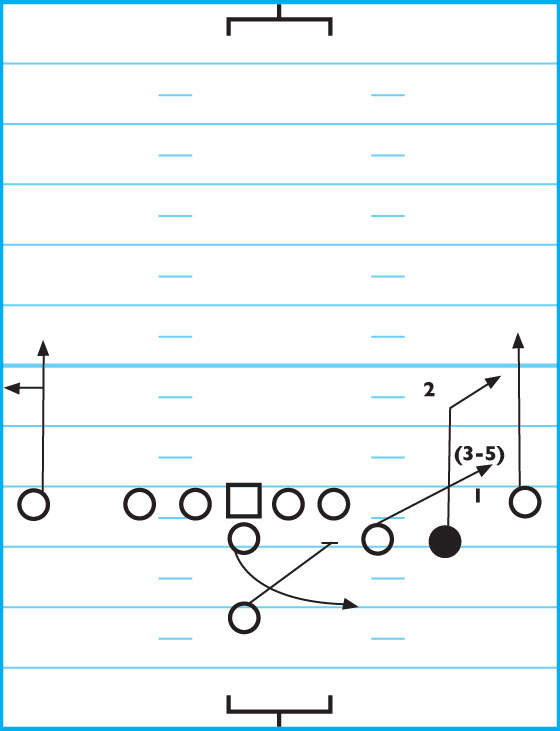
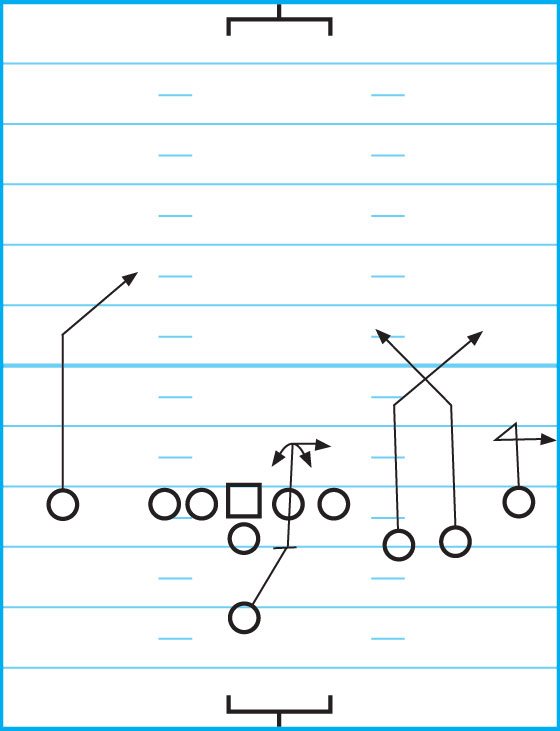
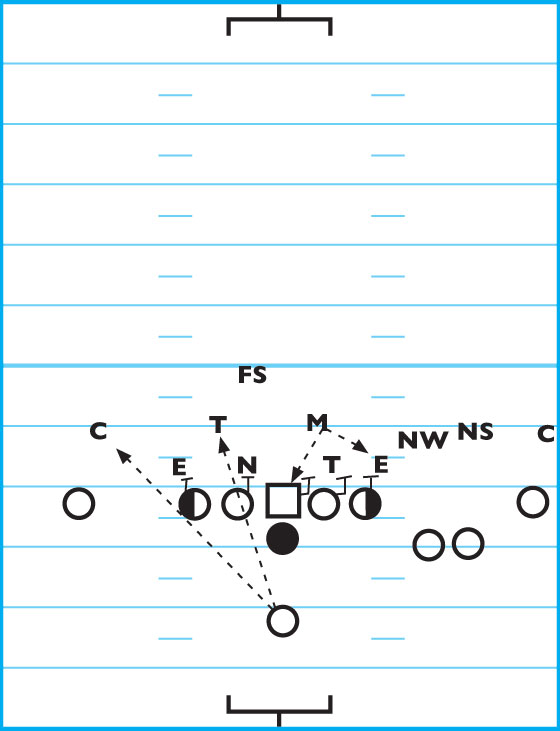
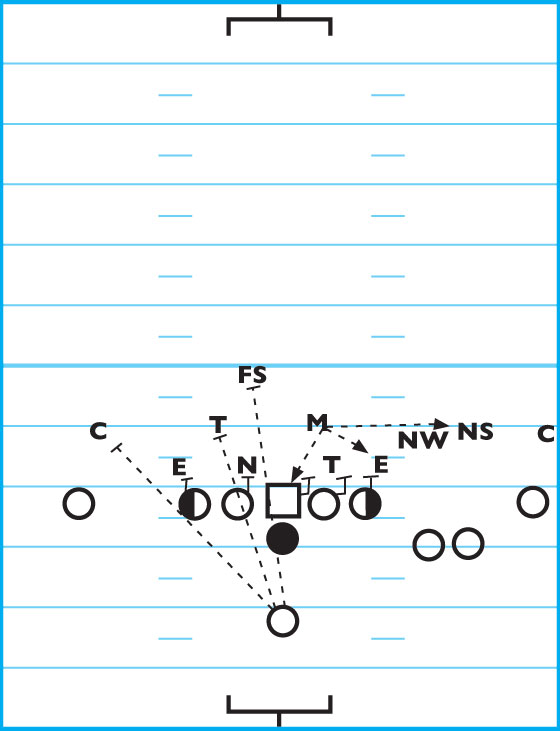
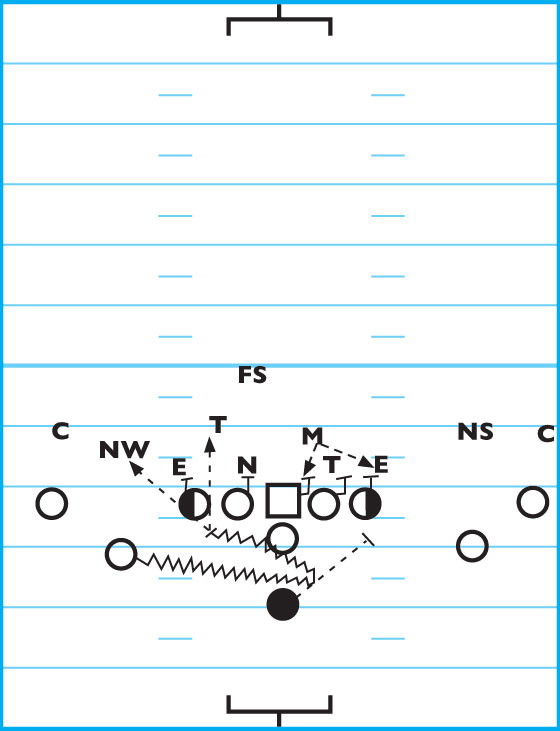
“Littletown” Draw Play
This is a quick-huddle draw play designed to keep defenses off-balance. With 4 wide outs spreading the field, the defense will be susceptible to a draw play up the gut.
As in any draw play, the blocking of the offensive line is the key to making this play work.
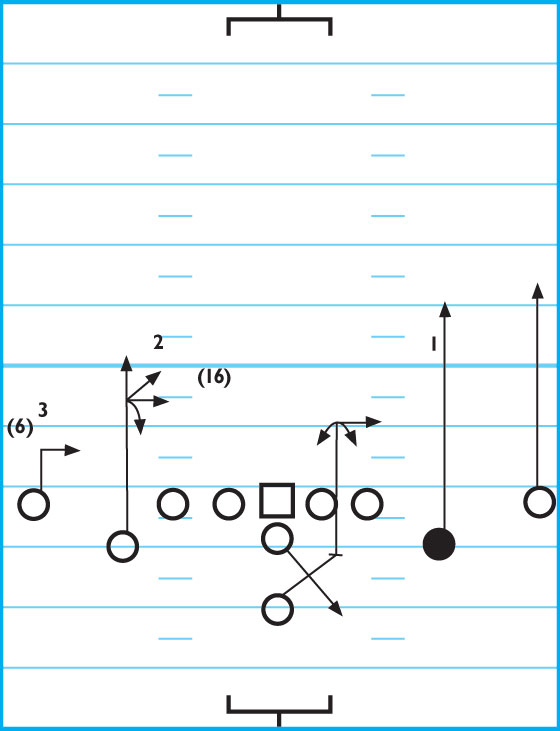
DIAGRAM 2: “Littletown” Draw Play. The center identifies the Mike LB and helps on any 1-technique. (Pass Set and Drive, Help to the 1-Tech Side, Base, shove, scoop.)
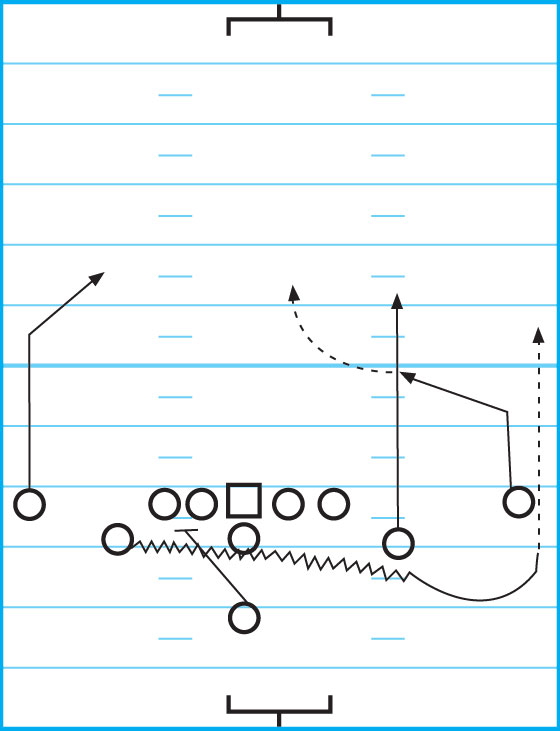
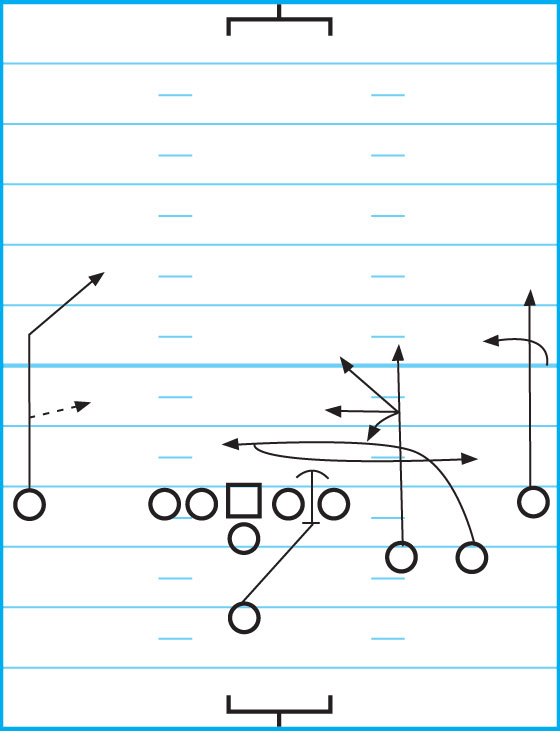
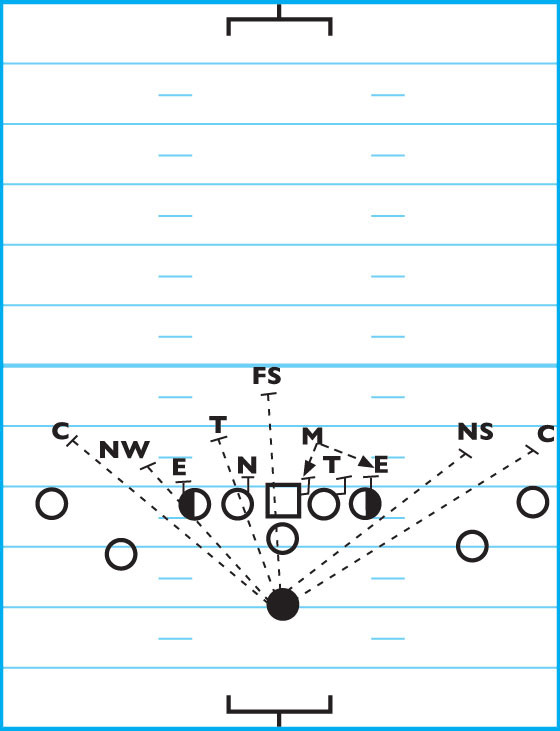
“Saint’s Corner”
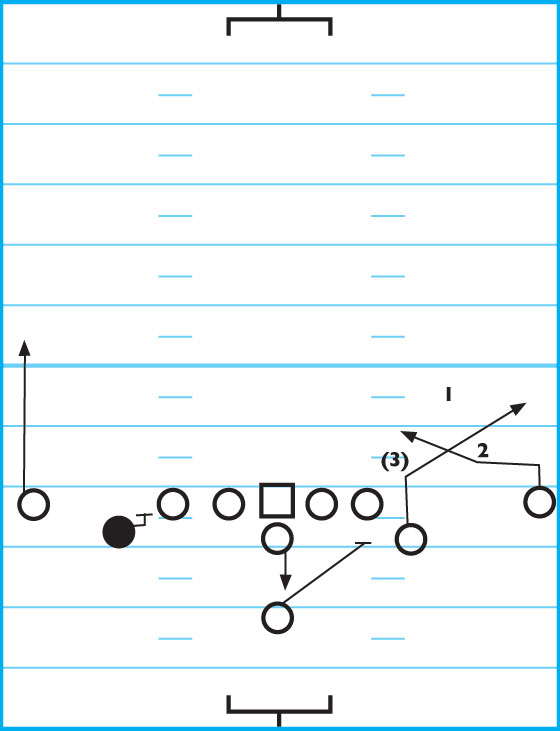
This is an excellent play against a Cover-3. The QB should look to hit the seam in the vertical hole. This play can also be used as an effective play-action pass. The QB must take a controlled drop and read his progressions.
DIAGRAM 3: “Saint’s Corner.” Do not use deep crossing routes against man coverage. Use this play only against Cover 3 teams.
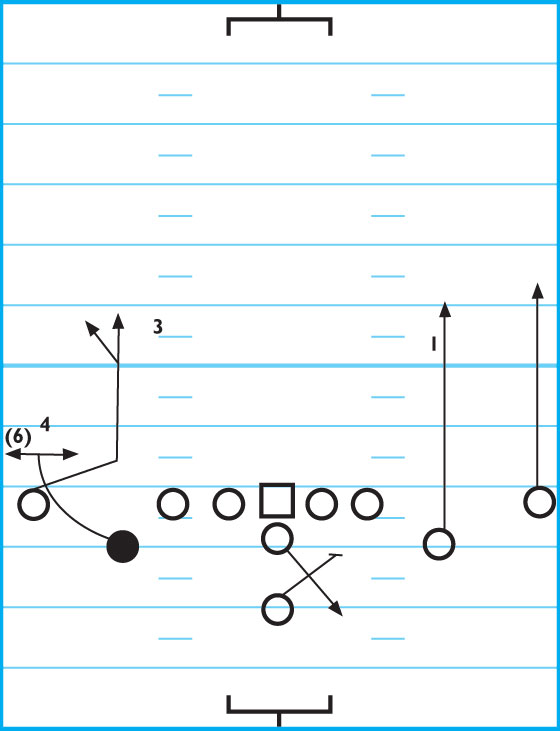
See the route adjustments in Diagrams 4 to 9.
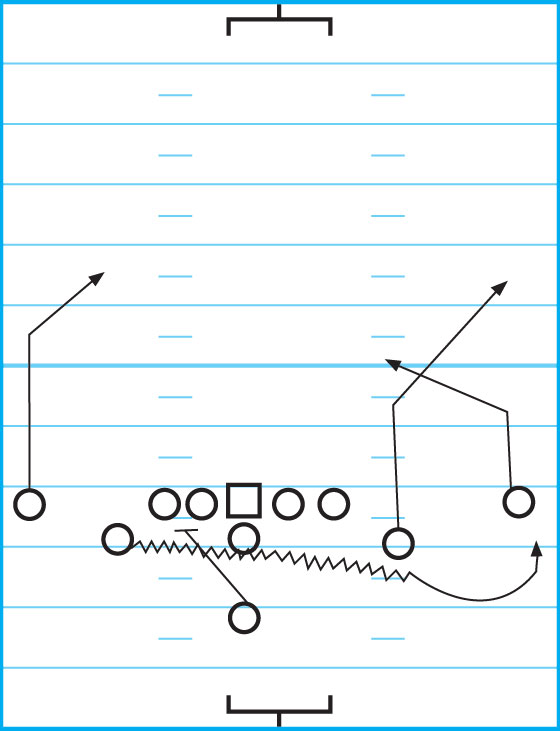
DIAGRAM 4: “Saint’s Corner” Vs. Cover-2.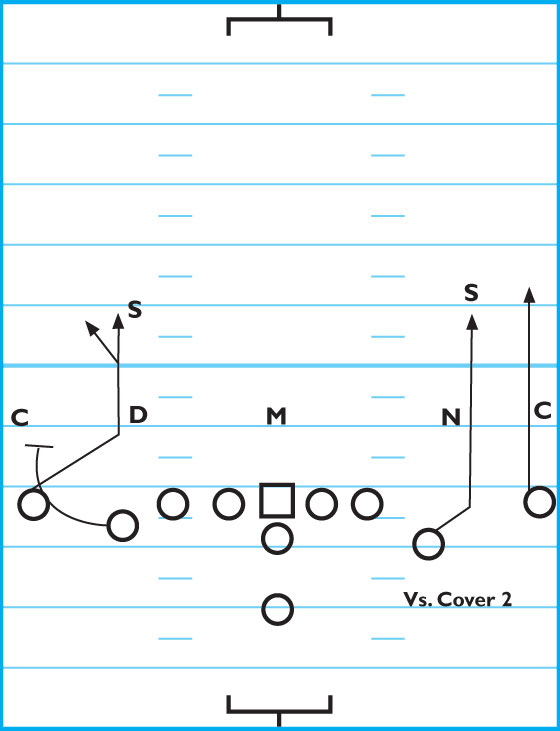
DIAGRAM 5: “Saint’s Corner” Vs. Cover-1.
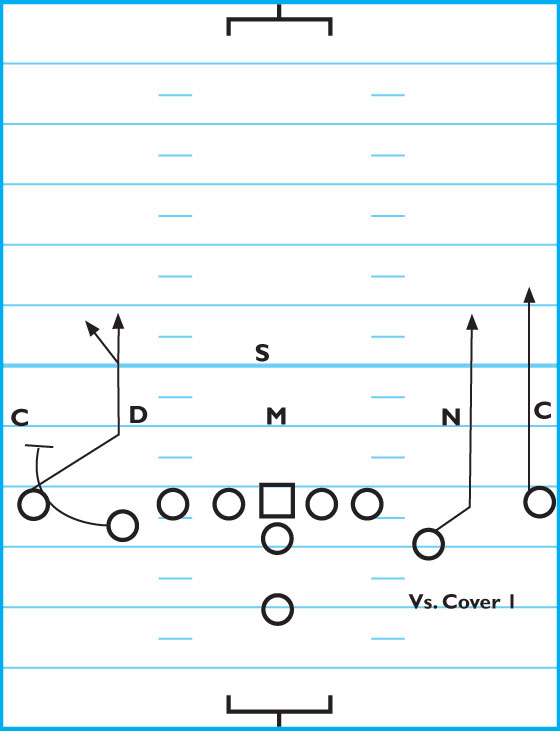
DIAGRAM 6: “Saint’s Corner” Vs. Cover-5.
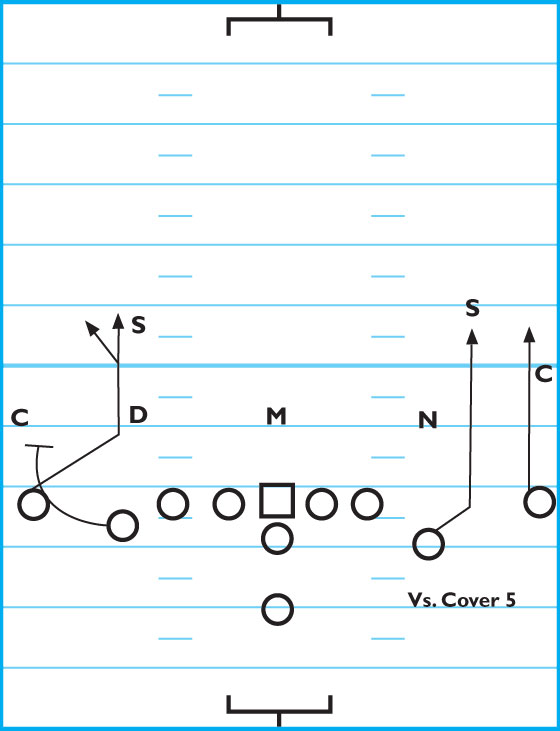
DIAGRAM 7: “Saint’s Corner” Vs. Man Under.
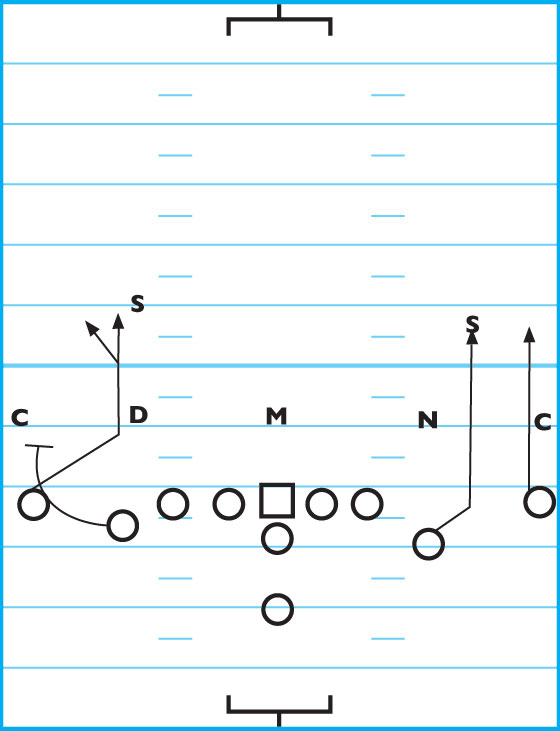
DIAGRAM 8: “Saint’s Corner” Vs. Cover 3.
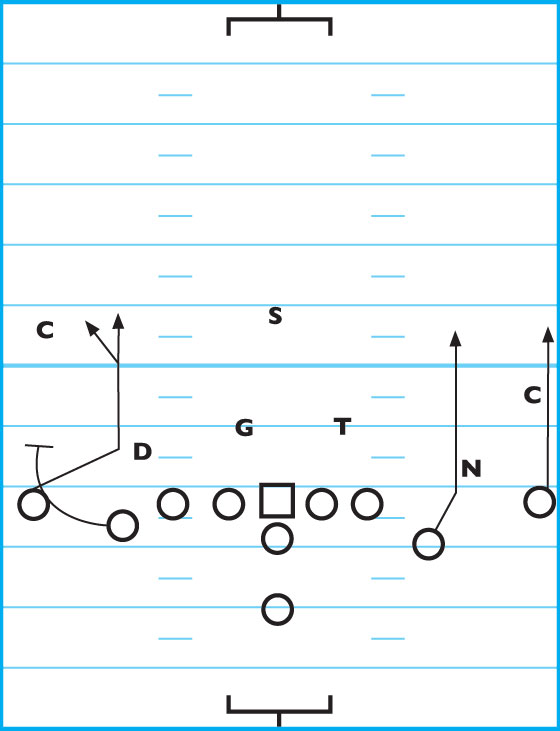
DIAGRAM 9: “Saint’s Corner” With Blitz Adjustments.
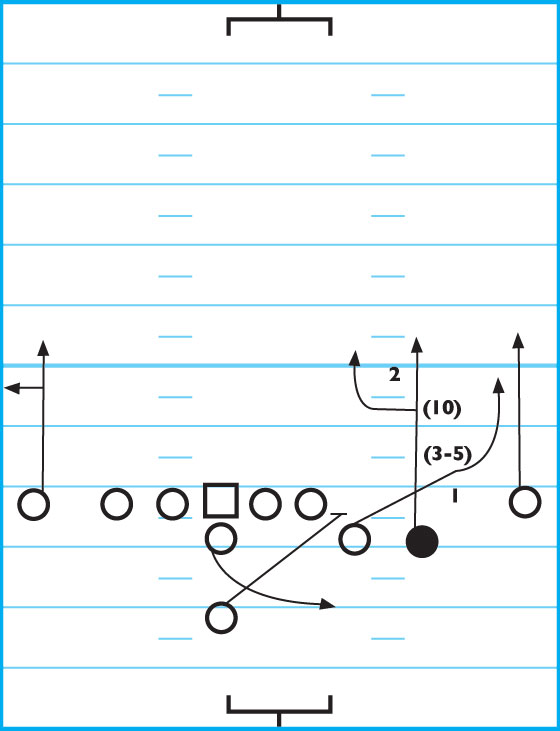
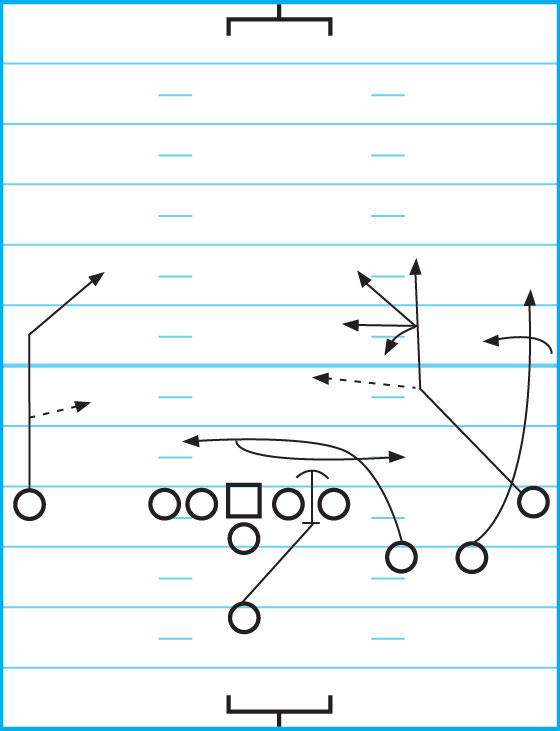
“Saints Delay”
This is an excellent play to use against a Cover-3 team, when you hit the seam in the vertical hole. This can also be an effective play-action pass.
DIAGRAM 10: “Saints Delay.” The QB takes a controlled drop and reads the progressions. Backside under allows a good high-low with the seam read route.
This play is equally as effective against Cover-2 teams who run their nickel backs with vertical releases by the slots.
Against a man defense, the only real options are the backside. Check out of this play if a blitz is suspected.
DIAGRAM 11: “Saints Delay” Vs. Cover-2.
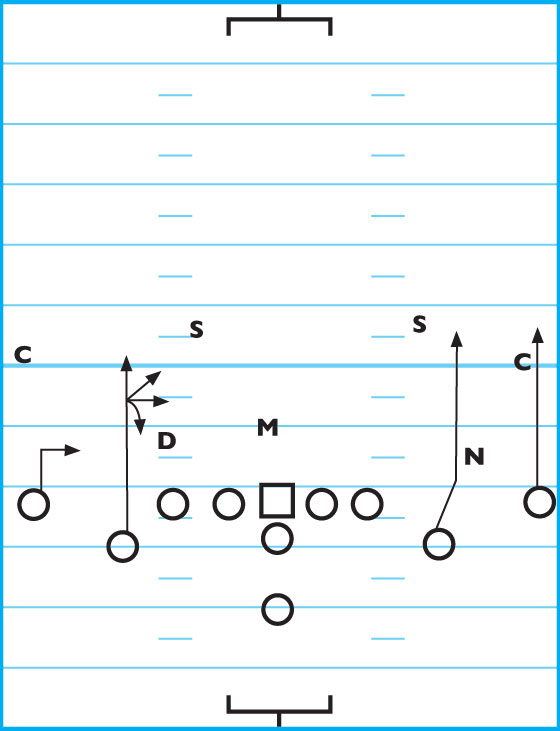
DIAGRAM 12: “Saints Delay” Vs. Cover-1.
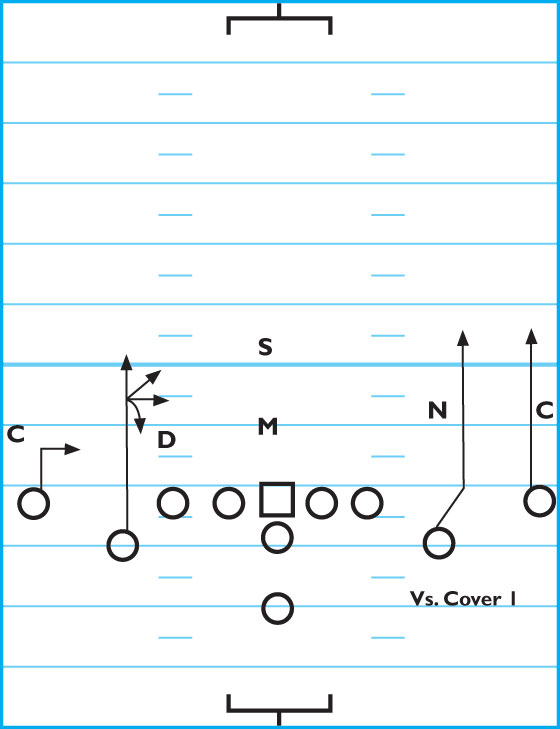
DIAGRAM 13: “Saints Delay” Vs. Cover-5.
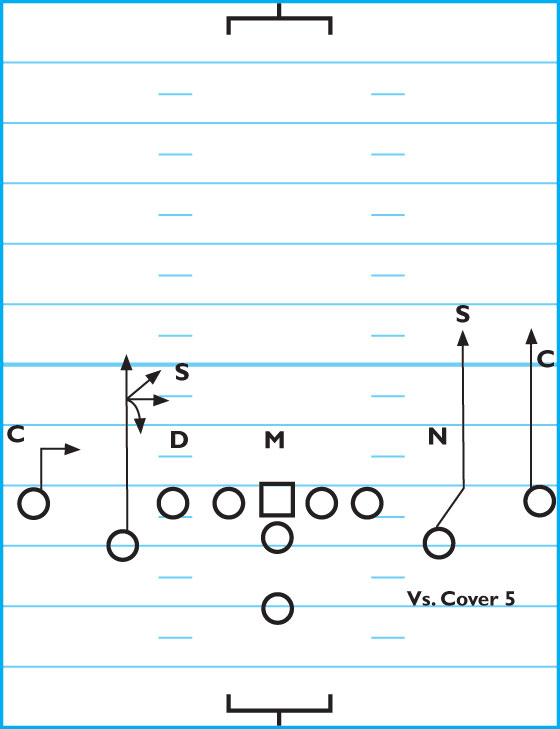
DIAGRAM 14: “Saints Delay” Vs. Man Under.
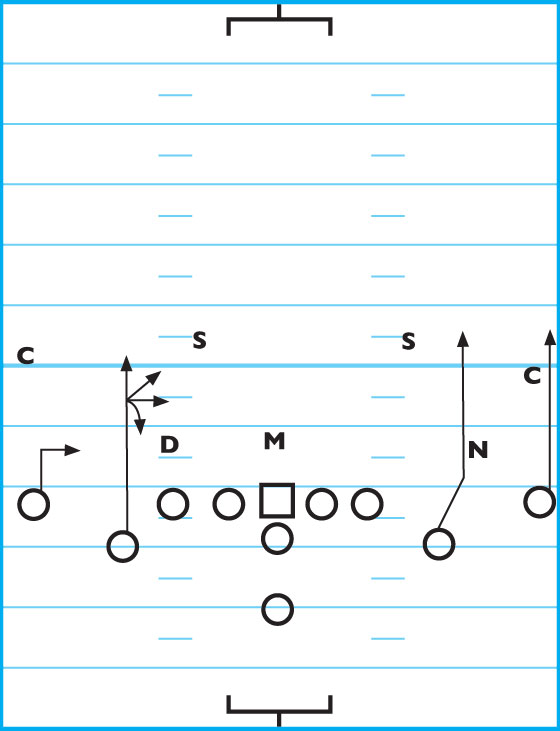
DIAGRAM 15: “Saints Delay” Vs. Cover-3.
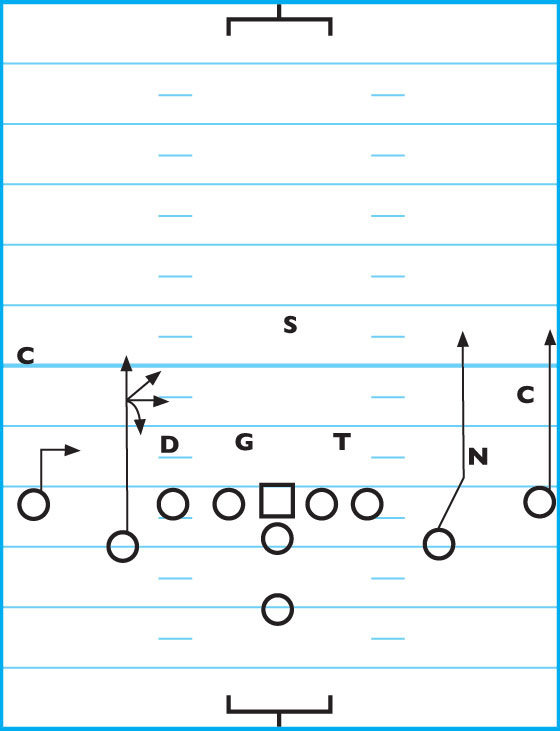
DIAGRAM 16: “Saints Delay” With Blitz Adjustments.

“GREEN/GOLD FOX”
This is a great play to use on the goal line. You should run it primarily against man coverage.
DIAGRAM 17: “Green/Gold Fox.” The QB should lay the ball up for the flag route and let him run under it.
“Silver”
This is a good short-yardage play to use against a Cover-3 or man defense. It also gives you another option with the 7-man protection against a blitz.
In this play, the vertical option is poor and you should instruct the QB to try to stay away from it. If it isn’t done early, it probably won’t get done.
DIAGRAM 18: “Silver.”
“Viking”
This play is design to defeat man teams who use banjo coverage with their nickel defenders on the slots.
This is also a good play to use against Cover-3 teams.
DIAGRAM 19: “Viking.” Tell the QB to check out of this play against a Cover-2 or Cover-4.
Giant
This play is best run against man defenses. The QB must recognize Lock or Banjo coverage on the Z and V receivers. The splits will adjust accordingly. Against a Cover-2, the QB must read from outside to in. Against a Cover-3, he looks high to low to the flat defender with the flat/seam package.
DIAGRAM 20: “Giant.” Tell the QB to check out of this play against a Cover-4. The QB has the option to run and press the corner with the drop. The FB seals the contain man. Blitz adjustments are built in.
Inside Draw Play
This play is similar to the previous draw play, only this time the draw is run between the center and OG.
DIAGRAM 21: Inside Draw Play.
“Steeler Special”
DIAGRAM 22: “Steeler Special.” In this play, receiver Z reads the curl route and pushes vertically to 18 to 20 yards, reads the coverage (finds the zone). The Y receiver makes a seam read and makes a decision at 16 yards. The H receiver runs a speed out at 4 to 5 yards. Receiver X uses an adjustable take off and sees if he can’t beat the CB on the take-off move.
“Lion”
DIAGRAM 23: “Lion.” Receiver Z runs a hitch route and pushes vertically to 6 yards. The Y receiver makes a seam read and pushes vertically until he’s clear the underneath coverage. The H receiver makes a corner read, pushes vertically until he clears the corner. Receiver X runs a no-depth post.

“Lion Special”
This play is great to use along the goal-line and must be used in sync with a quick huddle.
DIAGRAM 24: “Lion Special.”
The H receiver pushes vertically to 6 yards. The Y runs to the corner, pushes vertically to 12 yards and breaks to the back pylon. The H receiver pushes vertically for 12 yards and aims for the goal post. The X receiver runs a post route with no depth.
“Titan”
DIAGRAM 25: “Titan.” The Z receiver runs a 3-step slant and finds the open window. Z turns it up if he’s pumped. The Y receiver runs a seam pattern and looks after clearing the underneath coverage. The H receiver runs a bubble route and never passes the LOS unless pumped. Receiver X runs a post route.
“Titan Special”
This is another good play that’s effective on the goal-line and in short yardage situations.
DIAGRAM 26: “Titan Special.” The Z receiver runs a 3-step slant and finds the open window. The Y receiver aims for the back pylon. The H receiver runs a bubble route and never passes the LOS. X runs a post route.
“Colt”
DIAGRAM 27: “Colt.” The Z receiver runs a curl route, pushing vertically 18 to 20 yards, reads the coverage and finds the zone. The Y receiver runs away from his man — he never turns back without making eye contact with the QB. The H receiver runs a post, makes a decision at 14 yards (reading the safety to his side) and makes a decision on direction. Receiver X runs a post route. He runs to the feet of the CB.
“Colt Special”
DIAGRAM 28: “Colt Special.” Z receiver makes a push at 18 to 20 yards, reads the coverage and finds the zone. Receiver Y makes a seam read and makes a decision at 14 yards. He never settles against zone coverage. H receiver runs an under route away from the DB. X receiver runs a no-depth post route.
“Colt Switch”
DIAGRAM 29: “Colt Switch.”
Receiver Z runs a curl route pushing to a depth of 18 to 20 yards, reading the coverage and finding the hole in the zone. Receiver Y runs an under route, running away from his man. Receiver H makes a seam read, makes a route decision at 14 yards and nevers settles against a zone. Receiver X runs a post route.
Protections
The following are protections that work in conjunction to the 4-wide -out set and have proven very reliable over the years.
“Bulls/Pistons” Slide Strong
DIAGRAM 30: Bulls/Pistons Slide Strong.
“Nuggets/Jazz” Dual Protection
DIAGRAM 31: “Nuggets/Jazz” Dual Protection.
“Knicks/Nets” 2-back Protections
DIAGRAM 32: “Knicks/Nets”
2-back Protections. “Spurs/Sonics”
1-Back Protection
DIAGRAM 33: “Spurs/Sonics”
1-Back Protection