ONE OF THE BIGGEST challenges that coaches face when preparing a defense for each game is that they have to make changes and adjustments to defend the opponent, while maintaining the base structure of their defensive scheme.
A second challenge is to maintain a manageable level of sophistication in the defensive schemes while eliminating player confusion. Coaching staffs will spend an off-season studying and learning new defensive schemes or modifying their existing schemes and make decisions on which new ideas to incorporate into their defensive systems. When the season arrives, the coaches will be excited about the new defensive ideas and changes — but this is a time when you need to be careful. Players can become overwhelmed when they’re handed a large playbook filled with multiple fronts, blitzes and coverages.
To combat these challenges, we’ve developed a “Foundation For Defensive Success” that we present to our players at the beginning of each season. Each player receives one piece of paper; one side addresses the entire defense, the other side addresses the player’s defensive position group (defensive line, linebackers, or defensive backs).
We strive to “play offense on defense” and aggressively attack as much as possible. We tell our players that we’ll try to use multiple fronts, stems, slants, blitzes, coverages, etc., in an effort to be a difficult defense to prepare for, but that everything we do will fall under the parameters set on that one piece of paper. We spend the first few days of practice explaining the foundation so that players understand how the pieces fit together as we install our defense.
We’ve found that this system reduces the pressures of scheme installation that we all face, while improving our players’ techniques and football knowledge.
We break down the defensive foundation into 7 categories: Team Objectives, Communication, Alignment,
Stance, Key, Assignment and Pursuit.
To further play on this theme, we also have foundations that pertain to each position group.
1. Team Objectives
‰ Play with a relentless pursuit to the football, while using a multiple 8-man front and zone-coverage defense.
‰ Be known as a physical, pursuing, hard-hitting defense.
‰ Win the critical moments of each game such as:
• Sudden-change situations.
• Stopping third-down conversions.
• Keeping the opponent backed up.
• Making goal-line stands.
‰ Eliminate self-inflicted wounds such as:
• Drive-continuing penalties.
• Successful offensive plays due to defensive misalignment.
• Missed tackles.
‰ Practice to increase our team’s technique and knowledge. Strive to play “football smart.”
‰ Focus on “take-aways” instead of “turnovers.”
‰ Intimidate through style and scheme.
‰ Make communication our cornerstone.
‰ Play with emotion and trust in one another.
2. Communication
„ Translate the huddle call, sideline instructions and scouting report into useful information before, during and after each play.
„ Identify and present key opponent tendencies so we use vital scouting report information at game time.
„ Know the opponent’s personnel ID (2-digit RB-TE system) and formation ID (backfield and receivers) and what tendencies they show.
3. Alignment
Ó Use a numbering terminology for defensive alignments (1-9, 10-90).
Ó Make sure that all the defensive players are aware of the offensive-gap designations (labeled as A through D).
Ó Allow player independence but instruct so that your disguises and alignments are used effectively.
4. Stance
Prior to each snap, all defensive players must:
 Exude a winning attitude before ball is snapped.
 Be positioned with squared-up feet and shoulders with the wrists below the knees.
 Maintain an athletic stance during stems and disguises.
5. Keys
‰ Emphasize a focus on small targets; defenders should be told what body part to key, not just what
player to key.
‰ Must know reactions to five basic flows:
• Hard Flow: Both RBs to same interior of formation.
• Full Flow: Both RBs to same perimeter of formation.
• Split Flow: RBs in opposite direction, each to perimeter.
• Option Flow: Both RBs to same side of the formation with one RB to interior and other RB to perimeter.
• Trap Flow: RBs in opposite direction with one RB to interior and other RB to perimeter.
6. Assignments
Á All defenders must attack across the pressure on all blocks.
Defensive Linemen: Gap/blocker attack, oppose all pressure.
Linebackers: Inside LBs fill, while outside LBs fold or force. Preach the motto “Tempo the ball.”
Defensive Backs: Maintain cushion until the ball is thrown, rotate and force based on backfield flow and the called defense.
7. Pursuit
‘ Rip across and under all blocks – minimize your blocking surface and punch through blockers.
‘ Run through your mistakes!
‘ Play with pads over toes.
‘ Know how to fit vs. opponent’s three best plays.
‘ Emphasize closing the distance between the tackler and ball carrier. Stress that tacklers “Close” instead of “Break down” to run through a ball carrier.
‘ Emphasize “Club, wrap and run – bite the ball!” These verbal triggers teach tacklers to tackle with head and chest up and to run through BC.)
‘ Make open field tackles. Defenders must grab cloth and get the ball carrier under control. Stress that you don’t need a big hit – the object on every play is to get ball carrier on the ground!
‘ Tackling teaching progression should start very slow (at a walking pace) and allow each of your players to succeed so that they become confident tacklers. In drills, do not allow the ball carriers to defeat a tackler until they’ve developed excellent tackling technique.
Progressions, Circuit Drills
Continuing with the building-a-defensive-foundation mindset, we use a tackling progression and a defensive circuit to teach the fundamental skills presented in our foundation. The tackling progression teaches players how to fit on a tackle in a controlled environment, while getting maximum repetitions and coaching in a short timeframe.
The following drills are done with the entire team in pairs.
1. One-Knee Tackle Drill. The tackler and ball carrier (BC) start nearly chest to chest, with each player on one knee. The BC has his hands on his head, while the tackler is positioned with “hands in holsters” and his arms bent at a 90-degree angle. On the coach's command, the tackler throws his arms in an uppercut, grabbing cloth behind BC's shoulders.
2. Two-Knee Tackle Drill. The BC stands on feet in front of tackler who is on both knees with his butt on his heels and his "hands in holsters." On coach's command, the tackler explodes with his hips and arms upward, grabbing cloth behind BC's shoulders.
3. Fit-And-Finish Drill. The BC and tackler start at an arm’s length apart. The coach instructs BC which way to go so that tackler knows also. The tackler works to get hips between the BC and end zone by thrusting his outside knee high and upfield.
Tackling Circuit
Each day, we use three drills selected from the menu of drills presented below with each position group spending 3 to 5 minutes at each station.
During many of our tackling drills, the BC holds a hand-shield against his chest to encourage a great arm-thrust by the tackler.
DIAGRAM 1: Angle Tackle. Players align 3-yards apart. The BC runs at one of the edge cones. The tackler makes an angle tackle inside the cone.
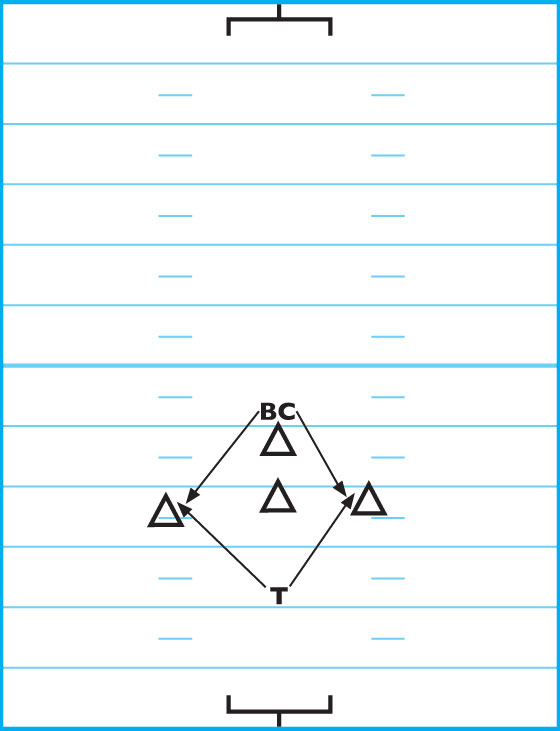
DIAGRAM 2: Angle Tackle With Ball Carrier Escape. Players align 1-yard apart. The BC runs at an angle inside to either cone and attempts to spin out of the tackler’s grasp.
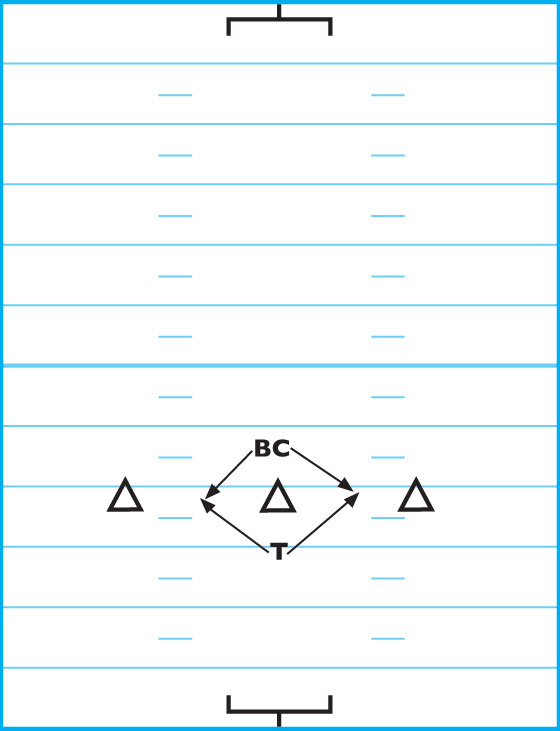
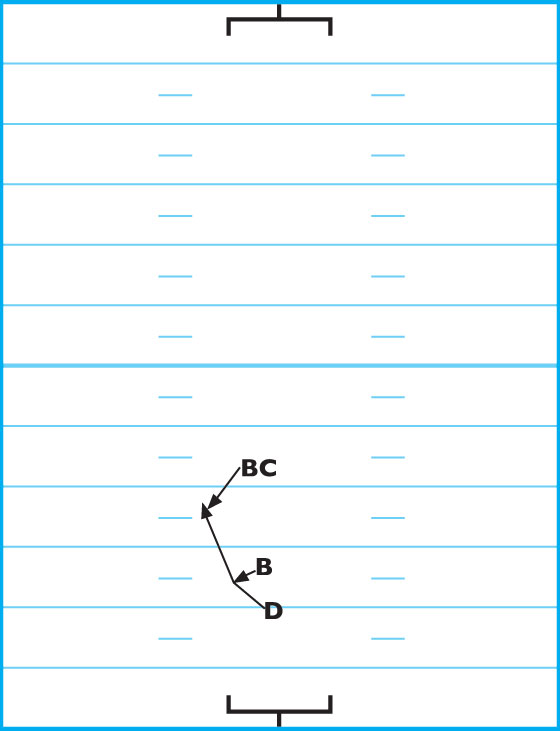
DIAGRAM 3: Leverage Tackle. The BC runs from the middle of field (MOF) to the sideline (SL) on a yard line and at varying speeds. The tackler moves downhill and maintains cutback leverage on the BC, finishing with a form tackle. The coach can incorporate bags or obstacles for the tackler. The tackler must focus on BC’s back hip and work to keep his shoulder’s square, using crossover runs or shuffles.

DIAGRAM 4: Chute Tackle. Players begin opposite each other on the middle bag of a series of bags lying on ground. The tackler keeps his eyes trained on the BC’s hip and mirrors his path, making a form tackle when the BC appears in an alley. The tackler must punch bags with his hands and keep his outside leg back. This drill is performed under a blocking chute to ensure a low pad level from the tackler. 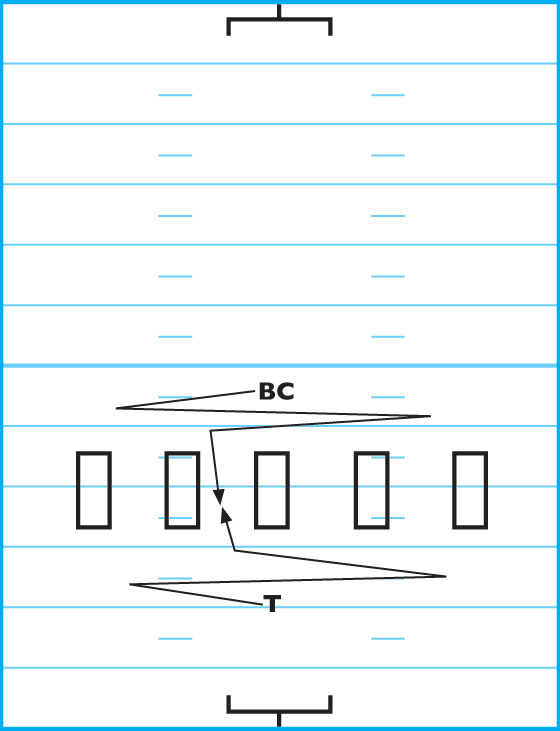
DIAGRAM 5: Open-Field Tackle. Players start on opposite sides of a 3 -yard-by-3-yard box. The BC must stay within the box and attempt to score by avoiding or faking the tackler. The tackler's goal is to wrap up the BC and stop his forward progress, with an emphasis on clubbing and grabbing cloth. As the tackler’s skill-level increases, the open area on the field should increase.
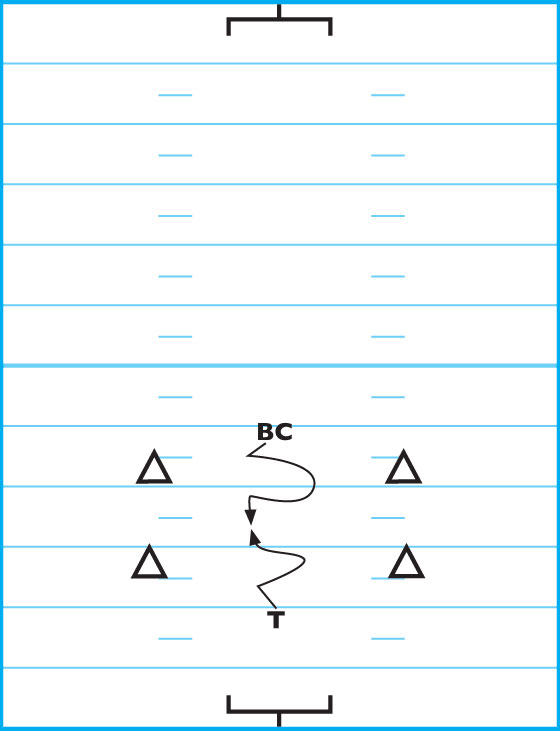
DIAGRAM 6: Read Tackle. The tackler aligns one yard away from the blocker (OL), The BC aligns 5 yards behind the blocker. The blocker attempts to hook or reach the tackler. The tackler reads and rips through blocker and executes a form tackle on BC who is moving in the direction of block. The tackler's rip and tackle must happen inside the cones.
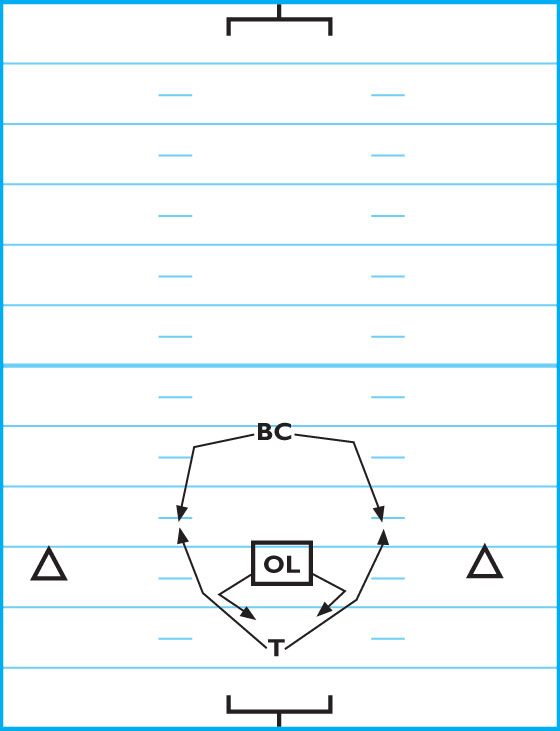
DIAGRAM 7: Alley Tackle. The tackler shuffles past a thrown medicine ball (which simulates a cut block) and strikes with the heels of his hands to defeat the cut block with his outside leg back and over one horizontal bag laid on ground. The BC shuffles in the same direction, approximately 5 yards away.
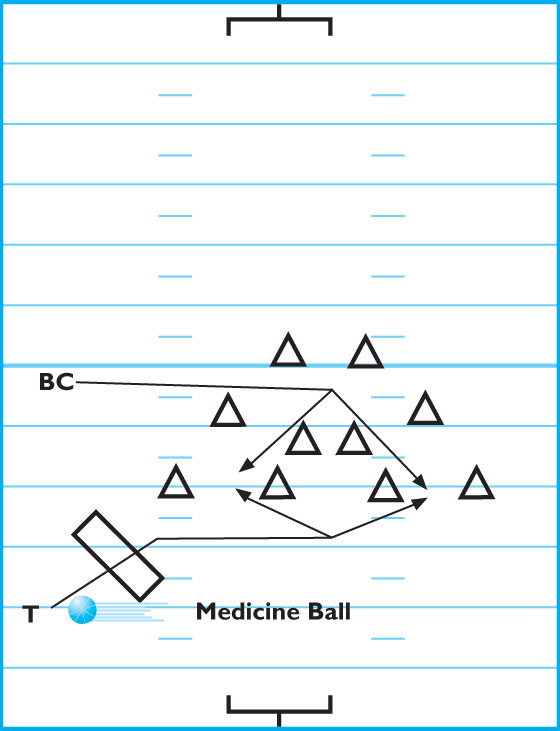
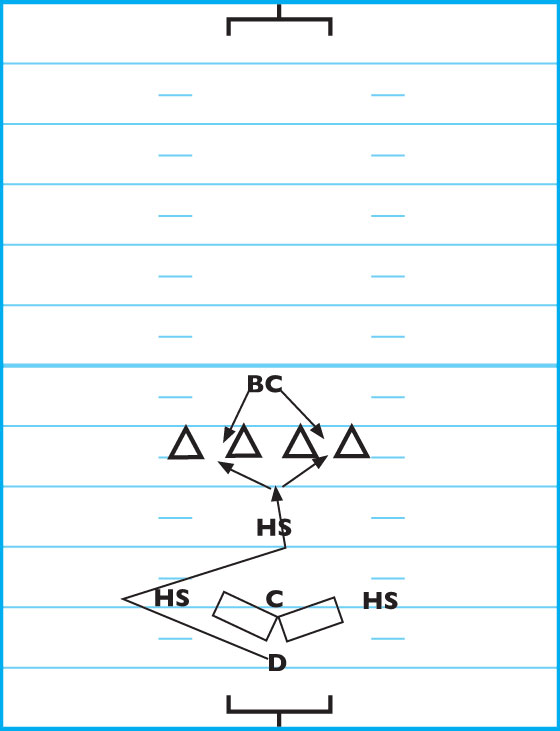
The BC has the option of running through one of two alleys — a cutback alley or sweep alley. The tackler must execute the tackle with his body between the ball carrier and goal line.
Takeaway Circuit
DIAGRAM 8: Fumble Recovery. The defenders align in a 6-point stance (using hands, knees, and toes) with the ball 1 yard in front of them. From the 6-point stance, the defenders recover the fumble by cradling and protecting the points.
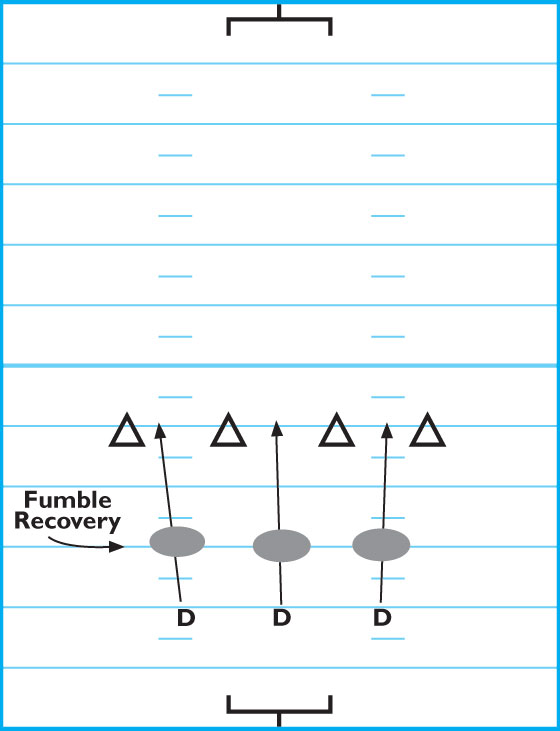
Next, the ball is placed 5 yards in front of the defenders who scoop ball by bending at the knees (not the waist) and sprinting through the cones.
Finally, a coach or another player roll balls and the defenders must scoop the ball up (with bent knees and eyes on ball) and sprint through the cones.
DIAGRAM 9: Interception. Defenders align in a stance and location according to position. The coach simulates the snap and the defenders use a 3-step open-hip drop toward the center of zone and backpedal with their eyes on the coach (who’s acting as QB).
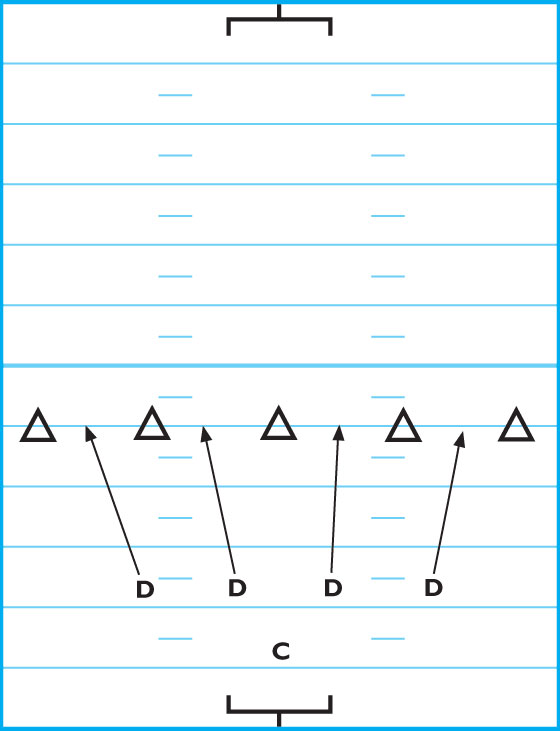
The ball is thrown toward a cone and the defenders break on ball. Emphasis should be on breaking one-third the distance the ball travels. The defenders finish the drill by intercepting the ball and returning it to coach QB.
DIAGRAM 10: Rake-And-Punch. Start with the players executing the angle tackle drill. D2 is 5 yards behind the tackler (D1), and D3 is positioned 10 yards behind D2. Defender No. 1 initiates a form tackle on the BC.
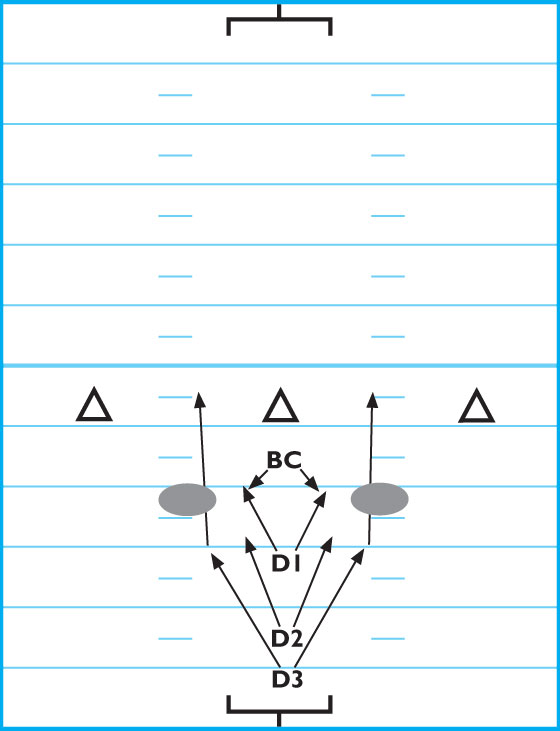
D2 then approaches the BC, pins the elbow of the arm that’s carrying the ball and either pries the BC’s fingers from the ball or punches the ball out of the BC’s grasp. D3 scoops up the loose ball and scores through cones. Rotate D2 to D1, D3 to D2, the tackler to the BC and the BC to D3.
DIAGRAM 11: Pass-Drop, Attack And Strip. Players align in a stance and location according to position and position themselves to face the coach. The coach simulates a snap and the defenders use a 3-step open-hip drop toward the receiver (R) in the center of zone. Each R holds a football.
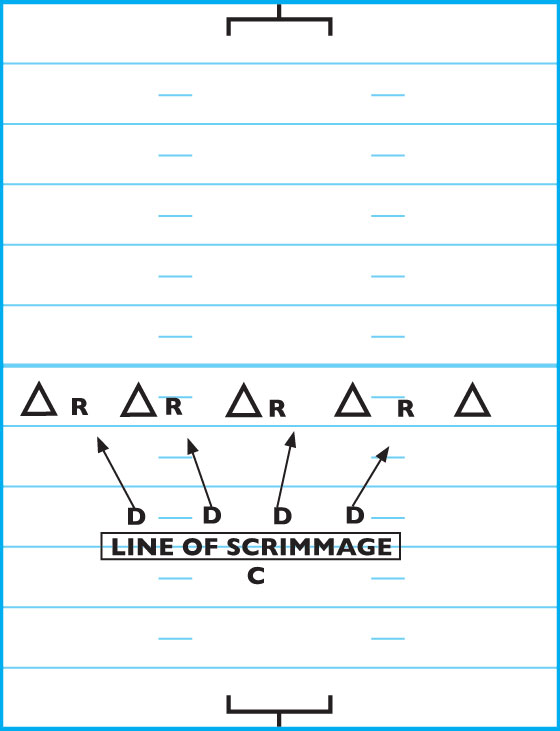
As the defenders approach, R in each zone has a choice to:
A. Hold the ball (the defender must then strip ball).
B. Toss the ball lightly into the air to simulate a tipped ball (the defender must then catch ball).
C. Roll the ball on the ground to simulate a fumble (the defenders must then recover the loose ball).
DIAGRAM 12: Move, Scoop And Score. The defender reads the blocker-resistance made by the player who is holding a hand shield and rips through the block. He then shuffles though the cones in the direction of the block, slides toward the opposite direction and then jumps over the rectangle bag.
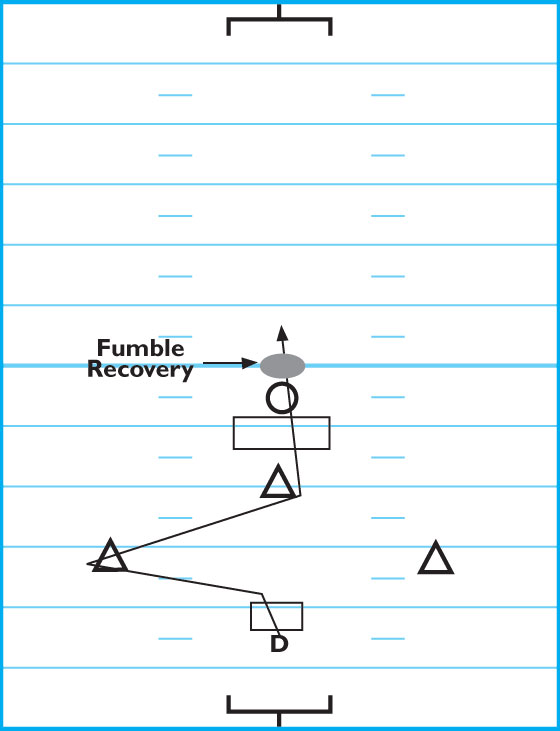
The defender then uses a 2-hand punch to defeat a medicine ball cut block thrown at his mid-leg area, scoops up the loose ball and scores through the cones.
Block Attack, Pass-Rush Circuit
DIAGRAM 13: Speed Rush And Read. Two or three defenders align by using a play-strip to ensure the correct alignment. Set up cones to designate the attack points for an inside run, outside run, drop-back, sprint-out and back flare. The coach (who simulates a BC) carries a ball to one of the attack points. The defender must take off, escape the play-strip dummy with low pads and read on the run while keeping his hips parallel to the line of scrimmage. The drill is finished when the defender fits on the QB or BC.
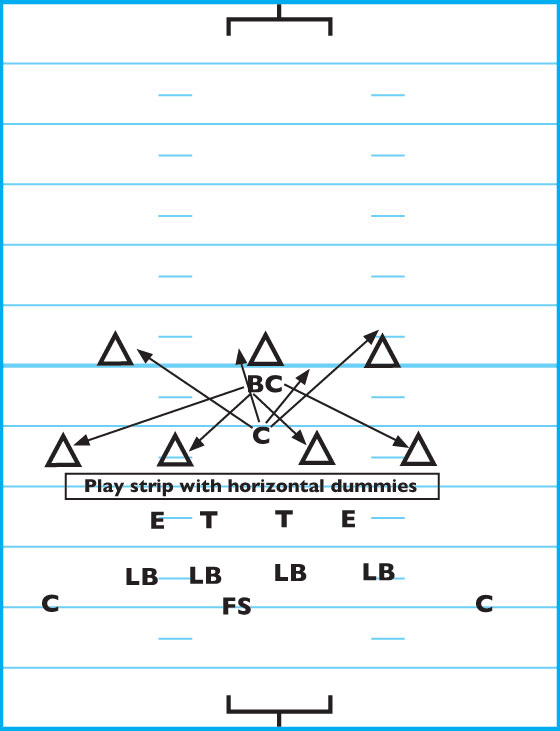
DIAGRAM 14: Punch, Rip And Clear. The defender aligns opposite the blocker who is holding a hand shield. He then executes a 3-point punch (face and hands), positions himself lower than than the blocker (by using good hip movement to open) and uses a pull-and-rip maneuver (the movement used must be “same-hand, same-foot”). If clubbing with the right hand, for example, the defender must step with the right foot while opening his hips. The defender then rips with the left arm while stepping with the left foot. The BC moves in the direction of the block after the defender releases.
The drill is finished when then defender fits on the BC.
DIAGRAM 15: Piano Slalom. Players align about a yard apart on opposite sides of the bags. The defender reads the coach or player who steps in either direction and shuffles the length of the rectangle pad with his hands on pad (“playing the piano”) to maintain a low-pad level and proper knee bend. He rips past the blockers who are holding hand shields and changes direction quickly.
As the tackler approaches, the BC goes in either direction and the tackler executes a solid form tackle.
DIAGRAM 16: Three Rips. The defender aligns one yard opposite blocker No. 1 (B1). Three blockers in succession attempt to hook or reach block the defender, who uses a rip move to evade blockers. The defender must keep his outside arm and leg free. The drill finishes with the defender scooping up the ball and scoring through cones.
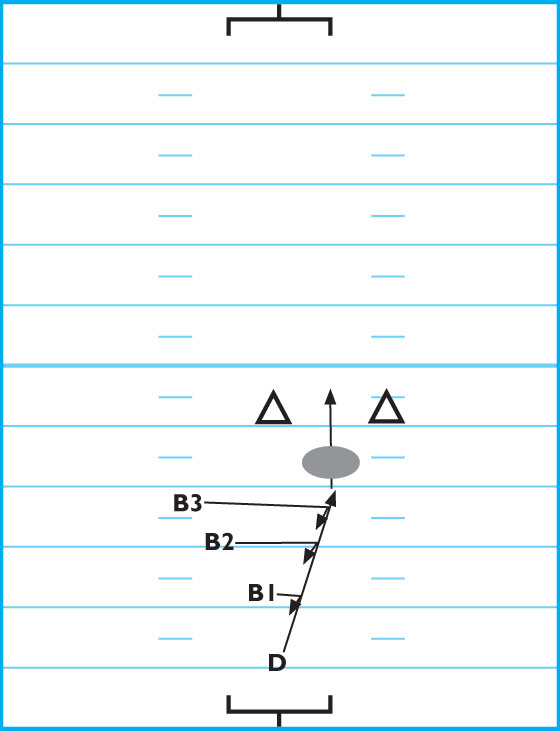
DIAGRAM 17: Block Read. The defender aligns immediately opposite of blocker No. 1 (B1). The three blockers in succession attempt to block the defender — B1 uses a hook or reach block, while B2 and B3 use their choice of hook or cut blocks. The defender must keep his outside arm and leg free, using a rip move against hook blocks and a two-hand punch vs. cut blocks.
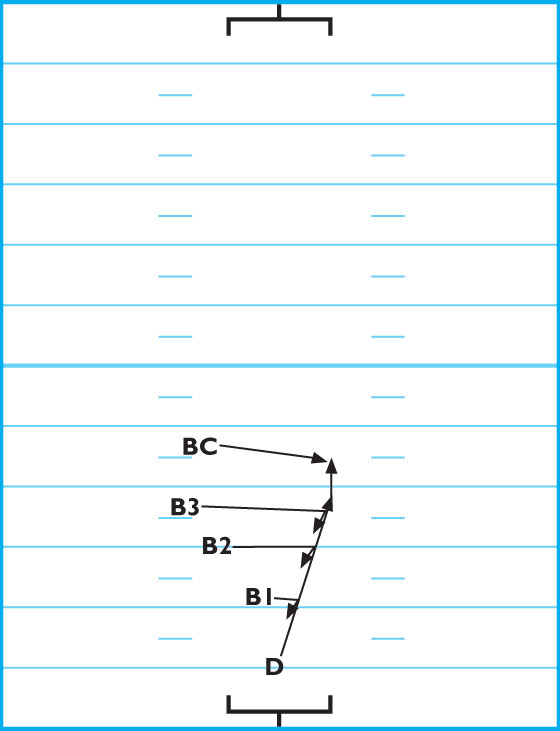
The drill finishes when the defender makes an angle tackle on the BC.
Circuit Benefits
The defensive circuit allows you to teach fundamental concepts to players so that when you decide to use a particular front, blitz or coverage scheme, the fundamentals for the scheme have already been taught; then all you need to do is to teach the assignment.
The benefits of the defensive circuit are two-fold. First and most importantly, it gives each coach an opportunity to interact with each player on the team. Secondly, it allows each coach to teach to his expertise.
For questions or more information, Scott Cramer can be reached at: scramer67@sbcglobal.net.