THERE’S NO BIGGER PLAY in a football game than the punt. If you can’t punt, you can’t win — it’s that simple.
We’ve had the most success in the punting game when we keep things simple for our players. They have basic, man-to-man assignments, so if things do break down, we know who needs to understand his role better or who needs to be reassigned off the punt team.
One of the hardest parts of coaching the punt team is to drill your players into learning that once the ball is kicked, they must make the switch from offensive player to defender.
Objectives Of Punting
We only use defensive players on our punt team so we don’t have to waste time training offensive players how to tackle and strip the ball.
There are six guidelines your team should follow to win the punting battle during every game.
1. Flawless Protection. You can’t allow any blocked kicks. As long as your blockers follow their assignments, it doesn’t matter what kind of front the defense throws at you.
2. Great Coverage. Contain the punt returner and don’t let him get more than 5 yards on any return.
3. Win Field Position Battle. When you are backed up in the shadow of your goal post, try to get the ball past midfield. If you’re punting from midfield, have a punt coverage goal of pinning the opposition inside their 10-yard line.
4. Average Big Yards. Your team goal should be to have a net average of 35 yards per punt.
5. Be Aggressive. Aggressive play leads to turnovers. Recover all muffed punts. Gang tackle the returner with the second converging tackler trying to strip the ball.
6. Pressure The Defense. Make the defense defend the play. Use different formations and motion. Throw a fake into the mix once in awhile to keep the defense honest. Sometimes, if the defense sees you in a different set, they may be forced to take a timeout, which could prove costly later in the game.
Basic Punt Formation
To make it easy on our punt-team players, we use man-to-man principles when kicking the ball away. If something goes wrong, we know who is to blame.
DIAGRAM 1: Punt Formation.
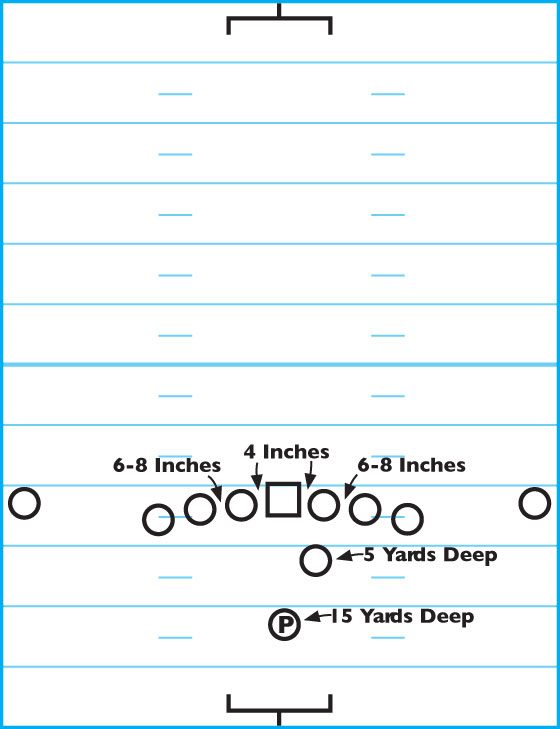
O Center. The center is the first one to break the huddle and get to the ball. Everyone else is going to set their position off the center, so it’s imperative that he hurries to the line of scrimmage (LOS), puts his hands on the ball and sets his feet. Upon snapping the ball, he’s going to shift to the left or the right (depending on whether the defense is balanced or overloaded) to pick up his block.
O Guards. The guards line up in 4-inch splits from the center. Using the center’s heel as a guide, the guards line up their toes on the same line as the center’s heel. Being just 4 inches away from the center allows the guards to protect the center while blocking their assigned opponent. It’s going to be tougher for your center to snap the ball and pick up his block right away, which is why you need the guards in close for help protection.
O Tackles. The tackles line up in 6- to 8-inch splits from the guards. You don’t want their shoulder pads to touch. They are a little wider than the guard-center relationship because the tackles should try to force their blocks to the outside. The longer it takes that defender to get to the punter, the better chance your punter has to get the ball away in time.
Tackles position their toes on the same line as the guards. You want your blockers as far back as possible. But, you must remind your linemen of the rule that states your guards and tackles helmets must break the plane of the center’s waist. Referees rarely call this penalty, so keep your linemen close enough to the line without getting caught.
O Wings. The wing puts his inside foot directly behind the tackle’s outside foot. Instead of designating a number-specific split, tell your wings to be an arm’s length from the tackle The wing should be able to reach out and touch the tackle’s hip.
O Fullback (Personal Protector). Standing 5 yards behind the LOS, the fullback stands in the A-gap on either side of the ball. It’s imperative to teach this player not to get in the way of the snap. If the snap hits him, it’s a fumble and a live ball.
To confuse the defense, switch your fullback from one side to the other from time to time. It gives the defense a different look to deal with while your squad’s responsibilities remain the same.
O Wideouts (Bullets). If the ball is in the middle of the field, the wideouts line up at the top of the sideline numbers. If the ball is on one of the hash marks, the short-side wideout positions himself at the bottom of the sideline numbers while the far-side wideout lines up between the sideline numbers and the hash mark.
O Punter. The punter is positioned 15 yards deep. He should receive the snap in 0.8 seconds and boot the ball in 1.3 seconds giving the blockers a total of 2.1 seconds to hold their block before they need to release down field.
Balanced Punt Protection
When the defense lines up in a balanced set on the LOS, your blocking schemes are not complicated. First and foremost, tell your linemen to keep 60 to 70 percent of their weight on their front foot (inside foot). When the ball is snapped, the linemen’s weight shifts to the back foot so each player has a steady base.
DIAGRAM 2: Balanced Punt Protection. Drill your players to get off the snap quickly and execute a kick-slide, kick-slide blocking scheme while keeping their hands up to force their assignment to the outside. The following are their individual responsibilities.
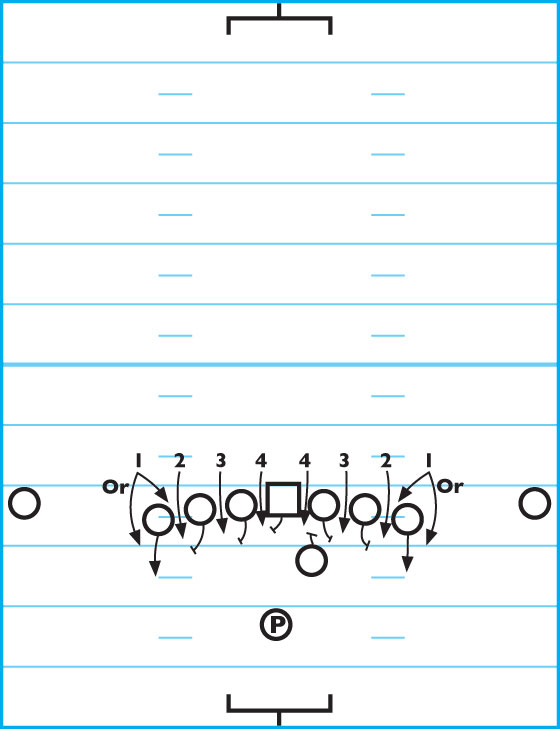
O Center. Snaps the ball, shifts to his left and blocks the 4 to his left.
O Guards. Each is responsible for blocking the 3 to the outside, holding the block for 2.1 seconds and releasing.
O Tackles. Same as the guards, only the tackles are responsible for blocking the 2 to the outside.
O Wings. Drop straight back a few steps to shadow the outside rusher (1). It’s critical that they drop back in a straight line and not expand outside their cylinder.
O Fullback. Steps up to block the 4 on the right side of the line.
O Wideouts. Try to get downfield as fast as possible to make a tackle on the return man. If the opposition’s wideout goes after the punter, let him because he won’t get there in 2 seconds.
Overload Punt Protection
If the defense tries to confuse you with an overload look, don’t worry about it. Your players’ responsibilities remain the same as the balanced look. And, if the defense does something crazy like lining up with six or seven on one side and just two or one players on the other — fake the punt and run the ball at the weak side. If you get a first down, the opposition won’t be as brave to run the heavy overload the next time.
DIAGRAM 3: Overload Punt Protection. In a typical 5-3 overload situation, your players have the following responsibilities (the example shows an overload to the right, just reverse it for a left overload).
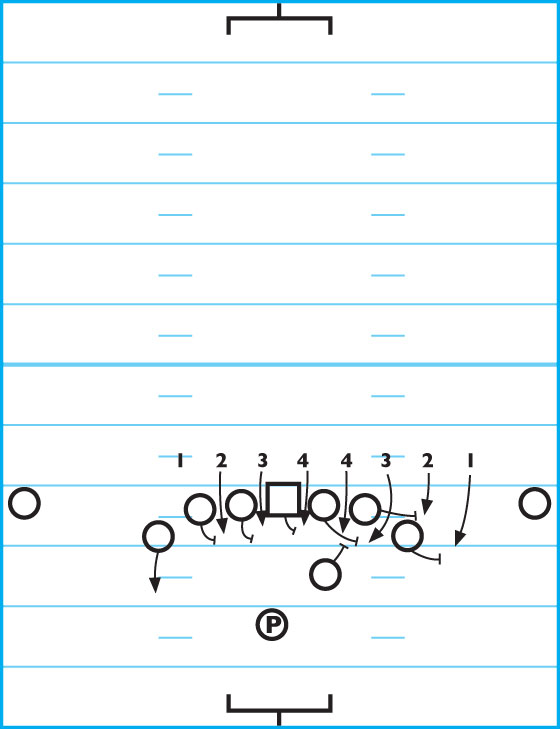
O Center. He’s still responsible for the fourth player on the line but in this instance, the 4 is to the right of him. He snaps the ball, shifts to the right and makes the block to the outside.
O Left Guard. If the 3 comes inside, he kick-slides and blocks him back to the outside. If the 3 goes to the outside, then his progression is the same as in the balanced set.
O Left Tackle. The same holds true for the left tackle. His responsibility is still to force the 2 to the outside.
O Left Wing. The same principle holds true for the wing as he tries to keep the 1 to the outside.
O Right Guard. Kick-slides to his right to pick up the 3. Remind him, and the rest of your linemen, that they don’t have to actively go get their assigned player. The opposition will come to them.
O Right Tackle. Kick-slides to his right to pick up the 2.
O Right Wing. Keeps the 1 to the outside so he can’t get to the punter in the allotted 2 seconds.
O Fullback. Steps up to block the same 4 as in the balanced set.