THE OPTION PUNT has been one of our most successful “trick” plays and it’s easy to install into any squad’s special teams.
The Option Punt uses motion and reading the defensive keys to move the chains (and possibly score) with relative ease.
We like to use the Option Punt late in the first half. This is a time when the other team’s coaches are starting to get ready for halftime, so it catches them off-guard. Plus, it makes them think about something else they need to defend in the coming half (when, from our point of view, there is no chance we would use it again).
Just be sure to have a punter who has the ability to run, as he needs to get to the outside to sell the speed option part of the the first play from the Option Punt.
DIAGRAM 1: Option Punt (A). Before any movement happens, the call for the Option Punt must be made from the sideline. I yell “Reno!” to signal we are set to “gamble” on this play instead of simply punting.
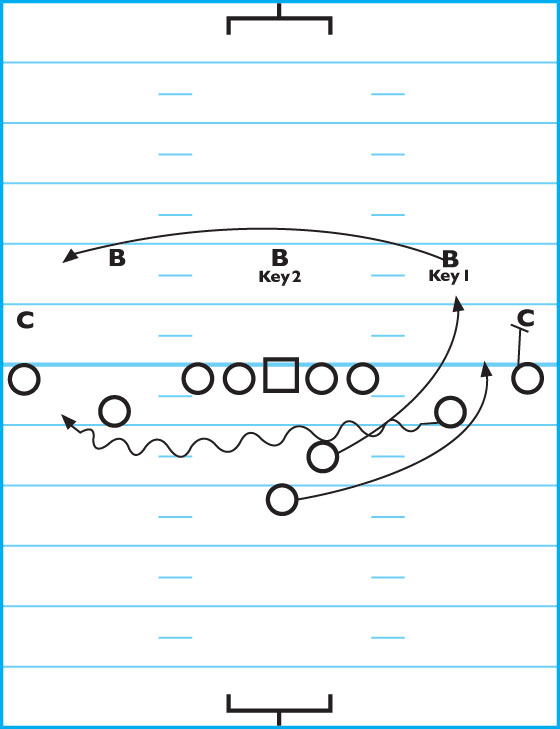
The Option Punt’s first possible play is to run the speed option to the short side.
To accomplish this, have your quarterback lined up in front of the punter shaded to his right. Send your slot receiver in motion from right to left. The QB must watch the defense’s Key No. 1, who is the linebacker lined up across from the slot WR. If Key No. 1 follows the WR across in motion, run the speed option.
After the slot WR crosses to the left, the ball is snapped to the QB, who runs to the space vacated by the Key No. 1. The punter must sprint to the outside so the QB has a pitch option if necessary. The WR on the short side blocks and seals his man.
The first goal of the play is to get a first down. Players must know where the sticks are. After a first down is secured, then players think about scoring.
DIAGRAM 2: Option Punt (B). If the slot WR is not followed in motion, then the play changes from a speed option to the short side to a hot pass to the WR in motion to the right.
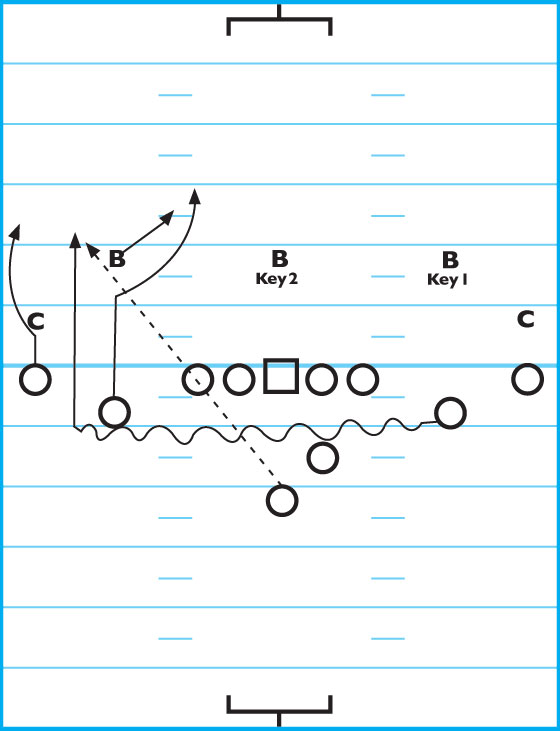
In this instance, no one is covering the motion WR. So, the left-side far WR runs a pattern to the outside. The slot WR on the left runs toward the LB, then breaks to the middle, opening a vacated area for the motion WR.
The QB receives the snap and fires to the hot WR for a first down, then the WR looks to score. Once again, getting the first down is key.
DIAGRAM 3: Option Punt (C). If Key No. 1 doesn’t follow the motion WR across the field but the middle LB (Key No. 2) does follow the motion WR, the play is a run trap with the QB slipping through the middle of the defense.
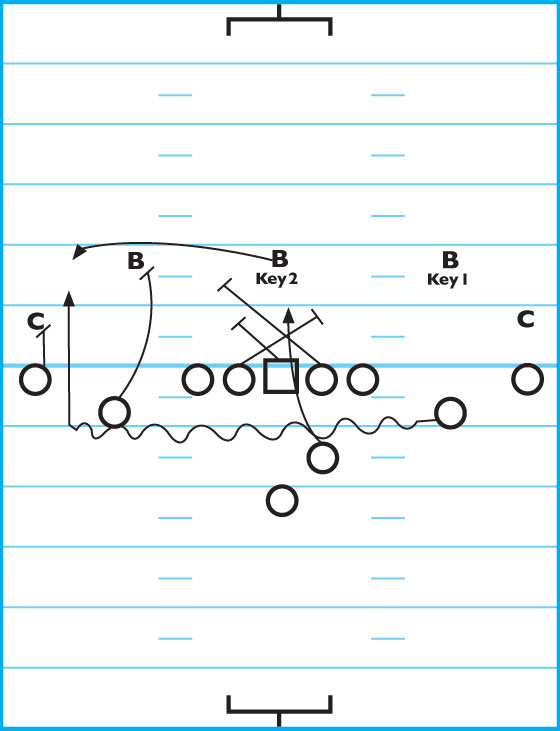
In this instance, the MLB follows the WR to the left side of the field. The left-side offensive guard blocks across the line for his part of the trap blocking. The right-side OG crosses to block into the second level of defense. The center blocks to his left to seal the left interior side of the field for his part of the trap blocking.
With the MLB removed from the middle of the field, the snap goes directly to the QB, who has an opening up the middle of the defense. Just like in the first two options, the goal is to secure a first down, then think about going all the way for a touchdown. It’s critical to stress this point to your players at all times — get the first down first.
When the Option Punt play is on, your players always have an option to beat the defense. No matter what the defense does, it’s going to be incorrect. So, even when teams scout your squad and think they have an answer to your Option Punt, they don’t. Of course, if your QB decides he doesn’t like his options, he simply signals for the punt to go off as scheduled and no harm is done.
The Option Punt is easy to install into any team’s special-team plans. During two-a-days, especially those early three days without pads, is a great time to put this play into your system. We usually spend a good portion of our second practice of the year on the Option Punt, then it’s set for the season. From that point forward, we review it twice a week for 10 minutes at a time.