WIDE RECEIVERS are not a dime a dozen. You can’t pull a speedy kid from the practice squad (or even the track team) and expect that player fill the role of receiver on your team. Sure, the athlete can sprint but that doesn’t make him a receiver.
Becoming a receiver takes hours of time developing timing with the quarterback, learning how to catch the ball and understanding what to do once the ball is in possession.
The following drills are designed to turn players into receivers by working their feet, hands, reflexes and understanding of the role of a receiver on your team.
Coming out drill
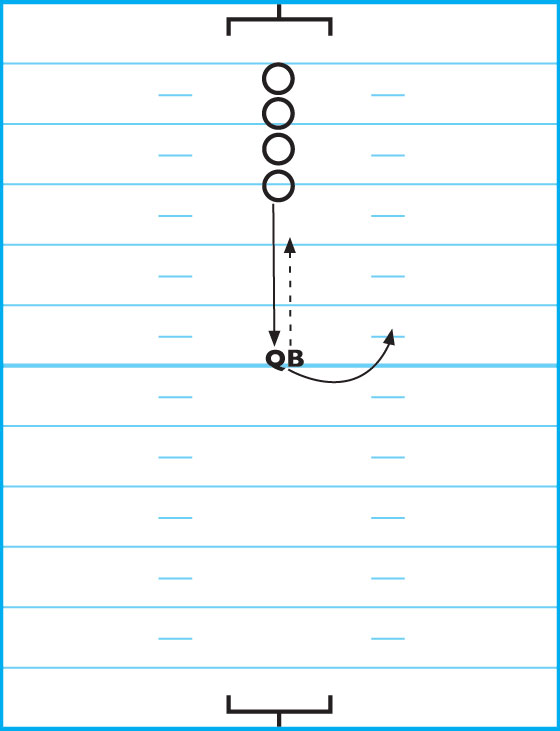
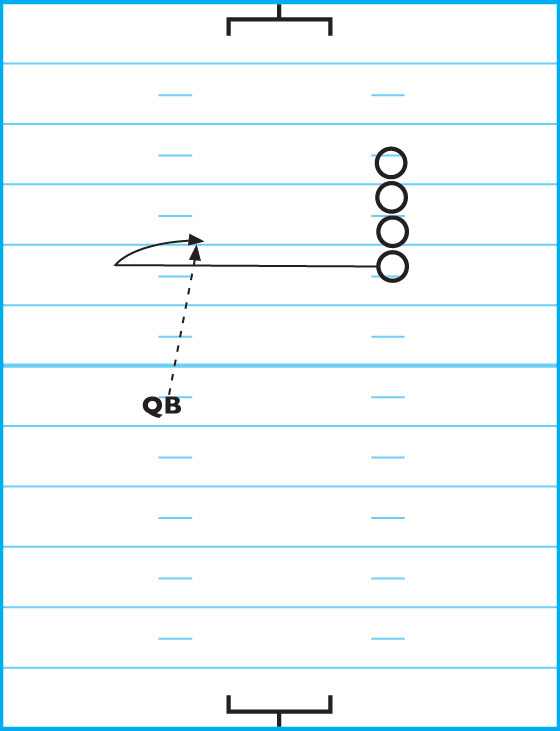
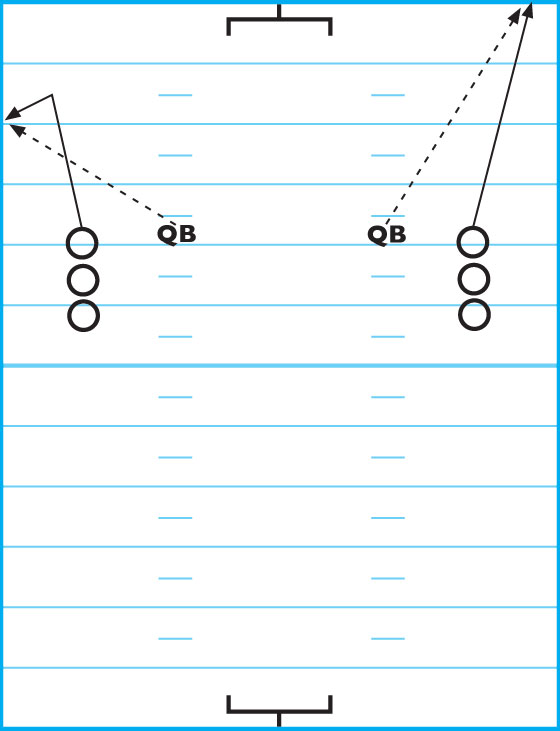
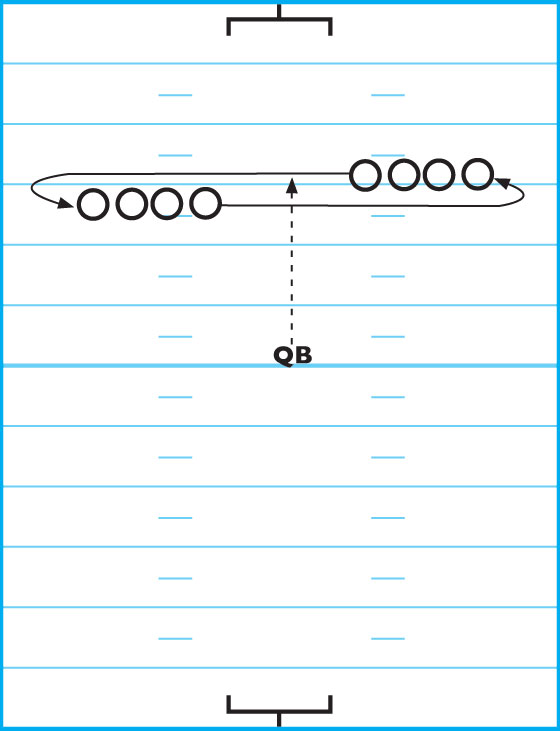
Receivers commonly don’t run through an entire route. When they see the ball coming their way, they instinctively stop to prepare to make the catch. The Coming Out Drill forces players to continue through their route while also teaching the correct hand position when catching the ball.
DIAGRAM 1: Coming Out Drill. Line the players in a single line facing the quarterback. When the coach raises his arm, the first WR runs toward the QB. The QB makes the pass as the WR runs all the way through to where the QB originally was standing (the QB has rolled out of the way). WRs must keep hands in proper catching position while on the run.
quick turn Drill
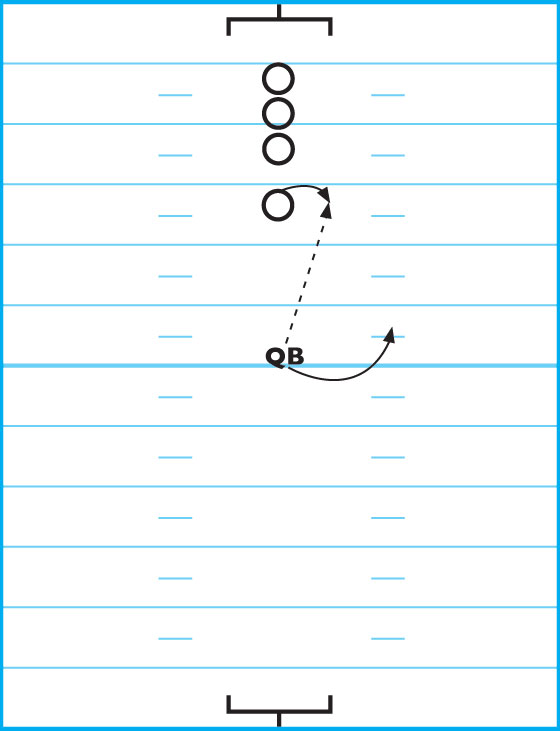
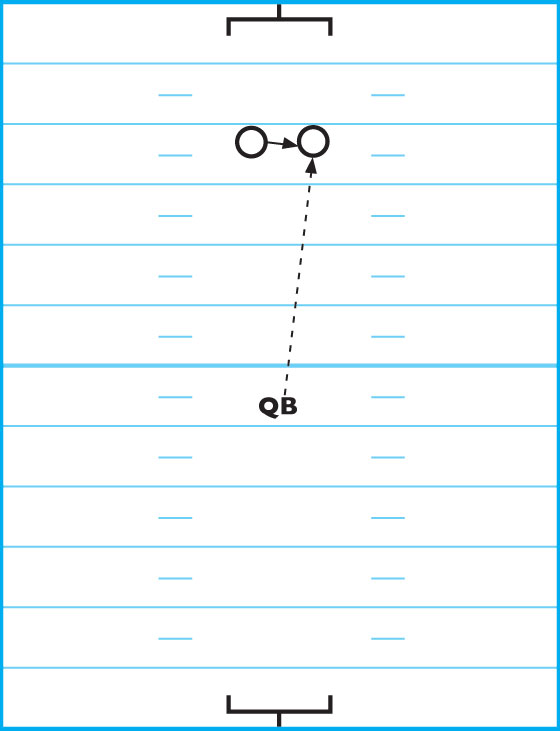
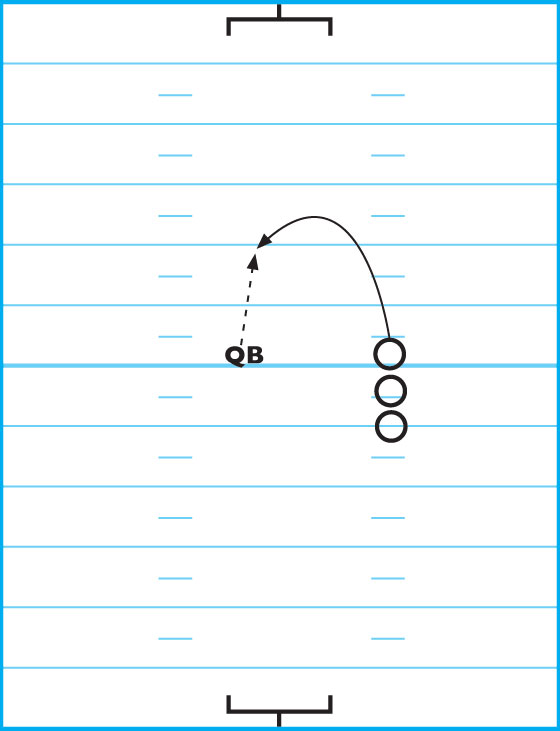
Eye contact on the ball is a critical skill to master for any WR. It’s more imperative when the WR is making a quick turn to catch the ball. Use the Quick Turn Drill to force players to use their eyes, as well as their hands, in a situation when they don’t have much time to adjust to the ball (much like in a game situation).
DIAGRAM 2: Quick Turn Drill. Line the WRs in a single line facing the QB. The first receiver steps out and turns his back to the QB. On the command (coach yells “Right!” or “Left!”), the QB throws to that side while the WR turns to that side with his head first, then makes the catch. Have the WR run the ball back to the QB. Add in a non-aggressive defender in front of the WR to make the catch more difficult.
one (two) hand(s) Drill
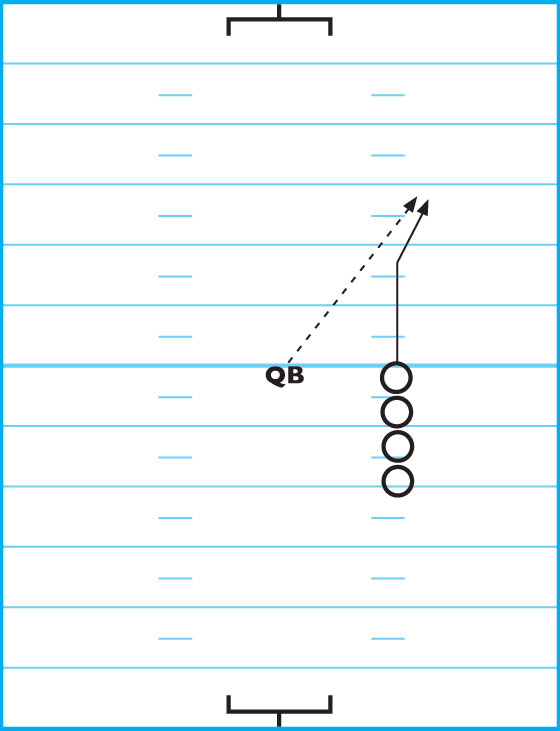
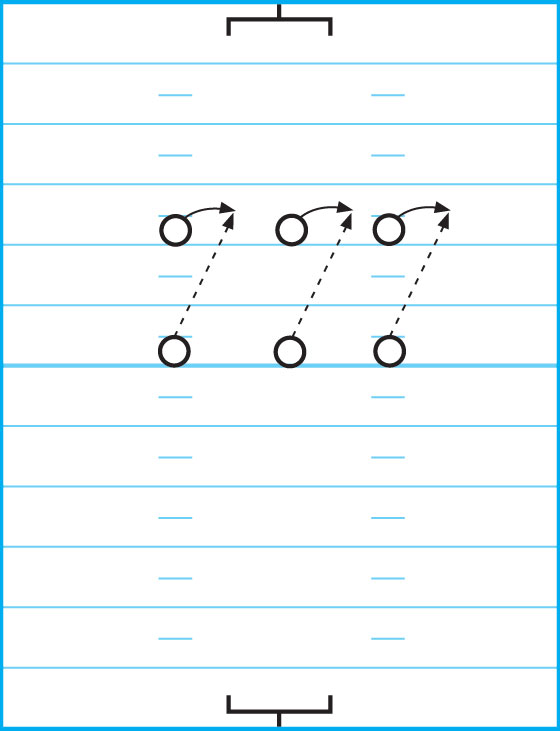
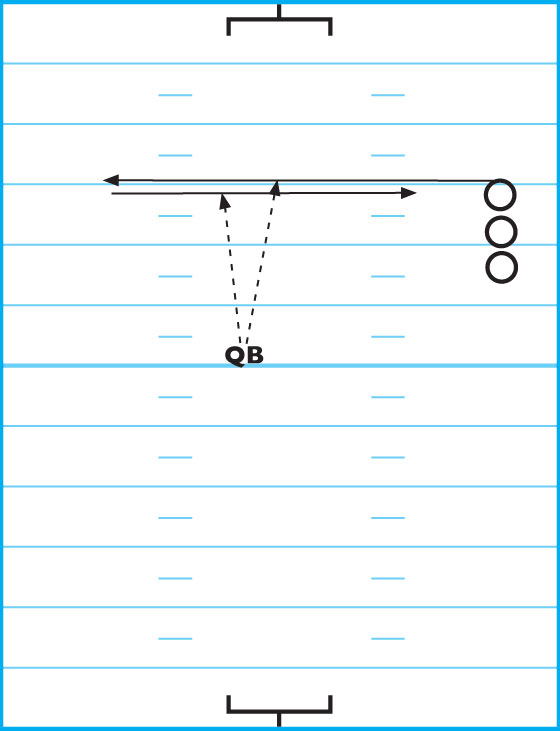
WRs need to develop concentration when catching the ball with one hand or with two hands. Plus, this drill also works on WRs bringing the ball into their bodies after making a catch with one hand or two hands.
DIAGRAM 3: One (Two) Hand(s) Drill. Line the players in a single line on the same side of the field as the QB. The QB and first WR should be parallel to one another. When the coach yells “Go!” the WR comes out of his stance and starts running downfield. The QB throws the ball at 8 yards and the WR watches the ball leave the QB’s hands, then looks it into his outside hand.
pass over wrong shoulder drill
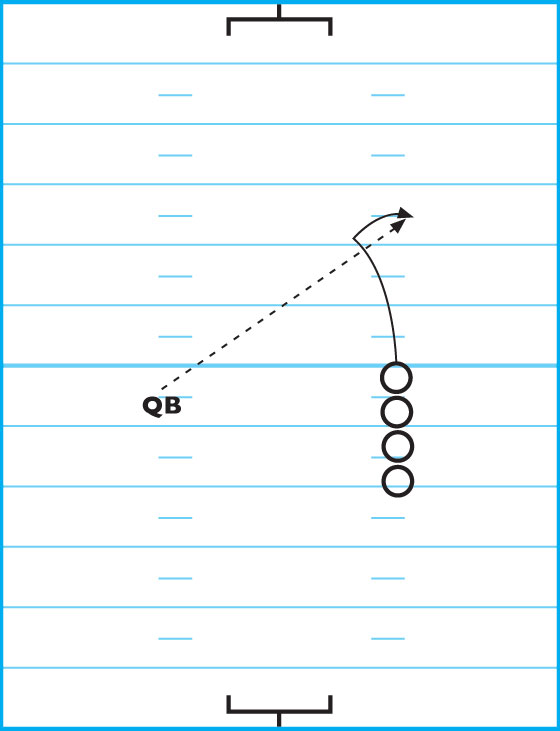
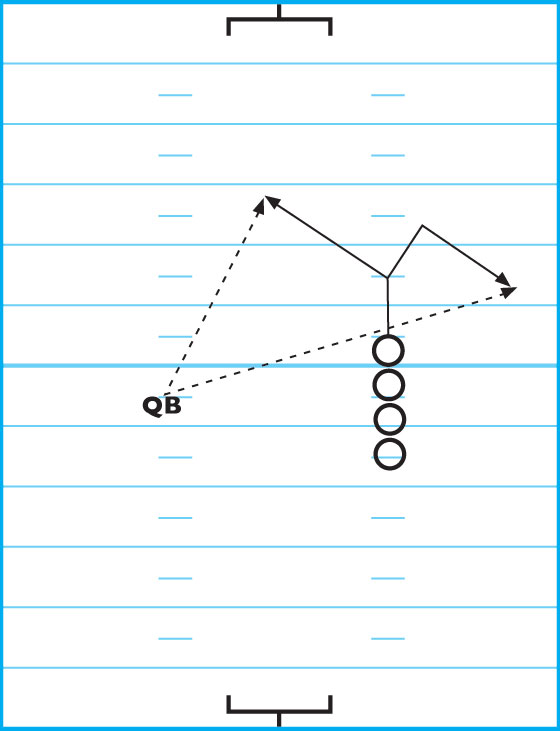
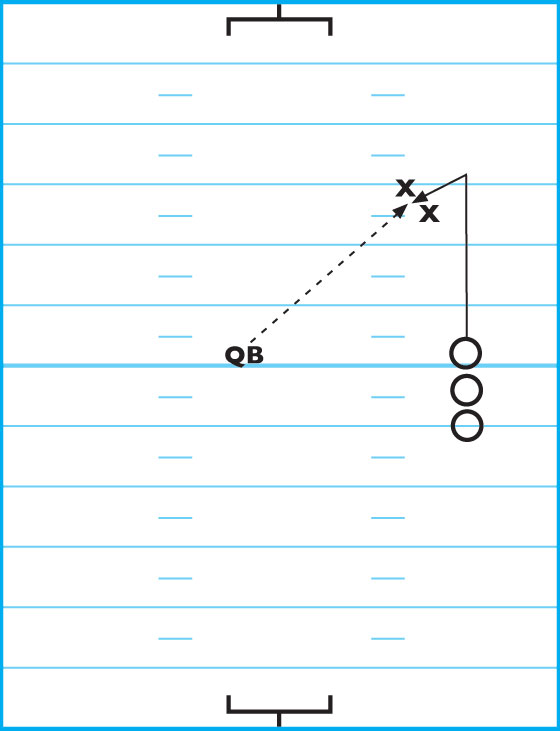
As great as your QB is, he’s not always going to make the perfect throw. WRs need to adjust on the fly. The Pass Over Wrong Shoulder Drill teaches them to find the ball in the air, look over their inside shoulder, then change to looking over their outside shoulder.
DIAGRAM 4: Pass Over Wrong Shoulder Drill. Line the players in a single line again on the same side of the field as the QB. The QB is standing diagonally behind the line of WRs. On the coach’s command of “Go!” the WR comes out of his stance and begins running downfield. The QB throws the ball over the WR’s outside shoulder. The WR starts looking for the ball over his inside shoulder, then must look for it over his outside shoulder. The WR must turn his head and body in order to catch the ball.
high behind drill
Just like the Pass Over Wrong Shoulder Drill, the High Behind Drill teaches WRs to adjust and make difficult catches on balls thrown not directly to them. In particular, the High Behind Drill teaches the WR to stop and turn his body as soon as he sees the ball being thrown behind him. This works on improving his reaction time, footwork and hands.
DIAGRAM 5: High Behind Drill. Line the WRs in a single line about 10 yards downfield. The QB is almost directly behind them downfield. The WR jogs and looks back over his shoulder at the QB. The QB then fires the ball really high to the opposite shoulder from where the WR is looking. Without losing sight of the ball, the WR turns and leads in the direction opposite to where his momentum is taking him and make the catch.
High (Look In, Look Out) Drill
Hand-eye coordination is critical to a WR’s success. While it is stressed in several of the other drills already discussed, the High (Look In, Look Out) Drill puts an emphasis on the particular skill. This drill emphasizes watching the ball into the hands and putting it away quickly and tightly. The WR uses his natural style of catching a high pass (either thumbs in or thumbs out). The drill also makes the WR turn his head quickly.
DIAGRAM 6: High (Look In, Look Out) Drill. Have the WRs line up 5 yards ahead of the QB. On the coach’s command of “Go!” the first WR plants his foot and turns to catch the high pass. Run this drill to the inside and the outside to test WRs’ hand-eye coordination going in both directions.
Concentration drill
Fighting for the ball downfield sometimes is the difference between winning and losing a game. Completing a big play down the field sets you up for a possible score while deflating the defense. Don’t underestimate working on the skill of having your WRs fight for a pass that is up for grabs. Concentration is key, which is why this drill is called the Concentration Drill.
DIAGRAM 7: Concentration Drill. Pair the WRs with one another and have them get 20-25 yards away from the QB. Designate one player as the offensive WR and the other as the defensive back. The role of the defender is to harass and make sure the WR doesn’t make the catch. Have the QB arc the ball high in the air in the direction of the two players. As the ball is in the air, the defender harasses the WR by jarring him, slapping him on the helmet or any other way of distracting him. The WR must concentrate through all of this to go up and try to catch the ball at its highest point.
laying out drill
Catching a ball in stride isn’t always going to happen. WRs must practice laying out for passes. The more they get used to sacrificing their bodies for the ball, the better they’ll be at catching tough throws in a game. The Laying Out Drill is perfect for getting players used to diving for balls out of their reach.
DIAGRAM 8: Laying Out Drill. Pair the WRs with each other. Have them get about 10 yards apart on their knees (no QB needed for this drill as the WRs throw to one another so both get plenty of chances to lay out for passes). The object for the throwing WR is to get the ball just out of the reach of the catching WR in order to make him lay out and catch it. Do this with the catching WR looking over his left shoulder, then his right shoulder.
harassment drill
Much like the Concentration Drill, the Harassment Drill teaches WRs to focus solely on the ball and not on a harassing defender. Getting hit or bumped while the ball is in the air shouldn’t affect your WRs.
DIAGRAM 9: Harassment Drill. Put the players in two lines, both facing the QB and parallel to the line of scrimmage. The player closest to the QB is the defender. The defender lets the offensive player get 1 yard in front of him as they get ready to run to their right. On the coach’s command of “Go!” both players take off. The defender harasses the WR while running down the line. The defender tries to block the WR’s view of the ball and bumps him if he has the opportunity.

Toe dance drill
A WR who has the greatest hands in the world but terrible footwork does you no good. Being able to get one foot down in-bound is a skill that takes time to master. WRs must have a sense of where they are on the field. The Toe Dance Drill works your WRs in catching the ball close to the sideline and close to the endzone line.
DIAGRAM 10: Toe Dance Drill. Line the players in a single line about 4-5 yards from each sideline and 15-20 yards downfield away from the QB. Have a QB stand at each hash mark on the field. On the coach’s command of “Go!” the WR breaks downfield and either runs to the sideline or to the endzone line (have one side go to the sideline and the other to the endzone so you don’t have players always choosing one way or another). WRs must catch the ball as they are leaning over the sideline (or endzone line) while keeping their feet in the field of play.
Scoop drill
Balls that are thrown just in front of a WR are some of the hardest to catch. WRs need to put their hands, wrist and forearms in front of the ball to secure it. Otherwise, the ball touches the ground and the pass is incomplete. The Scoop Drill works on the skill of getting low for a pass.
DIAGRAM 11: Scoop Drill. The WR runs a hook or out route. The QB drills the ball just off the ground only inches high just in front of the WR. The WR must get low to catch the ball by closing the elbows so the ball rebounds into the WR’s stomach or chest.
behind drill
Catching a ball thrown behind a moving WR is yet another difficult task. Stopping momentum and reacting in an instant are critical keys to securing a pass thrown behind a WR. The Behind Drill is run on a line to simulate a WR running a square, curl or out route.
DIAGRAM 12: Behind Drill. The WRs line up parallel to the QB with the front of the line 5-10 yards in front of the QB. The first WR jogs slowly back and forth in front of the QB. The QB throws the ball behind the WR at varying heights and distances. The WR must use both hands and his body to catch the ball.
gauntlet drill
The Gauntlet Drill forces the WR to catch the ball while knowing he is going to get hit.
DIAGRAM 13: Gauntlet Drill. Put two players about 15 yards downfield with hand shields in their hands. The WRs line up straight down from the players with the hand shields. The QB is placed in the middle of the field. On the coach’s command of “Go!” the first WR runs a curl route. When he plants to come back to the ball, he must run split the two players with hand shields. As the ball hits his hands, the hand shields hit the WR. The WR must concentrate and be tough to fight threw the “defenders” and catch the ball.
switch
crossing drill
Once again concentration is tested during the Switch Crossing Drill. This drill also forces the WR to watch the ball leave the QB’s hands and into his own hands.
DIAGRAM 14: Switch Crossing Drill. Divide the players into two lines, 15 yards apart and facing one another. Designate one line to be the receivers and the other line to be the distractors. The receivers runs a couple of yards behind the distractors. The QB is 15 yards away from both lines. On the coach’s command of “Go!” the first receiver and the first distractor run toward the middle of the field. When the two players are about to meet in the middle of the field, the QB throws the ball to the receiver. The distractor does what his name indicates — he acts as a distraction as he shields the receiver from seeing the ball all the way from the QB and into his own hands.
These 14 drills are easy to institute into any practice and immediately teach your WRs the skills they need to excel in your team’s passing attack. Stress good hands, hand-eye coordination, proper footwork and solid concentration. After awhile, WRs may start doing some of these drills on their own. Soon enough your WRs will be catching passes you never thought possible and you’ll be moving the chains at a faster rate.