This zone blitz scheme adds additional pressure to the offense but still remains solid with secondary coverage.
Traditionally, we have always been a multiple defensive system that morphs with the changes and tendencies of an opponent’s offense. Though I have transitioned from an odd (3-4, 5-2, and 5-3) or an even (4-3, 4-4) as a base core defense over the years, one thing remains the same – my defensive philosophy. That is, to attack my opponent’s offense, give multiple defensive looks, give multiple coverage looks, produce turnovers, and gamble on my opponent’s tendencies and make them do what they do not want to do. The game is one big chess match between the offense and defense and, as a defense, you may have to look ahead three moves!
With the rise of spread offenses and the change of personnel at my school, I have personally adapted the 3-4 as my base defense. Unfortunately, through the years, my kids have gotten smaller, quicker, and more agile and the huge defensive linemen have gone away. Since I have limited defensive linemen, I would rather use their speed and agility to match the openness of spread offenses with linebackers and defensive backs. So rather than fit a square peg in a round hole, we are going to put a round peg into a round hole!
Though this may give us a slight disadvantage against power formations/running teams, I use a bunch of movement and quickness to counter my opponent’s size advantage on the line of scrimmage. I also like to see how the nose guard disrupts the center – QB snap exchange on this level. I have seen teams like the Pittsburgh Steelers, New England Patriots, college teams like Alabama, and high school teams like Briar Woods High School (VA), and Geneseo High School (IL) flourish and win championships using this defensive system.
This clinic includes my four favorite fire zone blitzes. A fire zone blitz usually has a couple of common components: you are rushing five defenders, covering behind the blitz with a traditional 3-high and 3-under zone coverage, and may include the drop into a zone or spy against a screen with the weakside defensive rusher added as well. The main philosophy of the fire zone blitz scheme is to bring pressure and attack the offense without giving an “all chips in” gamble with man-on-man coverage behind the blitz.
In my defensive system there are a bunch of tags and calls to change up different blitzes. Rather than having 20 different named blitzes, I have 10 core blitzes with different tags. I included the weakside defensive end always going inside the outside defender for the four diagrams shown. That does not mean that I’m giving up the weak side edge every time I run a fire zone blitz. I will tag this attack based on QB personnel, down and distance, tendencies, and game circumstances.
So, for example, when I have the backside defender drawn up going inside, it may be on a non-traditional pass down, maybe with a QB who has limited mobility, or in a case-by-case scenario based off of tendencies. We can tag him to rush inside, rush outside, or drop into coverage depending on the game situation. The inside linebacker must be very mobile and be able to play from sideline to sideline and cover most of the field. Technically, the drop linebacker will be covered up and will get to flow with the play. Though there are some “bubbles” in the defensive secondary to exploit, the overall goal of the blitz is to get to the QB or disrupt the run blocking schemes quick enough and not give up the big play.
The first fire zone blitz is called “Gorilla”, and it is a fire zone coming from the strong side of the defense. The strongside OLB, known in our defense as the “Stud”, will be coming off the edge. The strongside defensive end will rush the inside gap, not running upfield beyond one yard from the LOS before breaking down and reading the play action. The strongside ILB, known in our defense as the “Sam”, will be blitzing the strongside A gap and read/react to play-action.
The nose guard will shoot the weakside A gap. I will tag the weakside rusher to shoot inside, rush outside, or drop/spy into coverage based off our research on our opponent (See Diagram 1). The strong safety rotates the coverage by occupying the curl to the flat zone to the strong side. The weakside OLB, known in our defense as the “Will”, will have the weakside curl to the flat zone. The free safety will rotate to the middle deep 1/3 zone. Both corners will bail to their 1/3 zones as well.

Diagram 1: Rip Gorilla - Cover 3 vs. 3-4
One of my favorite “tags” that I can call is “switch” where the blitzer switches gap responsibility with his nearest defender. So I can call “Gorilla Stud Switch-Cover 3” and the “Stud” will switch gap responsibilities with the strongside defensive end. The Stud would then go to the B gap after the defensive end who would loop outside to control outside the C gap.
The second fire zone blitz is called “Monkey”, a fire zone blitz coming from a combination of the strong side and weak side of the defense. The “Stud” will be coming off the edge. The strongside defensive end will rush the inside gap, not running upfield beyond one yard from the LOS before breaking down and reading the play-action. The weakside ILB, known in our defense as the “Mike”, will blitz the weakside A gap and our nose guard will shoot the strongside A gap. The weakside DE will be tagged with a rush call based off research (See Diagram 2).The defensive secondary will rotate to a 3-deep and 3-underneath zone coverage.
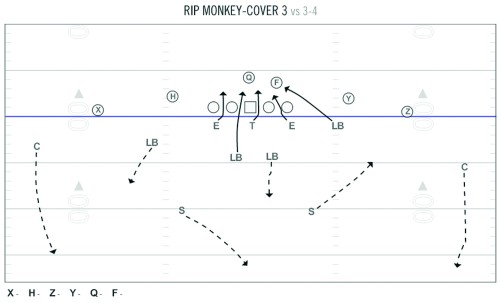
Diagram 2: Rip Monkey - Cover 3 vs. 3-4
The third fire zone blitz is called “Shark”, which is a combination of a weak side and strong side blitz very similar to the “Monkey” blitz. The Will comes off the edge and the weak side defensive end will rush the inside gap, not running upfield beyond one yard from the LOS before breaking down and reading the play-action.
The nose guard will shoot the weakside A gap and the Sam will blitz the strongside B gap. The strongside DE will get a tag call based off of research and tendencies. The Stud will rotate to curl-to-flat zone coverage. The free safety will rotate down to cover the weakside curl-to-flat zone. The strong safety will rotate and cover the deep middle 1/3 zone. Both corners will bail to their prospective deep 1/3 zones as well (See Diagram 3).
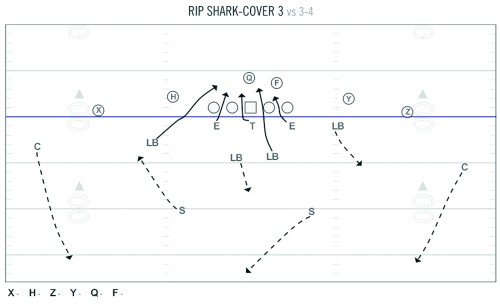
Diagram 3: Rip Shark - Cover 3 vs. 3-4
The last fire zone blitz is called “Scorpion”, which is a blitz coming from the weak side. The Will comes off the edge and the weakside defensive end will rush the inside gap, not running upfield beyond one yard from the LOS before breaking down and reading the play-action. The Mike will blitz the weakside “A-gap” and the nose guard will go strongside to the A gap. The strongside DE will be tagged accordingly. The free safety will rotate down to cover the weakside curl-to-flat zone. The strong safety will rotate and cover the deep middle 1/3 zone. Both corners will bail to their prospective deep 1/3 zones as well (See Diagram 4).
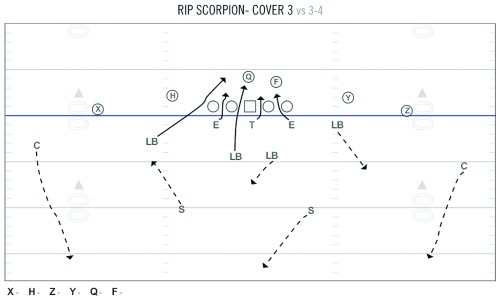
Diagram 4: Rip Scorpion - Cover 3 vs. 3-4
About the Author: Jared Van Acker is the head coach at Freedom (South Riding) High School, a 5A school located in Northern Virginia. He was the former head football coach at Grafton High School (VA). At the end of the 2010 season, he was named Coach of the Year for the Bay Rivers District. Van Acker also served as the head coach at Galax High School (VA) and was an assistant coach at William Campbell High School (VA) and Carthage High School (IL). A frequent contributor to American Football Monthly, Van Acker also has a DVD-series based on his offensive and special team schemes available at AFMvideos.com.