SPECIAL TEAMS ARE a vital part of the success of a football team. Did you realize that 1 out of every 5 plays in a game is some type of a “kick-related” play? These plays contribute to one of the most important statistics in football — field position.
Through special teams, a team can create momentum with a turnover, big return or even a score. Special teams plays are impact plays and create great excitement for the fans and players, but it takes a special breed of player to be involved on the special teams.
Special teams can change the outcome of a game, through field position and by taking advantage of every opportunity to score.
Punt Returns
The “Jet” and “Rocket” punt returns have been extremely successful for our teams over the years.
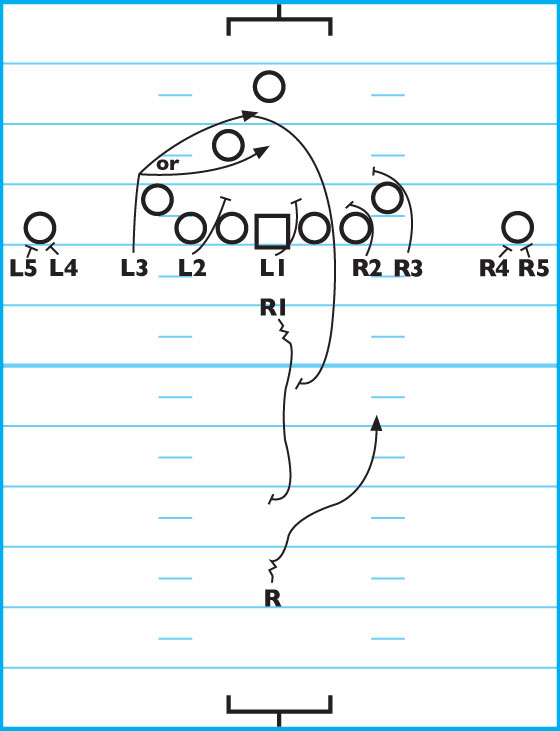
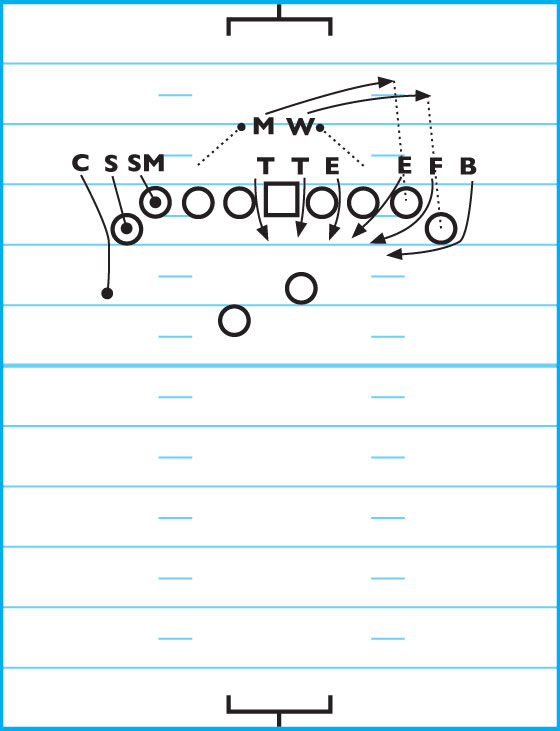
“Jet” Punt Return:
DIAGRAM 1: “Jet” Punt Return. The following descriptions detail the movements and player responsibilities for the Jet punt return. You can execute the Jet punt return from a variety of alignments and stems. The diagram illustrates our typical alignment.
L5 & R5: Uses inside-alignment rule on the gunner. Works with L4 and R4 to execute vice technique and take the gunner out of the play.
L4 & R4: Uses inside-alignment rule on the gunner. Works with L5 and R5 to execute vice technique and
takes the gunner out of the play.
L3: From a wide alignment, rushes the punter with speed. After attempting to block the punt, peels back through the middle and blocks the punt-cover man on his side from the inside-out.
R3: From a wide alignment, starts to rush the punter, spies any possible punt fake, turns and sprints to a spot 15 yards in front of the punt returner. Once at the spot, he whirls and blocks the nearest punt-cover man (probably the personal protector or the long snapper.
L2: Sets up in a 6-alignment on the offensive tackle. Drives straight up through the OT and executes inside crunch-shield technique. Plays with smart hands, keeps his feet busy and rushes with great effort.
R2: Sets up in 6-alignment on the OT. Drives straight up through the OT and executes inside crunch-shield technique. Uses smart hands, keeps his feet busy and rushes with great effort.
L1: Sets up in 0-alignment on the center. Drives up though the left offensive guard and executes inside crunch-shield technique. Plays with smart hands, keeps his feet busy and rushes with great effort.
R1: Sets up like a middle linebacker in the stack position behind L1. On the snap, he closes to the right OG and drives him back, executing inside crunch-shield technique. Plays with smart hands, keeps his feet busy and rushes with great effort.
Returner: Uses good judgment and focuses on making the catch. Runs straight ahead through daylight in the middle of the field. Looks to cut off R3’s block. Focus on ball security, fight for positive yardage and try to make the big play and score!
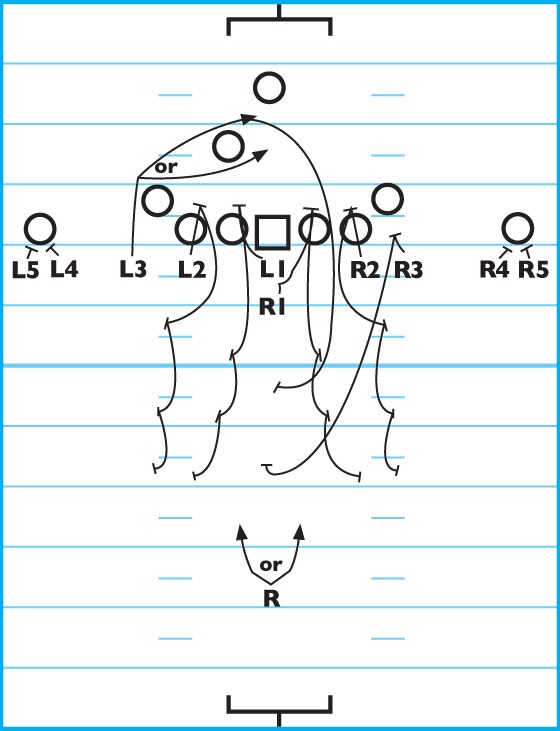
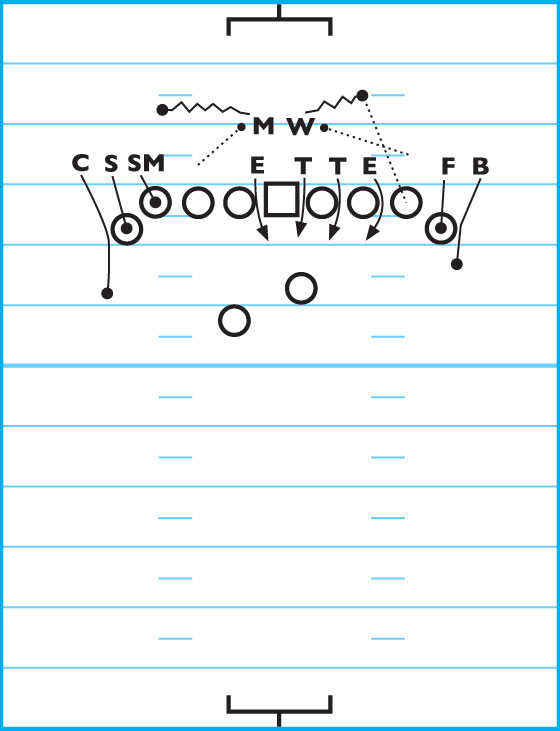
“Rocket” Punt Return:
DIAGRAM 2: “Rocket” Punt Return. As with the “Jet” return, you can execute the Rocket punt return from a variety of alignments and stems. The diagram illustrates our typical alignment.
L5 & R5: Uses inside-alignment rule on the gunner. Works with L4 and R4 to execute vice technique and takes the gunner out of the play.
L4 & R4: Uses inside-alignment rule on the gunner. Works with L5 and R5 to execute vice technique and takes the gunner out of the play.
L3: From a wide alignment, rushes the punter with speed. After attempting to block the punt, peels back through the middle and blocks the punt-cover man on his side from the inside-out.
R3: From a wide alignment, executes a speed rush toward the punter, driving up through the wing and executing outside crunch-shield technique. Plays with smart hands, keeps his feet busy and rushes with great effort.
L2: Sets up in a 6-alignment on the OT, slides to the inside and executes an inside shield technique on the
OG. Plays with smart hands, keeps his feet busy and rushes with great effort.
R2: Sets up in a 6-alignment on the OT and drives up through him toward the punter. Plays with smart hands, keeps his feet busy and rushes with great effort.
L1: Sets up in a 0-alignment on the center. Pushes the snapper backward and slides to the right OG, using outside crunch-shield technique. Plays with smart hands, keeps his feet busy and rushes with great effort.
R1: Sets up as the middle LB in a stack position with L1. On the snap, he gets depth and scans the punt team, looking for a fake. Turns and sprints to a position 15 yards in front of the returner. Once there, whirls around and blocks the punt-cover man away from the return side.
Returner: Uses good judgment and focuses on making the catch. Runs straight ahead through daylight in the seam between the hash mark and numbers. He should look for R1 to block the punt-cover man on that side to the inside of the field. Focus on ball security, fight for positive yardage and try to make the big play and score!
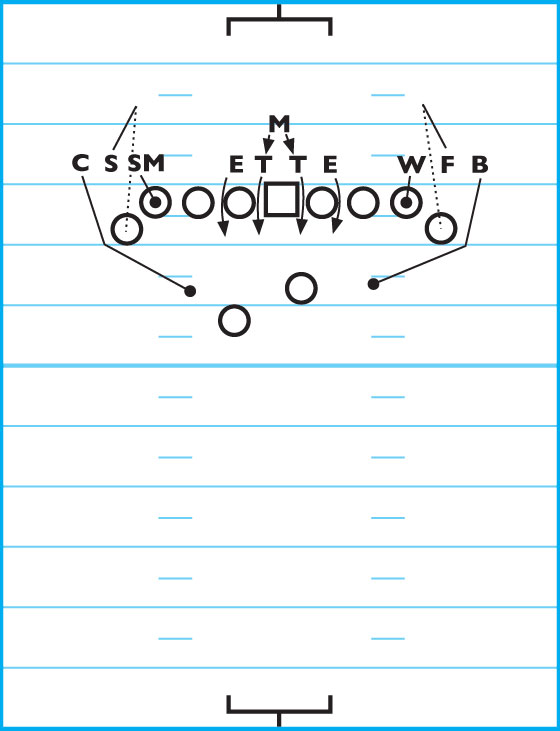
Field-Goal Blocks
The following diagrams illustrate several field-goal blocks that have been extremely effective for my teams.
DIAGRAM 3: Max Punt-Block Left.
Ends: The call-side end knocks a hole in the OT’s block. The opposite end stems and power rushes the
A-gap. Both players must keep their hands up!
Tackles: The inside OT penetrates the A-gap with push help from the Mike LB. The outside, call-side OT penetrates through the OG’s block with push help from the Will LB. Both players must keep their hands up!
Sam LB: Sets up in “disguise” position. Sets up in a 7-alignment on the call side. Crashes hard through the
TE-OT gap and tries to block the field goal attempt.
Will LB: Disguise away from the call side. Uses push technique through the call side OT.
Mike LB: Sets up in “disguise” position and uses push technique through the inside OT in the A-gap.
Call-Side CB: This player is the primary blocker and tries to block the kick coming hard from the edge.
Backside CB: Aggressively contains through the edge of the wing. Tries to scoop up the blocked kick and score!
Call-Side Safety: Called the “jumper,” this player penetrates the TE-wing gap and tries to block the FG attempt.
Backside Safety: Stays in position and watches out for fakes.
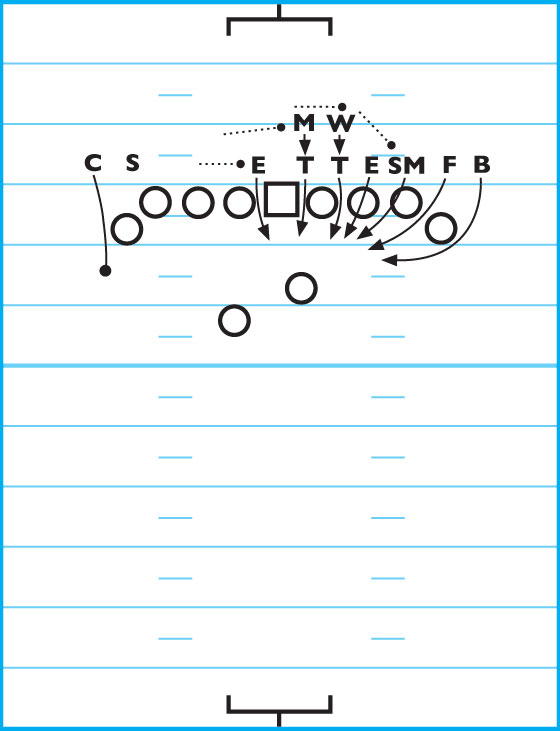
DIAGRAM 4: Edge Block Left.
Call-Side End: Moves out to a 7-alignment, crashes the TE-OT gap and tries to block the FG attempt.
Backside End: Flips to a 3-alignment, uses a quick swim move through the B-gap, gets his hands up and tries to block the FG attempt.
Tackles: Rush the A-gaps with their hands held high and try to block the FG attempt.
Will LB: Sets up in a stack position on the tackle to the call-side. Drops to the call side and covers the wing.
Mike LB: Sets up in a stack position on the tackle away from the call side, drops to the call side and covers the TE.
Sam LB: Sets up in a loose 9-alignment, clamps down on the TE and covers him tightly.
Call-Side Safety: Is the “jumper.” Penetrates the TE-wing gap and tried to block the FG attempt.
Backside Safety: Squeezes the wing and covers him.
Call-Side CB: Comes hard from the edge and tries to block the FG.
Backside CB: Aggressively contains through the edge and watches for any attempted fake.
DIAGRAM 5: Slip Block Left.
Ends: The call-side end knocks a hole in the OT’s block, while the opposite end power-rushes the A-gap. Both players keep their hands up!
Tackles: The inside tackle penetrates the A-gap, while the off-side tackle penetrates the B-gap. Both players must get their hips across the LOS and keep their hands up!
Sam LB: Sets up in a loose 9-alignment and covers the TE.
Will LB: Aligns as if he’s in push technique, then shuffles to cover the end man-to-man.
Mike LB: Aligns in push technique, shuffles and spies all fakes. This player is free to the ball!
Call-Side CB: Squeezes to the wing and contains him.
Backside CB: Squeezes to the wing and contains him.
Call-Side Safety (FS): Squeezes to the wing and contains him man-to-man.
Backside Safety (SS): Squeezes to the wing and contains him man-to-man.
DIAGRAM 6: 50 Block (Adjust). On this block attempt, the linemen charge hard with their hands held high, the safeties contain the wings , the Will and Sam LBs cover the TEs and the CBs both charge hard, aggressively containing the play and closing to the outside shoulder of the holder. The CBs try to scoop up any blocked FG attempt and score!