Why is it important to apply pressure to punt protection? If you are reading this article, it is very likely that you have experienced a “what if” moment at some point as a player or coach. During the course of a very meaningful game, your opponent might have failed to execute the snap and kick cleanly in a punting situation. Your opponent, as a result of little or no pressure, was able to execute a kick that created a positive change in field position for them and your team missed the opportunity to make a play that perhaps would have changed the outcome of the game.
Varying degrees of pressure and strategic application of pressure will go a long way toward preventing a “what if” moment. It is important to note that pressure does not have to involve committing every available player in an attempt to block the punt. Also, pressure will not prevent you from creating positive field position with a good return. By applying well-executed pressure, you will increase your chances of shortening the punt as well as delaying the release of any coverage player with protection responsibilities
The first step in applying pressure to any punt protection is to identify a group of effective punt blockers. Most effective punt blockers are also effective players at the position they play on offense or defense. These players are most likely starters at their offensive or defensive position and, therefore, are very valuable. Determining the value of each player in respect to the success or failure of the team on a weekly basis is very challenging. If you truly want to put your team in a position to win the punting game each week, you use the best available players at each position regardless of their place on the offensive or defensive depth chart. Not only will this philosophy result in the best possible productivity from your punt return unit, but it will also show your players that you are truly committed to winning this particular phase of each game. However, instances will occur when the potential risk is simply not worth the potential gain. In these instances, it is easy to make the decision to use a lesser player.
Selecting the best players for this particular unit begins with a simple test. Within the first couple of practices, each new player is evaluated to determine if he possesses the skills to block a punt. A simple means of assessing punt blocking skills is a drill we call “final phase punt block”. A single file line is formed at an angle 4-5 yards from the “block point” (See Diagram 1).
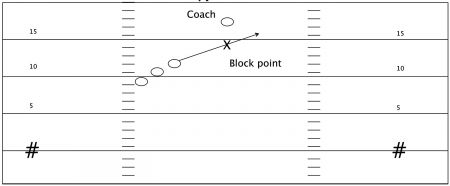
Diagram 1.
The “block point” is where the ball will leave the foot of the punter and will vary in distance from where the ball is spotted based on the punt formation, protection scheme, approach of the punter, etc. In order to give the players a visual aiming point on the field, we place a low-profile cone or rubber spot at the “block point”. A coach acts as the punter and starts about two yards directly behind the “block point”. As the coach begins the punting motion, the first player in line accelerates toward the “block point”. Some coaching points for the drill include:
• The coach should be looking at the player approaching the block point. The player should be looking at the cone or spot on the field. If the player is looking at the coach, he is wrong.
• The player should run through the block point at full speed without hesitation. If he gets there early, the ball should hit him in the face or chest.
• The player should not run to the block point with arms extended, but instead shoot the hands in front of the eyes to take the ball off the foot.
• Hands should extend at hip height with forefingers together. The hands should not sweep down from head height or higher.
Note: Whenever conducting a drill that includes actually taking a ball off the foot of a punter, it is a good idea to use partially inflated footballs to prevent injury.
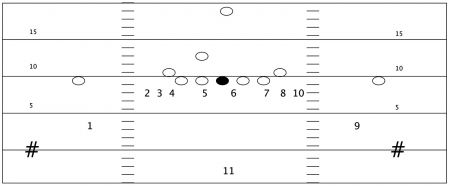
Diagram 2.
The next step is to assign each player a position. It is best to start with the returner because this position is the most important. A dangerous return man puts a great deal of pressure on a punt team. If your best return man is also one of your best punt blockers, we believe it is better to keep him as a return man. The outside rushers (#2 and #10 in Diagram 2) need to have good acceleration. Against a spread punt it is critical that these players force the wings to get depth quickly. Also, these players must cover the most distance to get to the “block point”. The next rushers inside (#3 and #8 in Diagram 2) should be the best punt blockers. Against a spread punt, these rushers will typically be isolated on the tackles if #2 and #10 do a good job of stretching the wings. Although these players have the next longest distance to the block point, they have the best angle. The next rushers inside (#4 and #7 in Diagram 2) should be the next best punt blockers. Against a spread punt, these rushers will typically be isolated on the guards if #3 and #8 do a good job of stretching the tackles. Also, these rushers have the second best angle to the “block point”. The inside rushers (#5 and #6 in Diagram 2) can be a little slower. A good punt blocker lacking the acceleration to play a position further from the block point is a good choice for one of these positions.
In terms of coaching assignments, we prefer to maximize our instruction potential by utilizing as many coaches as possible when installing and practicing our punt return. This allows the most efficient use of available time. Two coaches handle the scout punt team, one coach for the center and left side and the other coach for the fullback and right side. We assign two coaches for #1, #9 and the corresponding gunners for the scout team. We also assign one coach for #2, #3, #4; one coach for #5, #6; one coach for #7, #8, #10; and one coach for #11. This breakdown allows for quick feedback during full unit practice as well as fast, effective and productive reps during individual drills. If we were forced to work with one fewer coach we would eliminate the coach for #5 and #6 and add #5 and #6 into their respective sides. Our plan for two fewer coaches would be to eliminate a coach working with #1 and #9. This would result in the gunners for the scout punt team being added to the coaches working with the scout punt team. Our plan for three fewer coaches would eliminate one of the coaches working with the scout punt team.
When devising a game plan, we like to start by finding the block point, which varies from 7-9 yards from the spot of the ball. Each week we put a cone or spot on the field at that distance during all full unit practice reps. This allows the players to become familiar with the amount of distance to push vertical before bending to the “block point”, and the angle necessary to run through the “block point”.
The basic structure of the punt formation or formations will help us determine how we will align our players. It is important to adapt your alignment to different punt formations in order to maximize pressure on punt protections. Our playbook includes 11 different punt return fronts. However, a typical game plan will include three or less. This process is very similar to a defense adapting to different offensive formations.
The next step is to determine the blocking rules. Is the center involved in the protection? Answering this question is a critical step in formulating a game plan. If the center is involved, we look for a tendency for the A gap he is responsible for protecting. Given a choice, most long snappers prefer one A gap over another in protection. Finding a way to widen that A gap and rushing that gap with an effective punt blocker makes the job of the center very difficult. We feel that the more stress we can apply to the center, the better chance we have of altering the total operation time of the kick. If the center is not involved in protection, we determine how the A gaps are protected. This will provide information critical to formulating the best way to get an unblocked player to the block point.
Next is a further examination of the rules, responsibilities, and techniques for each player involved in protection. How do they block a balanced front? At the snap, do any of the players involved in protection get depth or leave a foot planted in the ground? Answers to these questions will help determine if any form of zone protection is utilized. We believe it is best to attack zone protections with vertical stretch principles or overloading a specific gap that a second level blocker (e.g., the personal protector or fullback) is responsible for securing. Any type of man protection allows for “picking” or “rubbing” players to get an unblocked player to the block point. How an unbalanced front is blocked is a good starting point for determining if any man protection rules are being utilized. In general, any type of spread formation utilizing a protection in which the center is not responsible for either A gap includes some form of man protection rules.
Most punt formations include at least one second-level blocker, and unless a full man protection scheme is being used, the second- level blocker is typically responsible for an A gap. Also, It is necessary to slightly change the technique of any player rushing through the A gap to the side of the kicking foot of the punter. This player is unable to run through the block point without potentially roughing the punter. Running through a spot slightly outside the near hip of the punter and placing his hands off to the side over the block point will prevent the possibility of roughing the punter. When overloading a specific gap with two players, we believe the A gap in the scenario described above is the most effective.
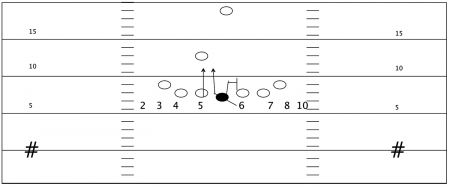
Diagram 3.
When executing the A gap overload (See Diagram 3), it is important to be clear and specific with the two rushers regarding where to fit on the player being overloaded. Timing is critical and if either rusher is forced to break stride or change his path, the likelihood of blocking the punt is greatly diminished. In the scenario shown in Diagram 3, #5 should be the first through the A gap. Emphasis should be made on staying tight to the inside of the guard as he pushes vertical to the near shoulder of the fullback or personal protector. This path will help prevent impeding the path of #6 and establish a direct course to the block point if the fullback or personal protector does not block him. If #5 is blocked by the fullback, it is important that he avoid any contact that might impede #6 from reaching the block point. The initial path of #6 should make him second through the A gap. Emphasis should be made on staying tight to the shoulder of the center as he pushes vertical to the face of the fullback or personal protector. This path will help prevent impeding the path of #5 and establish a direct course to the block point if the fullback or personal protector blocks #5. If #6 is blocked by the fullback or personal protector (See Diagram 4), he should avoid the near shoulder side to prevent any possibility of impeding the path of #5 to the block point. These principles apply regardless of the gap being overloaded, but the additional distance required to reach the block point from a wider gap reduces the potential of blocking the punt.
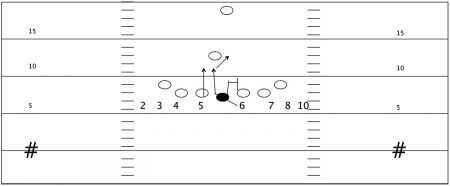
Diagram 4.
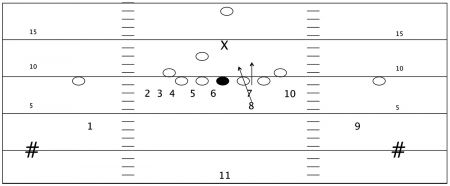
Diagram 5.
Attacking man protection with a pick is most effective when you have the ability to predict the two players that will be responsible for blocking the two players performing the pick (See Diagram 5). This illustrates a potential scenario where the left guard and left tackle on the punt team would be responsible for blocking #7 and #8. In this case, #7 is the player executing the pick and should be in a three-point stance on the outside shoulder of the guard. Also, the timing of the pick is better if #7 is in a right-handed stance with the right hand down and right foot back.
In order to create the best combination of spacing and timing, #8 should align behind #7 in a two-point stance with the left foot back. Both players will move simultaneously so the spacing will require some practice to prevent impeding #8. Too much or too little distance between #7 and #8 will prevent #8 from arriving at the “block point” in time to block the punt. At the snap, #7 should push vertical through the outside shoulder of the guard with low pads. Two possibilities exist for #7, and he should be prepared to react. If the guard stays engaged with #7, he should continue pushing vertical to clear the path for #8. If the guard blocks #8, then #7 should step on the toes of the tackle and bend to the block point. Correspondingly, #8 should also be prepared to react to either possibility. If the guard blocks #7, then #8 should be free to the block point. If the guard blocks #8, then he should stop his vertical push to prevent impeding the path of #7.
One of my favorite parts of this profession is learning from other coaches. It is truly a pleasure to have the opportunity to share ideas with colleagues. Everything in this article is a result of other coaches’ willingness to share.
About the Author: Steve Rogers is currently in his fourth season as both Special Teams Coordinator and Defensive Backs Coach at Wabash College. He previously coached at Bluffton University for three years and MacMurray College for four seasons. Rogers is a 1994 graduate of Mount Union College and holds a Masters Degree from Defiance College.