DEPENDING ON DEFENSIVE personal, defensive structures, blitzes, dogs, line stunts, slants and twists it’s important to incorporate half- and full-line slide protection schemes.
You can also look for personnel match-ups that work to your advantage, but it’s imperative that offensive linemen remain efficient when they execute the half- or full-line slide protection scheme because of the launch point of the quarterback.
Half-Line Slide Protection Schemes
Half-line slide protection is a zone protection scheme to the slide side or the call side. The center makes the call and the guards echo the call.
Each offensive lineman to the call side is responsible for blocking a specific gap. It is crucial the offensive linemen to the call side or slide side maintain the proper spacing to decrease the pass rush lanes for the defense. Most of the time, we’ll slide away from the TE, however, it depends on our opponent’s defensive structure and blitz package for that particular week.
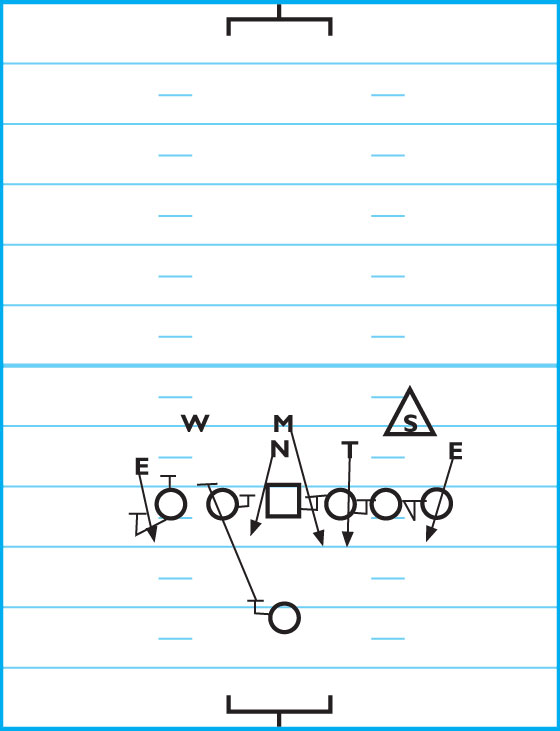
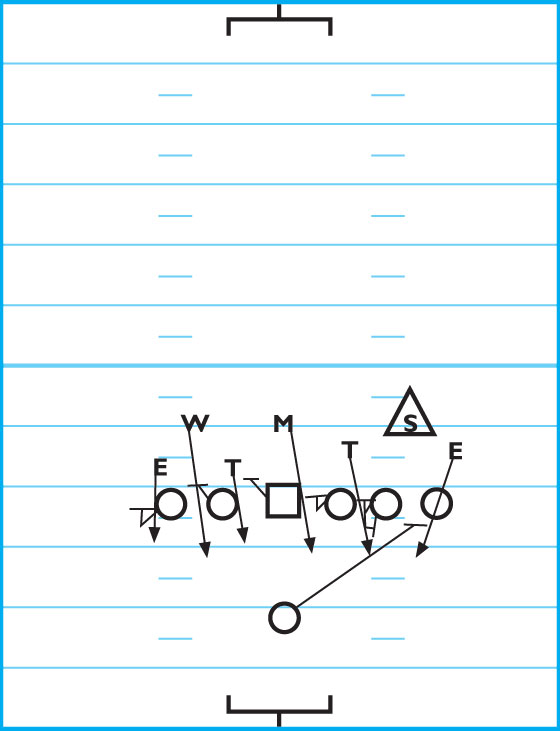
DIAGRAM 1: Slide Protection Scheme Away From The TE (Left) When The Will LB Is Blitzing The A- or B-Gaps.
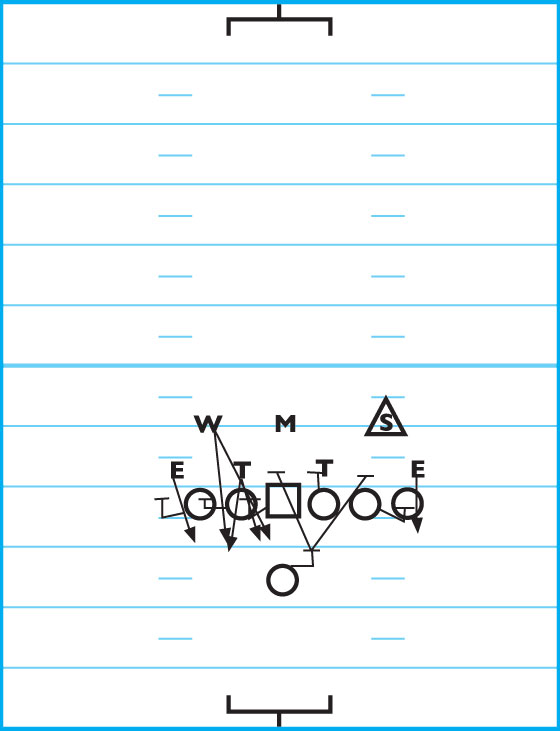
When the Will LB is blitzing the A- or B-gaps, the center must declare his responsibility to the left working with the left OG and the left OT. In this protection scheme, the center, left OG, and left OT are sliding to the left and are responsible for the gaps (A, B and C) to the left. They are setting on the defender over them and looking to their gap responsibility.
It is imperative the offensive linemen hold space. The right OG is BOB (big on big).
The right OT is also BOB; however, if the TE is in the route and the right OT is uncovered, he pass sets on the 7-technique.
The RB looks inside-out from the Mike LB to the Sam LB. If both the Mike LB and Sam LB blitz, the Sam LB is hot.
It’s important that the offensive linemen in the slide, punch with the inside arm (“use their levers”), which helps close off the rush lanes and helps the offensive lineman next to them in the slide.
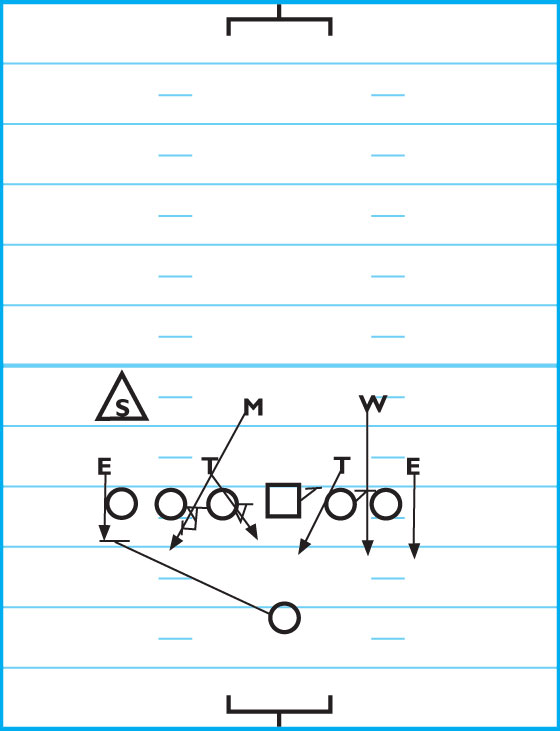
DIAGRAM 2: Slide Protection Scheme Away From The TE (Left) When The Will LB Is Blitzing Off The Edge (C-Gap).
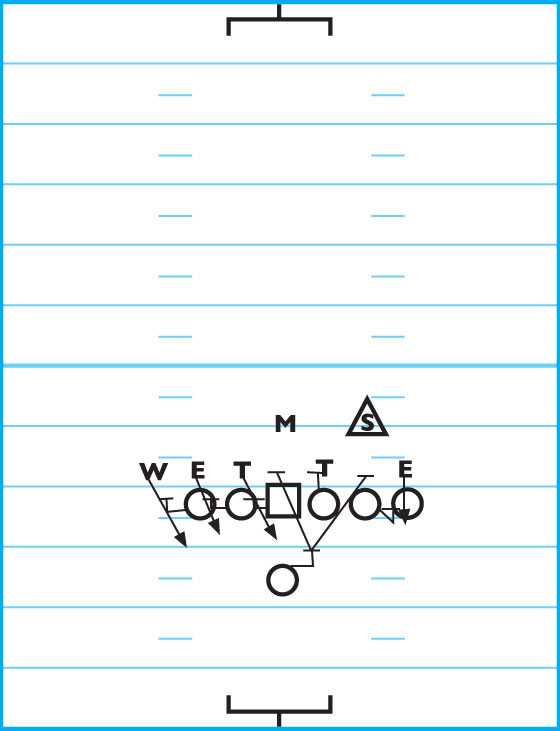
When the Will LB is blitzing off the edge (the C-gap), the center must declare his responsibility to the left working with the left OG and left OT. In this scheme, three offensive linemen to the call side are sliding to the left, setting on the defender to their outside.
Also, the offensive linemen to the call side, kick directly to their gap responsibility and block any defender who comes to them.
Offensive linemen to the call side must be careful not to gain a lot of width when executing the slide. They should expect the down defender to pinch. If they over set (setting too wide), they’ll give up the inside and allow QB pressure.
In this scheme the Will LB walks up off the edge and the left OT makes a call to alert the left OG and the center. The right OG and the right OT are both BOB (big on big).
The RB looks inside-out from the Mike LB to the Sam LB. If both the Mike and Sam blitz, the SAM is hot.
Half-Line Slide Protection To The Right
DIAGRAM 3: Slide Protection Scheme To The TE (Right) When The Sam LB Is Blitzing The A- or B-Gaps. When the SAM LB is blitzing the A- or B-gaps, the center declares his responsibility to the right, working with the right OG and the right OT.
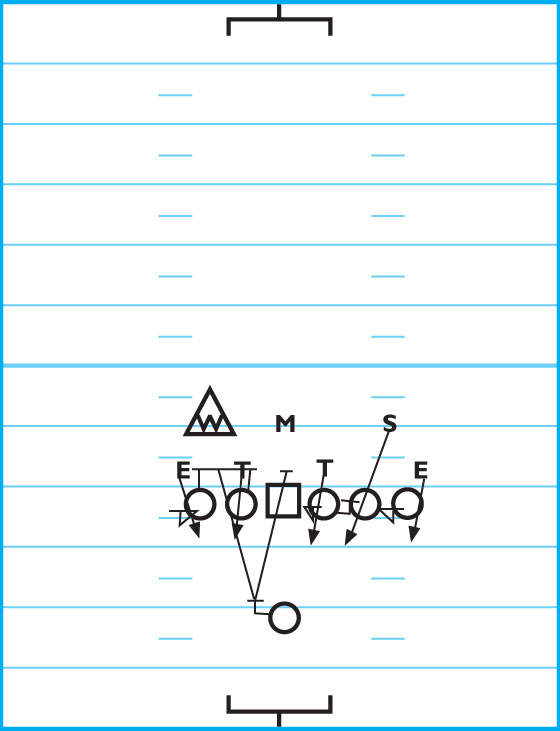
In this protection scheme, the center, right OG and right OT are sliding to the right, responsible for the A-, B- and C-gaps to the right. They must set on the defender over them, looking to their gap responsibility.
It is imperative the offensive linemen hold space. The left OG and left OT are BOB (big on big).
If the left OT has a 5- or wide-5-tech he’ll soft kick and get width. If the DE is tight, he can jump.
The RB looks inside out from the Mike LB to the Will LB. If both the Mike and Will blitz, the Will is hot.
It’s important that the offensive linemen in the slide punch with the inside arm (use their levers), which helps close off the rush lanes and helps the offensive lineman next to them in the slide.
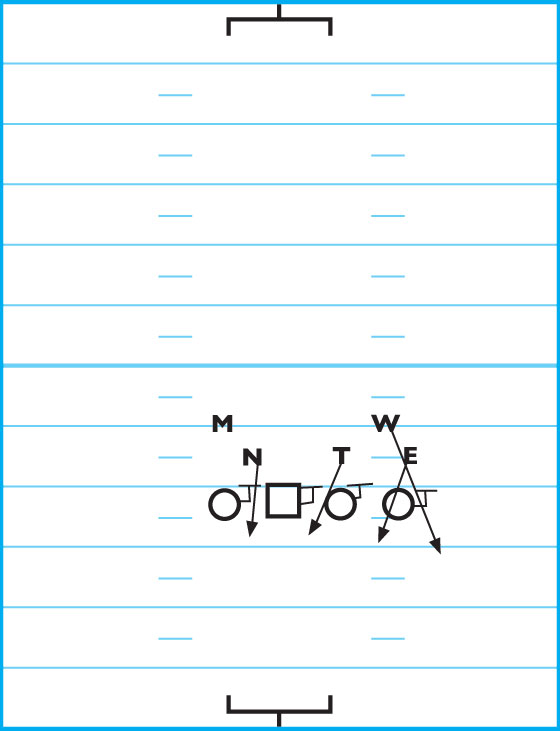
DIAGRAM 4: Slide Protection Scheme To The TE (Right) When The Sam LB Is Blitzing Of The Edge (C-Gap). When the Sam LB is blitzing off the edge (C gap), the center declares his responsibility to the right, working with the right OG and right OT.
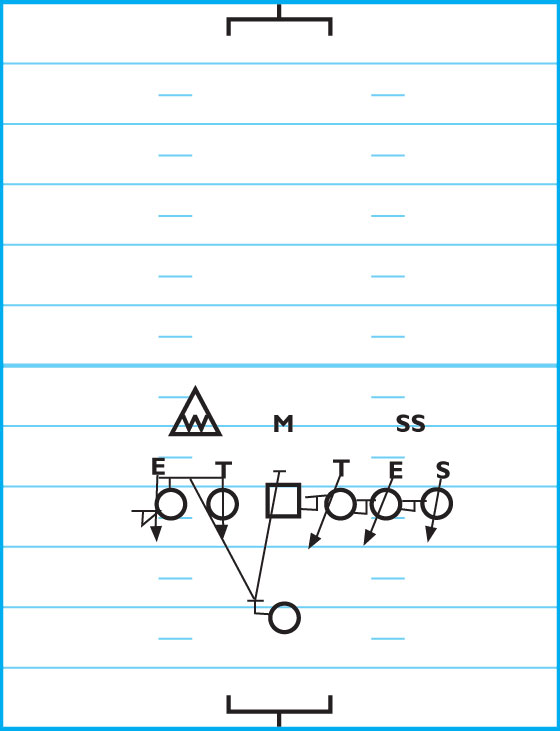
In this scheme, three offensive linemen to the call side are sliding to the right and setting on the defender to their outside.
Also, the offensive linemen to the call side, kick directly to their gap responsibility and block any defender who comes to them. They must be careful not to gain a lot of width when executing the slide and should expect the down defender to pinch. If they over set (setting too wide), they’ll give up the inside and allowing QB pressure.
In this scheme, when the Sam LB is lined up on the edge, the right TE makes a call to alert the right OT, right OG and center.
The left OT and left OT are both BOB. If the left OT has a 5- or wide-5-tech, he’ll soft kick and get width. If the DE is tight, he can jump.
The RB looks inside out from the Mike LB to the Will LB. If both the Mike and Will blitz, the Will is hot. The TE is in the route.
Half-Line Slide Protection To The Left
DIAGRAM 5: 4-Man Slide Protection Scheme To The TE (Right) When The Nose Is In A 0- or 1-Technique. In this scheme, there are four offensive linemen in the slide. The center declares his responsibility to the right working with the right OG, the right OT and the left OT.
“Slide” alerts the left guard that he is in the slide. The offensive linemen in the slide are responsible for the gaps to the right, setting on the defender to their outside.
The TE is in the route and the left OT is BOB. If the left OT has a 5- or wide-5-tech, he’ll soft kick and get width. If the DE is tight, he can jump. The RB blocks the Will LB. The Sam LB is hot.
Half-Line Slide Protection To The Right (When The TE Is Left)
DIAGRAM 6: The center declares his responsibility to the right. Three offensive linemen slide to the right and are responsible for the gaps to the right. Offensive linemen are setting on the defender over them and holding space, looking to gap responsibility. The Same LB is hot.
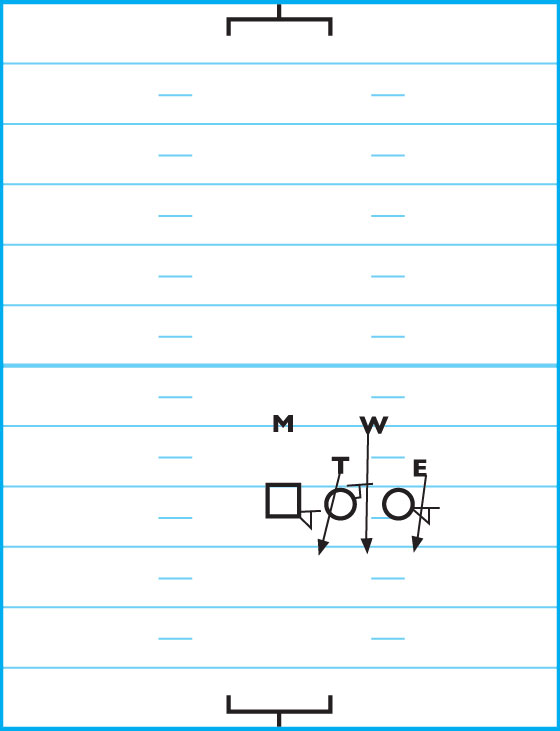
DIAGRAM 7: “Alert” Call By The Tackle. The center declares his responsibility to the right. Three offensive linemen slide to the right and are responsible for the gaps to the right, setting on the defender to their outside. The OT makes an alert call. The Will LB is on the edge and the Sam LB is hot.
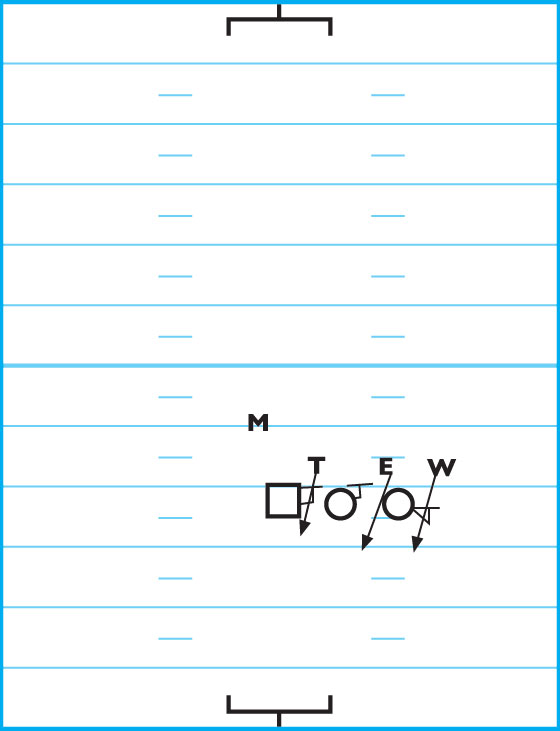
DIAGRAM 8: “Slide” Alert By The Center For The Left OG. In this instance, the left OG is uncovered and the center declares his responsibility to the right. Four offensive linemen slide to the right and are responsible for the gaps to the offensive linemen’s right. They set on the defender to their right, looking to their gap responsibility. The left OT is BOB and the SAM LB is hot.
FULL-LINE SLIDE-PROTECTION SCHEME
In the full-line slide protection scheme, all linemen are involved in the slide regardless of the defensive structure. It’s used primarily with 3-step drop passing game and is also an audible protection scheme against blitz packages by the defense. It’s also a zone protection scheme where each offensive lineman is responsible for blocking a specific gap.
The key to the full-line protection scheme is canceling gaps. Each offensive lineman sets in his gap and engages the defender who rushes into their gap or area and runs him into another area. The OT away from the call side is now the last lineman in the slide. Therefore it’s imperative that he slow plays his gap.
FULL-LINE SLIDE PROTECTION TO THE LEFT
DIAGRAM 9: Full-Line Slide Protection To The Left. This scheme is a total slide protection to the left OT from the right OT. Offensive linemen are responsible for the gaps to their left. If protection is called away from the OT (the right OT is away from the call side), it’s imperative that the right OT not turn his back to his gap or go too soon and not make the block on the appropriate defensive lineman.
The right OT must slow play — in case of blitz — and slant for the second-level defender. He must be patient if the LB is off the line of scrimmage.
When the right OT takes his pre-snap read and sees that the defensive end is pinching, he should anticipate the pinch and now block the DE.
The RB works to the Sam LB or the DE if the TE is in the route. If the TE is in the route, then the Sam is hot.
FULL-LINE SLIDE PROTECTION TO THE RIGHT
DIAGRAM 10: Full-Line Slide Protection To The Right. This set calls for total slide protection to the right OT from the left OT. Offensive linemen are responsible for the gaps to their right. If protection is called away from the OT (the left OT is away from the call side), it’s imperative the right OT not turn his back to his gap too soon and not make the block on the appropriate defensive lineman.
The left OT must slow play; in case of a blitz and slant for the second-level defender. He must be patient if the LB is off the LOS.
When the right TE takes his pre-snap read and sees that the DE is pinching, he should anticipate the pinch and now block the DE.
The RB works to the Sam LB or the DE if the TE is in the route. If the tight end is in the route, then the Sam LB is hot.
In a 1-back set, if the TE is in the route, you will have 6 to block 7, so you should build hots in to your 3-step slide protection package.
Flip the formation and the blocking scheme changes to the call side or away from the TE.
You can run 3-step half and full-line slide protections either toward or away from the TE. You can also keep the TE in to block if the protection is breaking down.
5-Step Drop-Back Pass Protection Schemes
In this protection scheme, when the QB uses the 5-step passing game, it’s important that the offensive linemen know the launch point of the QB (because the defensive pass-rush angles change according to the depth of the drop by the QB).
The offensive linemen aggressively set and control the LOS. The offensive line sets firm from OG to OG to reduce penetration from the interior linemen. OT’s are on an island, so they must protect and take away the pass rusher’s quickest path to the QB.
DIAGRAM 11: Center Is Declaring His Responsibility With The Right OG. In this diagram, the center is declaring his responsibility. If the nose is in a 1-technique to the TE side, the center alerts the right OG with a “rip” call. This call alerts the right OG that he and the center are going to work from the 1-technique to the Mike LB.
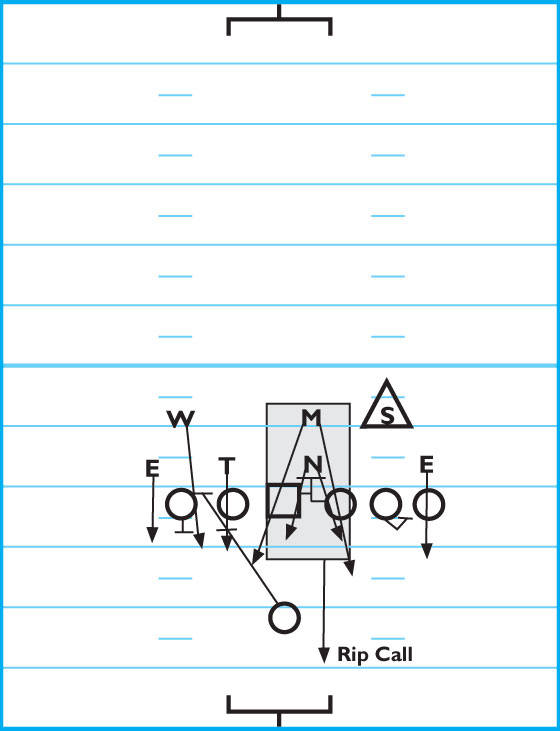
The center posts the 1-technique and eye balls the Mike LB. The right OG also posts inside on the 1-technique and eye balls the Mike LB.
The left OG is BOB on the 2- or 3-technique and sets firm. The left OT is BOB on the 5-technique, taking away the quickest path of the defender.
The right OT is BOB on the 5- or 7-technique, taking away the quickest path to the QB.
The RB blocks the Will LB. If the Will LB doesn’t blitz, the RB is in the route.
DIAGRAM 12: Center Is Declaring His Responsibility With The Left OG. Here, the center is declaring his responsibility with the left OG. If the nose is in a 1-technique to the TE side, the center alerts the left OG with a “liz” call. This call alerts the left OG that he and the center are going to work from the 1-technique to the Mike LB. The center posts the 1-technique and eye balls the Mike LB.
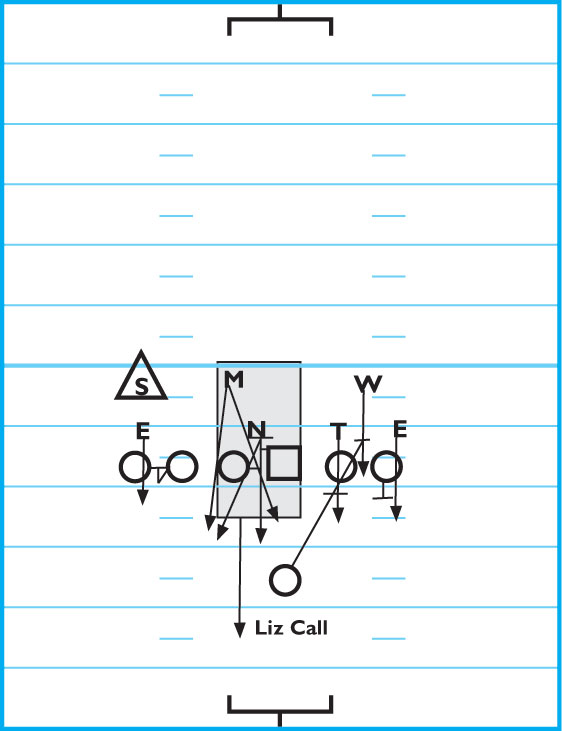
The left guard posts inside on the 1-technique and eye balls the Mike LB. The right OG is BOB on the 2- or 3-technique and sets firm. The right OT is BOB on the 5-technique, taking away the quickest path of the defender. The left OT is BOB on the 5- or 7-technique, taking away the quickest path to the QB.
The RB blocks the Will LB. If the Will doesn’t blitz, the RB is in the route.