In any shotgun offense, it is vital to the success of the run game to be effective at the zone read game. At Bentley, all adjustments, including the determination to run power, iso, and outside zone stems from a defense’s ability to stop your inside zone. For this reason, we spend the first 4-5 days of our pre-season camp working different looks, stunts, slants, and especially back-side gap exchange for the quarterback and back-side tackles to adjust on the fly. First and foremost, our offensive linemen must all be on the same page.
Determining Whom to Attack
Identifying the front is the job of the center. His call will determine his pre-snap responsibility, but obviously we understand a defense will not always stay in their desired gaps – in fact a big part of zone is to force defenders into a different gap. Based on the down linemen and the alignment of an A gap on the middle linebacker, we make the fronts which effect all offensive linemen, tight ends, and H-backs in the scheme. A center’s responsibility is the “0” call with all linemen working to the defender relative to the center’s responsibility. The play-side guard is 1 and therefore the defender marked 1 is his responsibility, etc.
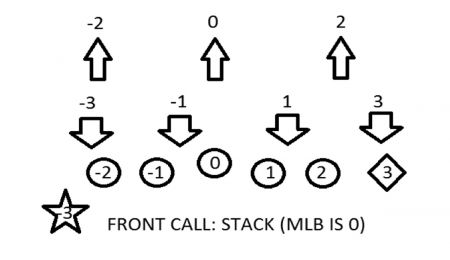
Diagram 1
The Stack Call (Diagram 1) is made when there exists a MLB over the center’s back-side shade to the play-side guard’s back-side shade. This determines that the center will be responsible for the MLB in the play-side A gaps. A Stack Call also states that a play-side tackle/tight end combination will stay “in the box” and work to the outside linebacker – not a safety. Finally, and most importantly, this will signal the back-side tackle to check a slow flowing MLB coming to the back side B gap before the turning back and sealing the back-side LB’s flow to the cutback.
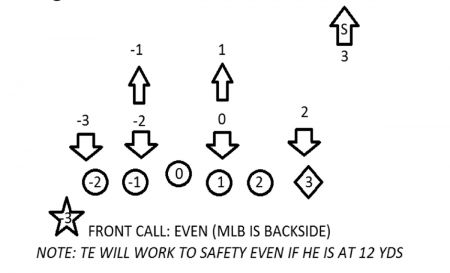
Diagram 2
Even Call (Diagram 2) is made where there lacks a true A Gap MLB. Often in 1- high defenses out of 2 by 2 formations, a team will bump their inside linebackers over the front-side and back-side guards. Remember, we do not want to block back. In an even call, the center and play-side guard will be responsible to combo the DT to the play-side ILB. The back-side tackle and back-side guard will combo to the back-side inside linebacker, and ignore any outside linebacker to the back side. Finally, and most importantly, this will signal the play-side tackle and tight end to combo block the defender to the safety. Whether the safety is at 6 yards or 12 yards, we will work to him. We do not want the tackle to block back on the play-side inside linebacker. If he does, the play will more than likely break play side, into the waiting arms of the filling safety.
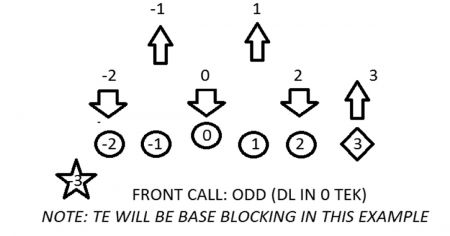
Diagram 3
In the Odd Call, this is your standard 34 or 52 scheme (Diagram 3). With a true nose guard, we break certain rules. Combination blocks will now “bump back”. The center is responsible for sealing the nose guard, with his back-side guard working to him, eyes to the back-side inside linebacker. The back-side tackles will be base blocking in most cases against the back-side 5 technique.
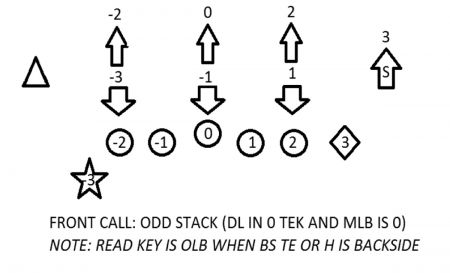
Diagram 4
In an Odd Stack call, this is a typical 33 or 353 defense (Diagram 4). This is a difficult defense to block the zone, mostly because of the post-snap games defenses will play. But pre-snap, you can see the responsibilities always “work up” in an odd stack. A LB aligned directly over the down lineman will always have a higher number and be the ultimate responsibility of the play-side OL in a combination block. More importantly, the back-side tackle (without help of a tight end or H-back) must recognize he will be blocking the back-side B gap threat. With an OLB and down lineman stacked, he must drop step and climb based on the movement inside or outside of the down lineman.
Determining How to Attack
Our offensive linemen must first designate if they are covered or uncovered. If a first-level defender is shading them on either side, they are a covered offensive lineman. When the back-side teammate is covered, there is no combination. The offensive lineman will take a drive step with toes pointed into the middle of the numbers of the defensive lineman, hands retreating to the hips, ready to strike the middle of the chest plate. The movement of the defensive lineman will determine where we will “take him”. This part is simple base blocking.
Combinations are determined when the next back-side teammate of a covered offensive lineman is uncovered. Now the covered lineman will take his first step based on the shade. On the second step, we want to time up the punch with the step and “gain real estate” either laterally or vertically, firing off and driving the defender. The ultimate goal for a covered lineman - engaged in a combination block – is to be able to strike the play- side number of the defender and drive through it, turning the defender’s play-side shoulder up the field.
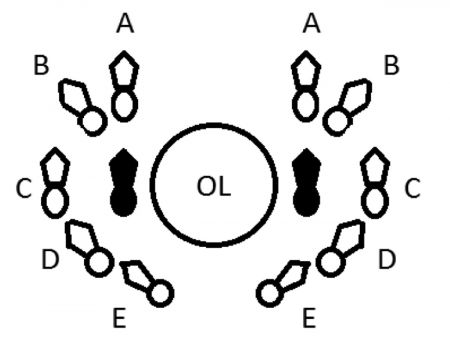
Diagram 5a,b,c,d,e
Against an outside shade, the covered lineman will take a zone step, or 45-degree step (Diagram 5 – “B”). We will not simply point the toe to the outside number. This first step will allow us to be in position to drive through the outside shoulder, or take a wide rusher wide and up the field. This is acceptable as it will allow the uncovered blocker to climb through easily and create a running lane for the RB. Just like the base blocking technique we teach, the hands will retreat to the hips holding the offensive lineman in an initially balanced positioning.
Against a head-up shade, the covered lineman will take a lateral step (Diagram 5 – “C”) so that we maintain a balanced, square shoulder position. This first step should put the OL’s eyes on the play-side number of the defender while maintaining a base that we can adjust to a play-side slant. If the outside number is struck upon the second step, the goal is to allow no lateral movement until the uncovered lineman overtakes the defender.
Finally, against a back-side shade, the covered lineman should recognize that – by alignment – he has already gained the outside shoulder. There is no reason to make a play-side movement; however, we do not want to block back against the zone movements. We will still take a play-side step, but it will be a drive step (Diagram 5 – “A”), or a step straight up the field sealing the defender back-side. We want to make contact with ONLY the back-side hand into the play-side number of the defender. Younger players will turn their body and use both hands but do NOT allow this. Work on the play-side leg of the covered lineman to stay vertical and slowly use a sift technique to maintain balance and vertical movement while the uncovered lineman overtakes the defender.
In all situations, if we are able to gain the play-side shoulder, square the body and drive the defender vertically, leaning back to the defender slowing his lateral movement, we will be successful. This will allow the uncovered defender to overtake and seal the defender as he pushes off the covered lineman to climb to the linebacker. The play-side hand must release and be free once the defender has been reached.
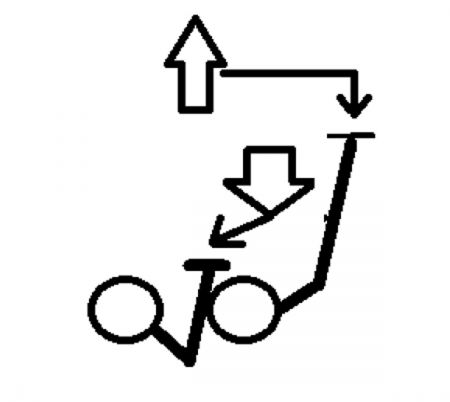
Diagram 6.
In combination situations, an uncovered offensive lineman must take his drop step (Diagram 5 – “D”). This first step must include significant depth to allow the drop player to run through the covered lineman and seal the defender. However, it also gives the lineman a second to recognize the back-side knee of the defender. As an uncovered lineman takes his first step, his eyes must go to the nearest knee of the defender. If the knee comes toward you (Diagram 6), this will most likely be a slant and it is the job of the uncovered lineman to punch through and seal the defender. Do not give up penetration, but do not simply drive the slant player laterally. Use the punch and hat placement on the play-side number to seal the defender and allow the covered lineman to climb.
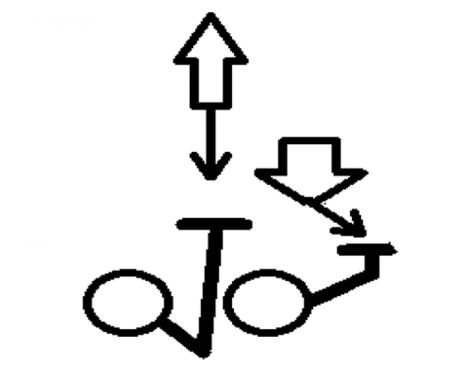
Diagram 7.
In the case the knee goes away (Diagram 7), we shift our eyes to the second level but continue lateral movement with our hands feeling for the covered block. Track the path of this player; don’t simply move up to the next level – gain ground toward your responsibility. Once we recognize a second level defender closing in, attack him in the center of the chest and make him determine which direction he will go. If he takes you on square, be physical and drive the linebacker.
Necessary Practice Progression
10 minutes - With this scheme, it is vital to work a step progression against air every day, nonstop 1 step and 2 steps only. Feel free to work these steps on the boards, adding defenders or shields as you see fit.
10 minutes – Work combination blocks live against two defenders focusing on body positioning and stopping lateral movement. Work on this at least once during your practice schedule.
5 minutes - Finally, continue to work the slant and stunt game at full speed at least once a week. Once an offensive lineman begins to recognize the “feel” of these blocks, it doesn’t matter the front or scheme of a defense, they will have the confidence to block any defense, and give you the confidence to call the inside zone on any down and distance.
Adjustments – Back-side tackles and QB reads.
While I have not gone into a quarterback’s role in this article, the basic rule of the QB in the shotgun zone read play when meshing with a RB is to key the back-side defensive end. This player is not often blocked on the back-side unless there is a tight end or H-back to the back-side of the run play. Initially, the rule of thumb is “Give Unless”, meaning that you will hand the ball off to the RB unless the defensive end attacks the RB or turns and runs down the line of scrimmage to catch him. Defenses began to play games with back-side players in the attempt to force a QB to pull the ball while another defensive player loops into position to tackle the quarterback. Here are some basic adjustments and rules for the back-side players and quarterbacks. Practice these adjustments WEEKS after working the basic reads.
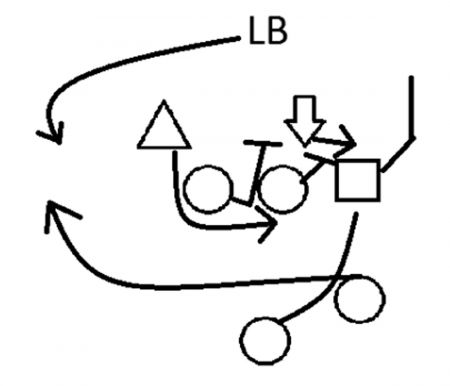
Diagram 8
Diagram 8 shows an “Even” called front, where the back-side OT will work with the covered OG to the LB. In this case, the tackle will drop step and recognize the knee of the down defensive lineman go away. His eyes should snap to the WLB. The WLB will be engaged in his stunt to the back-side. In this case, repetitions will give the tackle the understanding that a DE is bending behind him to the RB. While other coaches will tell the tackle to continue to the WLB and block him out for the QB to cut back underneath his block, the depth at which our back-side tackles drop step allows him to recognize this stunt, drive his play side foot into the ground and pivot back, opening up, and sealing the defensive end. If the quarterback recognizes this gap exchange, he will trust in his tackle and give the ball to the RB, allowing a B gap cutback and, hopefully, a big gain.

Diagram 9
In Diagram 9, the NG is now looping to the back-side in order to play the QB. In most cases, the back-side DE will be told to cut in front of the back-side OT to attempt to penetrate the B gap. For the back-side OT, this is very difficult. Sometimes film will show an alignment change (heavier shade) by the defensive end, and sometimes it will not. The OT must be taught to stick with his visual key of the down lineman, but also recognize pressure from a defensive end trying to penetrate the B gap. He must work to keep inside leverage and drive vertically. If done correctly, the offensive guard will have recognized the loop, but in terms of how we teach the inside zone, the loop by the nose guard signals that the offensive guard has successfully gained the play-side number. He will then work vertically. He CAN NOT just continue on a lateral path. If he stops and works vertically, he can help the tackle hold inside leverage on the way to the back-side LB (or the LB with A gap responsibility).
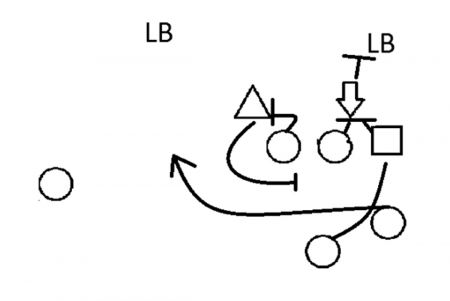
Diagram 10
In Diagram 10, a team shows a “Stack” called front (more than likely a 2 high shell, or 2 safeties). Defenses will use this and tell the DE to bend and run to the RB forcing the QB to pull the ball. However, in the 2-high look, the WLB or outside linebacker over the slot receiver, will play between the receiver and the back-side tackle. In doing so, he is in a good position to play the quarterback off the pull, and too hard to be blocked by the slot. While we can motion the slot into the backfield and run the triple option, remember the 2-high safety shell allows a safety to come down and play the pitch, so this is not a “quick fix”. Our answer - lock the back-side DE. The QB can make a call such as “LOCK”, “KEY”, “DEAD”, and our back-side tackle knows he will drop step, take one step on path, and then wheel back. We do not want him to simply turn and block the DE. Doing so can help the safety or WLB to read the play, and more so, we do not want to give the DE any opportunity to cross face into B gap. Finally, the lock call must be echoed to the center and back-side guard that they will double team the defensive lineman to the MLB. Without the back-side tackle, they are responsible if the MLB slow plays the back side.
Winter and spring football drills are generally handled in the same way as two-a-days in August would be – getting on the same page as the coaches as to what they want videotaped and ready for playback during meetings.
While coaches are primarily focused on recruiting and keeping up with players’ grades and workout regimen during the winter and spring, the individuals who are in charge of the video program should concern themselves with the specifics of their jobs as well. One person should handle overall video operations. This person will oversee a staff – many of which are student workers – and explain to them what should be videotaped during the practices and what isn’t necessary. The Director of Video Operations should also be the contact person for service providers and suppliers and other video-related matters. Each team needs to assess its own situation as well as what they want to accomplish.
The most important thing is to make sure the equipment is in good working order and that warranties are current. A good time to get equipment repaired is between the end of the season and the following July. It would also be good to be acquainted with any upgrades that manufacturers have come out with and, whenever possible, to attend a training seminar when new products are issued. Each program would have to determine for itself which video equipment, hardware and software should be purchased.
This will ultimately come down to the team’s budget, staff familiarity with specific equipment and overall team goals. We would all like to have unlimited budgets but limited budgets are a part of life. The most obvious piece of equipment is the camcorder. In most cases, the cost of a camcorder can range from $1,000 to $6,000. The key is to be able to do your job with the camcorder which is within your budget. Especially for new programs or those overhauling equipment, it would be worthwhile to test a camcorder for 3-6 months before making a final purchase. You can tell the manufacturer that you are considering purchasing a specific camcorder and ask if a trail run is doable. Over the last 15 years, camcorders have been greatly reduced in both size and cost.
Software that has specific applications such as Webb Gameday and XOS Digital can be used to directly enhance your video operations. One of the major areas of growth in the past decade has been Digital Asset management. The basic idea behind this is to be able to input, store, and retrieve digital photographs, animations, videos and music. This process makes it easier to backup files, move files from computer to computer, or to save onto specific media such as the DVD. These applications can be used for importing, video editing and viewing by coaches and the team during meetings.
Other equipment includes batteries (at least two for each camera or a portable battery pack) extension cords and tripods.
I personally like JVC, Panasonic and Sony. Since everything is going to the internet and being edited for uploading across multiple platforms such as Blackberry or iPhone, going with a digital-based recording format such as flash memory HD video may be the best way to go long-term. Budget-wise, this can be a great alternative if you don’t have the option to order the higher-end professional camcorders. You can usually purchase handycams for a price range from $300 up to $1,000. If you use a three-camera set up (wide and both end zones), you may consider going with two HD cameras and one professional camcorder.
Make sure that the camcorders are AVCHD compatible. AVCHD (Advanced Video Coding High Definition) first introduced in 2006 is a file-based format that was developed jointly by Panasonic and Sony for the digital recording and playback of high-definition video. When it comes to storing on your computer be it a desk top or laptop, you can never have enough memory. I recommend at least 100 gigabyte hard drives (most current releases have at least several hundred GB). They should be set up for importing video/audio directly from the camera or laptop if you choose to record to it. It should also be able to transfer video for recording on multiple formats such as DVD or backup storage onto external removable drives. This is especially valuable for archival footage or if coaches/scouts were to request video of a prospect. Just think of all the memories that could be kept. p