Three days of drills and proper technique can improve your wide receivers’ performance at any level.
As a former receiver and current receivers coach, I have observed that times may have changed but the importance of good technique remains the same. The drills we did at the University of Florida in the late 90’s are still useful and valid today. The techniques I instilled and drilled into Mohamed Massaquoi and Hakeem Nicks when they attended Independence High (NC) in the mid 2000’s are still working with student-athletes at Johnson C. Smith University. I have attended local and national clinics and learned that drills are drills. It’s the coach’s approach and the players belief that make the drills work. With that said, I want to share my philosophy on technique development.
In 2007, I developed a program that assisted receivers with their transition from one level of football to the next (middle school to high school and high school to college). The program is a six-week, three day a week cycle that addresses basic route running, catching and blocking techniques (See chart of schedule for the first three days). My approach centers around my past experience as a player in hopes of enlightening my student-athletes to a holistic approach to the receiver position. Again, I stress that you should pull out and rearrange the drills and sets to fit your program.
Day 1: Proper Stance and Start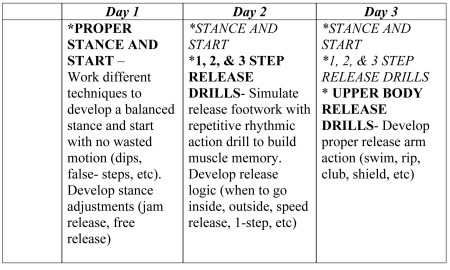
Chart 1.
Stance and start are the most important parts of a football player’s repertoire. Regardless of your position the first couple of steps you make at the snap of the ball will play a major factor in your ability to execute the play. For a skill position player, a solid and consistent stance and start makes the defender play you “honest”. This means that the defender can not tell if the play is a run or pass by your stance or start; therefore, they must play their responsibility. When a receiver lofts off the ball, a safety or corner can read run and throw an extra body in the box making it harder for the O-linemen. When a running back doesn’t carry out his fake, the safety drops back in coverage, making a harder read for the QB. By exploding off the ball every time, you not only put yourself in position to obtain leverage on the defender, but you can also help the play develop the way the coach intended it to.
In order to achieve maximum explosion off the ball we must eliminate false steps, dips, or any wasted motion that will delay the building of momentum. Here are a series of four drills that should be helpful to your program:
Point of Emphasis: A good stance will allow you to explode off the line at the snap of the ball. During these drills, we will focus our attention on staying low, driving arms and legs, and eating up the defenders cushion. The cushion is the space between you and the defender. When we get a free release, it gives us an opportunity to use speed and body control to deceive the defender. There must be no false stepping, dipping, or any resetting types of movements.
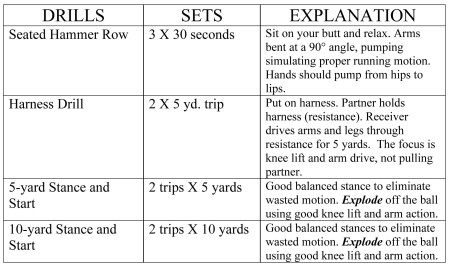
Chart 2.
False steps include cocking your foot up or back at the snap of the ball before actually taking off and gaining ground. False steps are usually the result of a bad stance and you have to move your feet around in order to take off. Dipping comes from standing straight up and having to bend at the knees at the snap of the ball to get a good take-off. You must eliminate those resetting movements by perfecting your stance. In order to program your muscles to explode at the snap of the ball, you must practice the same stance and same start every time.
Day 2: 1, 2 and 3-Step Releases
As a true freshman at the University of Florida, I had to learn the hard way to beat a DBs jam technique. My first experience during camp participating in one-on-one drills was an eye-popping, teeth-slamming, life-changing experience. I was hit twice in the chest and one time in the throat by a guy who was half my size. After that day, I swore that no one would ever put their hands on me like that again.
Now that I look back, I lost that battle before I even started. I never learned to beat the jam in high school because I was bigger and stronger than most DBs. As you advance in your athletic career, the game also advances. Athletes will get bigger, faster, stronger, quicker, and smarter and so will you. Today, we avoid getting embarrassed at the line of scrimmage by developing some sound release techniques. There are unlimited variations of releases but we will concentrate on basic 1, 2, and 3 step release techniques with emphasis on getting back on top of the defender or restacking. These methods will give you a solid platform of releases to defeat the jam or press coverage (See chart of releases).
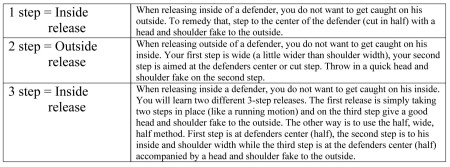
Chart 3.
These releases are based on an inside foot up alignment. If your program has an outside foot-up alignment, then your releases would go as such;
1-step = outside release, 2-step = inside release
and 3-step = outside release.
Here are a set of shuffle drills for your daily practices that will help your wide receiver’s overall technique. They include one, two, three-step shuffles as well as the stack release:
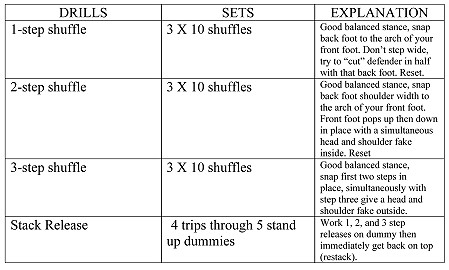
Chart 4.
Point of Emphasis: Each release is designed to set the defender up. If you take an outside release, we want the defender thinking inside. Running a slant, make the defender think fade and vice versa. The set-up comes from your footwork as well as your upper body language. In the explanation column, I use the term “cut the defender in half”. This simply means step to the side you want to release to. Cutting a defender keeps you from stepping on the side that gives him the advantage. Moves are to be made at the line of scrimmage.
The WR must not step upfield until the defender is beat. Moves will not work if you make them moving toward the defender.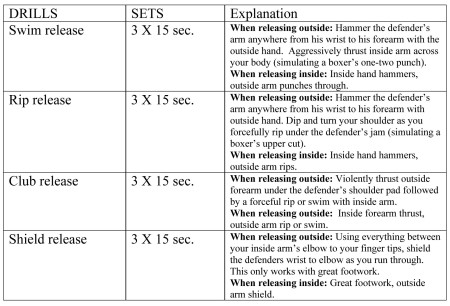
Chart 5.
Day 3: Upper Body Release
Upper body mechanics are just as important running or catching. Your footwork in a press coverage situation is important but you cannot win every time without your hands. Your quick moves will get you far, but one day you will meet “him” and “he” is not going for it. “He” is going to be the one that doesn’t move and just waits on you to cross that line and just like that “he” has his hands on you. But don’t worry because we have something for “him” too.
Today we will begin putting pieces of the puzzle together. When you mix an explosive stance and start, proper release, and quick and powerful arm action you get “openness”. This means more separation, more time to react and more opportunities to make plays. Like footwork releases, there are countless methods to get a defender’s hands down but we will focus on the swim, rip, club, and shield techniques (See release chart).
Point of Emphasis: Each release will be accompanied by the proper footwork. Whether it’s a 1-step, 2-step or 3-step move off the line, use the release technique that’s in the explanation box. These techniques are also very violent movements. You have to bring some punch to the party when facing a jam defender. As mentioned in the day 2 point of emphasis, we must make these moves at the line of scrimmage. Moving upfield before the defender is set up will result in getting jammed. When receivers rush upfield, it closes the gap between them and the defender.
About the Author: Steve Shipp recently completed his third season as Wide Receivers Coach on the staff of Johnson C. Smith University. He began his coaching career at Independence High School (NC) and later joined the staff of West Charlotte High School. Shipp attended both the University of Florida and North Carolina A & T University.