EFFECTIVE BLITZES ARE a great way to disrupt an offensive scheme. Every defense should have some type of blitz package to pressure the passing game. Heavy defensive pressure almost always creates offensive mistakes.
Called “Saint,” this blitz was adapted from a blitzing scheme used by the Kansas City Chiefs and taught to me by former NFL defensive back and current Bellevue High School defensive backs coach, James Hasty. Under the right circumstances, this blitz is a great way to confuse even the best and most-prepared blocking schemes!
When It’s Effective
Since this is a delayed blitz, it works best against a 5- or 7-step drop passing attack, but will also work against a team that uses a 3-step drop if the quarterback holds the ball or tends to pass off rhythm.
It’s especially effective against a team that tends to use a slot formation or against a tight end that’s the hot receiver. If you can match up the hot receiver against your strong safety, it’ll be among the most effective blitzing schemes you can use.
“Saint” Blitz Keys
The diagrams indicate the assignments and alignments of all 11 players. While these diagrams show the blitz against a pro and slot formation, it works well against any three-receiver or more attack, as long as your cover players handle their receivers.
The two key aspects of this scheme are:
Bringing pressure by two defensive players through the same gap.
Playing a collision technique with a safety on one of the inside receivers.
The Saint is effective against 5-, 6- or 7-man protection packages because the double blitz through the same gap is difficult to detect and most teams are not prepared to handle two blitzing players in the same area.
Some opponents have become so confused that they didn’t block either blitzing player and it completely destroyed their passing game.
“Saint” Blitz
DIAGRAM 1: “Saint” Blitz Vs. Slot, I. Blitz scheme designed to put 4 defenders rushing against one side of the offensive line.
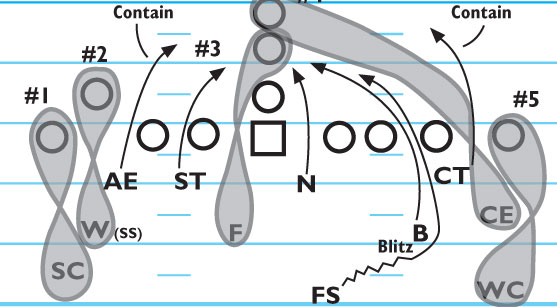
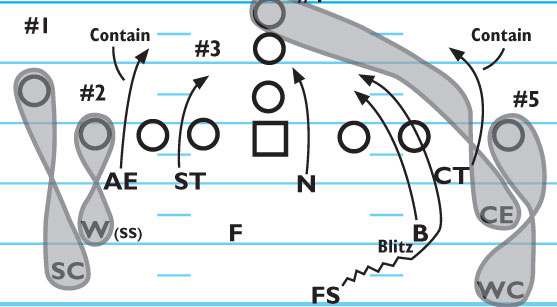
DIAGRAM 2: “Saint” Blitz Vs. Pro, I. Since the FS follows BLB, it’ll often confuse pass protection.
PLAYER ASSIGNMENTS
(Defensive Line)
AR: Align on the outside shoulder of the OT (7 technique) in the C-gap. This player has contain responsibility.
ST: Align on the outside shoulder of the OG (3 technique) and handle the B-gap. He must stay in his gap lane.
N: Align with and shade on the center to right side (shade technique). This player has A-gap weak-side responsibility. He must stay in his gap lane.
CT: Align on the outside shoulder of the OT on the weak side (7 technique) and handle the C-gap on the weak side. This player has contain responsibility. He must work outside to help open the
B-gap for blitz.
(Linebackers)
F: Align on the inside shoulder of the OG at 4 yards. (10 technique off) and handle the A-gap. Man coverage on #3.
B: Align on the outside shoulder of the OG on the weak side (30 technique off) and blitz the B-gap on the weak side. He should take on any blocker to open up the FS on his blitz.
CE: Align in gap between the split end and the OT on the weak side at 3 to 4 yards (90 technique off). Use man coverage on #4.
(Defensive Backs)
SC: Align 7 yards off and 2 yards inside the WR. Play loose man coverage on #1. This player has no safety help.
W(SS): Align 5 yards off and 1 yard to the outside slot. He should use the collision technique on #2 on the snap of the ball. Maintain a depth of 4 to 5 yards and collide with the slot receiver. Stress that this player remain patient, maintain outside leverage and make legal contact with slot. This player must have nerves of steel to play this technique.
FS: Align 9 yards directly over the center. He must sell to the QB a pre-snap read of the cover 3. Just prior to snap, cheat up and blitz through the B-gap. This player should time the blitz during the cadence to disguise it.
WC: Align at 7 yards and 2 yards inside the WR. Play loose man coverage on #5. This player will have no safety help.
Attack The Weak Link
By bringing four defensive players against one side of the line, this scheme is really effective against the weakest offensive lineman in your opponent’s pass-protection scheme. It’s critical that all four of your defensive linemen rush in lanes and the defensive ends contain the QB so he doesn’t escape outside the pocket.
If your blitzing LB and FS do not sack the QB, the DEs often will get the QB trying to escape the pressure.
To play this defensive scheme, your DBs must play solid man-to-man coverage since there’s no safety help. But it doesn’t require them to be great man-on-man cover players since the added pressure means the QB must throw the ball early to avoid the sack. This also means that his throws are often less accurate.
Use Collision Technique
The collision technique requires some explanation so coaches can teach their players how to play this technique effectively.
The DB that’s using this technique should align with his heels 5 yards from the receiver he’s covering and 1 yard outside. At the snap of the ball, he must wait until the receiver comes to him by adjusting his position slightly but not coming forward to meet the receiver.
The defensive player collides with the receiver at 4 or 5 yards to totally disrupt his pattern. This requires patience and your DB must have nerves of steel and maintain outside leverage.
The collision technique is especially effective against the receiver if he’s the hot or outlet receiver. If the hot receiver is well coached, he’ll shorten his pattern and often look back at the QB. Since this means that the hot receiver often loses sight of the defender covering him, you can imagine the results.
If your DBs are going to utilize collision technique, teach your players the difference between legal and illegal hits on the receiver. Be aggressive, but never teach your players to take cheap shots.
Make sure that the DB using this technique has the proper judgement to make it work legally. If your players learn how to use this technique effectively, don’t be surprised if the collision technique shows up on your team’s highlight reels!
Double-Teaming One Gap
Since the “Saint” blitz calls for the FS and LB to blitz through the same gap, they must work together. The LB must open the gap and destroy any blocker(s) trying to pick up the blitz. This means he must not run around blockers but run through them on his way to the QB or the ball.
The FS must sell a cover 3 pre-snap read to the QB. He must time his blitz so that he cheats up just prior to the snap to help disguise the blitz.
While this may sound complicated, you’ll be amazed at how quickly your players pick this blitz scheme up. The FS will think you’re the greatest coach on earth since he seldom gets a chance to blitz.
Players seem to step it up a notch when this blitz is called since they know you trust them enough to play a riskier defense. Most defensive players love to attack their opponents!
Things To Watch Out For
There are some risks to this scheme. First, if the WRs can beat your corners and the QB makes the pass, you could give up a big play, or worse, a touchdown. Poor timing can tip the blitz to the offense and result in an audible or an adjustment of routes to beat the pressure.
If the LB doesn’t open the hole up or clear the blockers, your safety could run into him. However, careful scouting of the opponent and teaching the weaknesses of the scheme will lessen the chances of these risks.
Give It A Shot
If you are fairly conservative in your defensive approach, the “Saint” is a change-up scheme that could tip the balance of a close game in your favor. My experience using this scheme is that, at worst, there’s a quick throw or a short completion. Most of the time, the results are favorable with a sack, incomplete pass or interception on a panic throw.
This blitz scheme works well in a second- or third-down passing situation call to frustrate the offense, especially if they’ve been moving the ball on your defense.
Although this blitz is designed to go through the B-gap weak, it can be adapted as needed. For example, it could go through A-gap strong with the other LB, or be used in combination with a stunt from the strong-side tackle rushing through A-gap strong and sending a LB through B-gap followed by the safety. These are often great game-time or half-time adjustments.
“Saint” As A Decoy
To add further impact to the “Saint” blitz scheme, you can fake or show blitz, then play a different defense to fake out or further confuse your opponents. Use this technique to force early throws or force a team into throwing into double coverage as they adapt to beat this blitz, thinking there will be no safety support.