THE ROCKET SWEEP is a great package when you want to force the defense to have to cover the entire field from sideline to sideline.
It’s an easy package to install and runs as a perfect complement to your other packages, notably to a traditional Wing-T.
If you have considered the Rocket Sweep but weren’t sure if it would be useful in your program, consider these reasons why this package is effective. Then, move on to the principles of the Rocket Sweep and some examples of running and passing plays.
The Rocket Sweep forces the defense to play sideline to sideline.
It forces perimeter players, especially cornerbacks, to be tacklers and it causes interior players to run sideline to sideline.
It is very formation friendly. It can be run to split-end flanks, tight-end flanks, Nub sides and unbalances.
It forces the secondary to roll coverage, so it’s difficult for the secondary to remain in a plain Cover 3.
The speed of the motion is going to help the offense outnumber the defense. This creates new conflicts for the defense.
It requires minimal blocks. Your offense only has to block defenders from the C-gap to the outside.
It is an excellent package from which to run play-action passes.
It is easy to run counters off the Rocket Full Flow, Rocket and Jet motions.
It is easy to install.
principles of the rocket sweep
Once you decide to install the Rocket Sweep into your offense, it’s critical to keep the following 10 basic principles in mind. These principles are the basis for everything executed and accomplished (blocking, running and passing) while using the Rocket Sweep.
1. Always A “Check With Me” Play. Your players come out of the huddle having one direction in which the play in the Rocket Sweep is to be run. However, the QB always has the option to change the direction of the play based on what he sees. He simply calls out, “Opposite! Opposite!”
2. The Split End Has To Be A Concern For The Defense. This causes the linebackers to flow and the secondary to fill. The best passes come against a rotating secondary.
3. The Fullback Has To Be A Run Concern For The Defense. This especially is true in the companion plays (Belly, Down and Trap) to the Rocket Sweep.
4. Two Key Blocks Part I. When the Rocket Sweep is to the tight-end or wing-back side, the TE and the WB have two key blocks.
5. Two Key Blocks Part II. When the Rocket Sweep is to the split-end or slot-back side, the SE and the slot back have two key blocks.
6. Complementary Plays Must Be Productive. If the defense stops the Rocket Sweep, then the complementary plays must be productive. Even if the Rocket Sweep doesn’t gain a yard, the complementary plays are going to be explosive.
7. Results In A Minimum Amount Of Blitzing And Stunting. The defense has to decide if it wants to pursue all the way to the flank or risk blitzing and get caught up inside.
8. Forces Defense To Develop Two Distinct Game Plans. The defense must have a plan to stop this package and your traditional offense.
9. Utilize As Many Formations As Possible. The Rocket is easy to run from different formations, which puts the defense in a bind.
10. Timing Is Everything. The timing of the Rocket back and the timing of the toss are critical to establishing the Rocket Sweep.
numbering the defense
Understanding the Rocket Sweep also has a lot to do with understanding the defense across the line from your offense. The best way to break down the defense is by using a numbering system, whereas “1” signifies the first defender outside the C-gap (remember, only players in the C-gap and outside are blocked) and so forth.
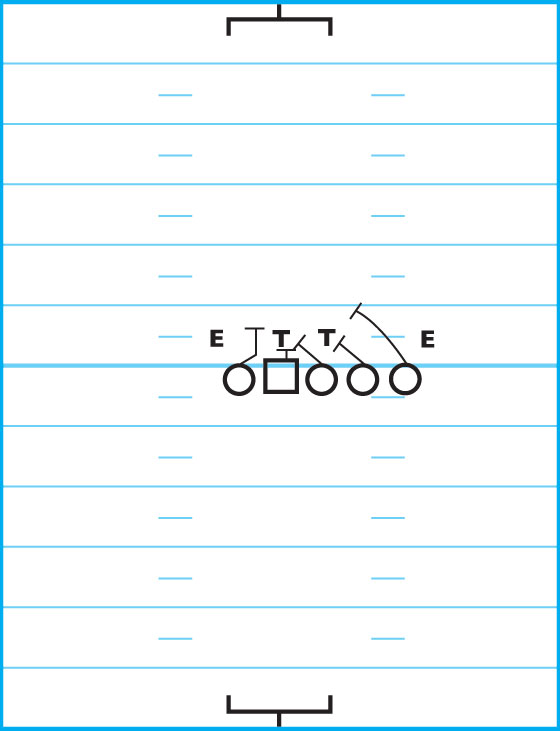
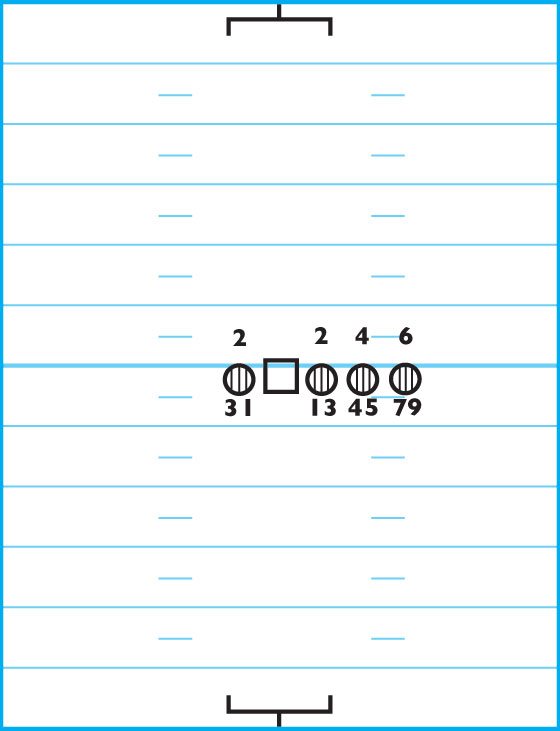
DIAGRAM 1: Numbering The 50 Defense. Draw an imaginary line through the C-gap on both sides and number the defensive players according to who is the first just outside that gap. Against the 50, the defensive tackles are No. 1, followed by the defensive ends, CBs, safeties and LBs. This helps determine who on the defense might be involved in making the play.
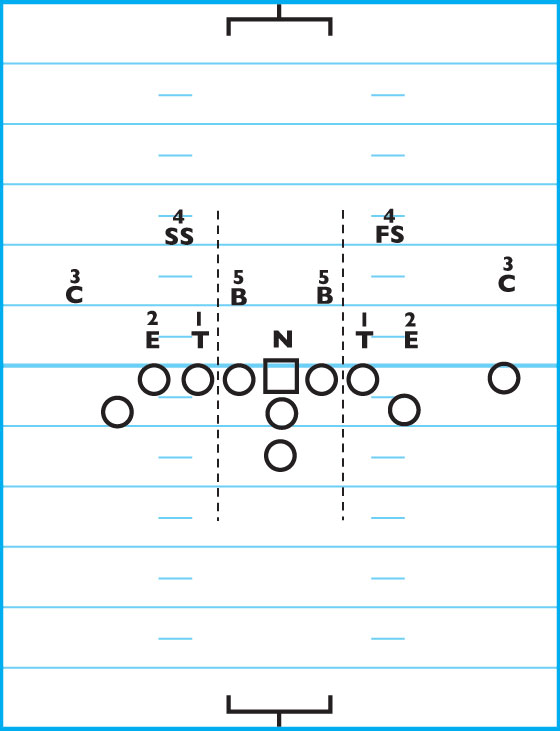
DIAGRAM 2: Numbering the 4-3 Defense. Against the 4-3, the DEs are first, followed by the Sam and Will LBs, then the CBs, followed by the safeties and finally the Mike LB.
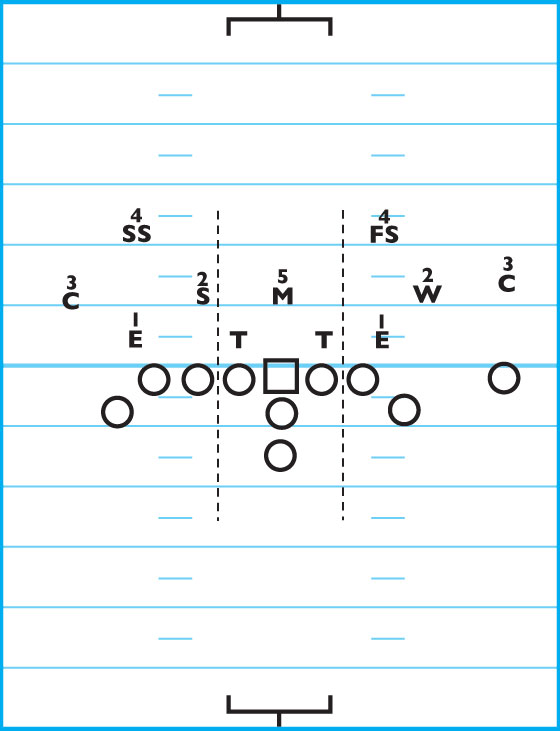
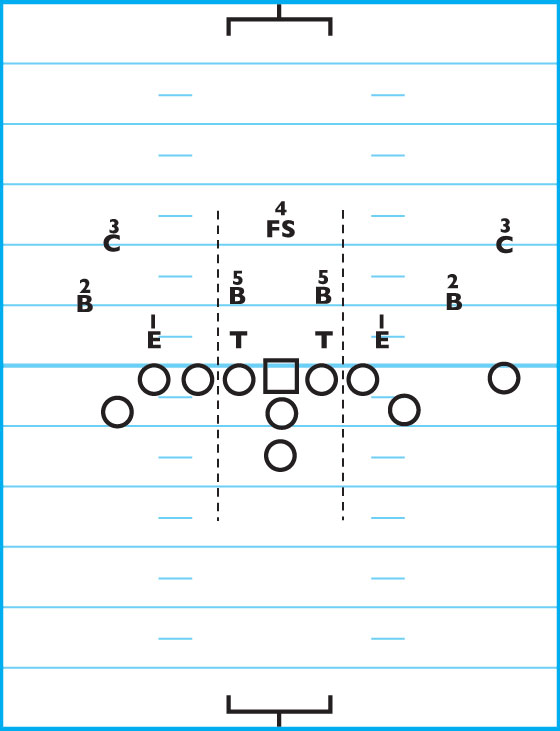
DIAGRAM 3: Numbering The 4-4 Defense. In this case, the DEs are first, followed by the outside LBs, the CBs, the free safety and finally the inside LBs.
A good rule is to have one coach constantly watching the play-side 1 and 4, another watching the play-side 2 and 3, a third coaching watching the 5 and a fourth coach watching the backside chase player.
rocket sweep running plays
As mentioned, the Rocket Sweep is easy to run against all defensive fronts and to most areas. The following are some basic and successful plays within the Rocket Sweep package.
DIAGRAM 4: Rocket Sweep To TE Side Vs. 8-Man Front. Against an 8-man front, the right HB blocks the OLB while the TE blocks the CB on the second level (bypassing the DE). The play-side OT and OG hold off second-level pursuit while the backside linemen scoop. The left HB comes in motion and continues running to the right side. He is at a 3 1/2-yard depth and is close to the outside leg of where a “ghost” TE would be on the line when he receives the pitch.
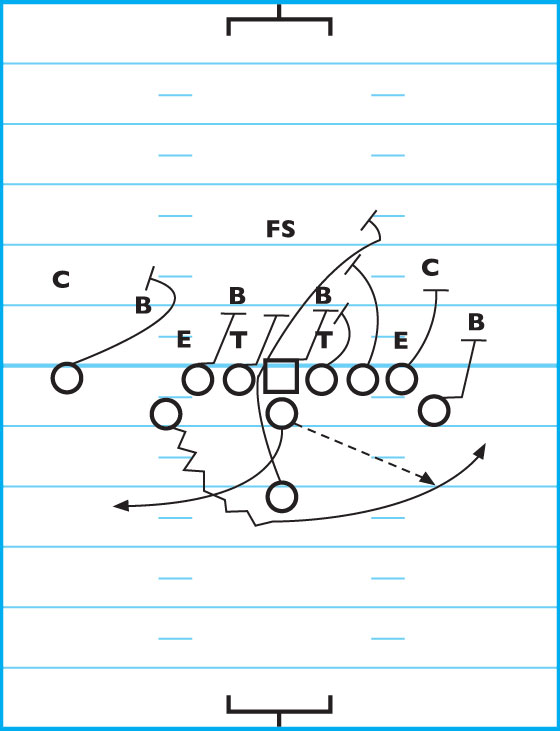
DIAGRAM 5: Rocket Sweep To TE Side Vs. 7-Man Front (50 Defense). Against the 50 the principles are the same only this time the TE blocks the DE and moves on to the strong safety. The right HB blocks the CB.
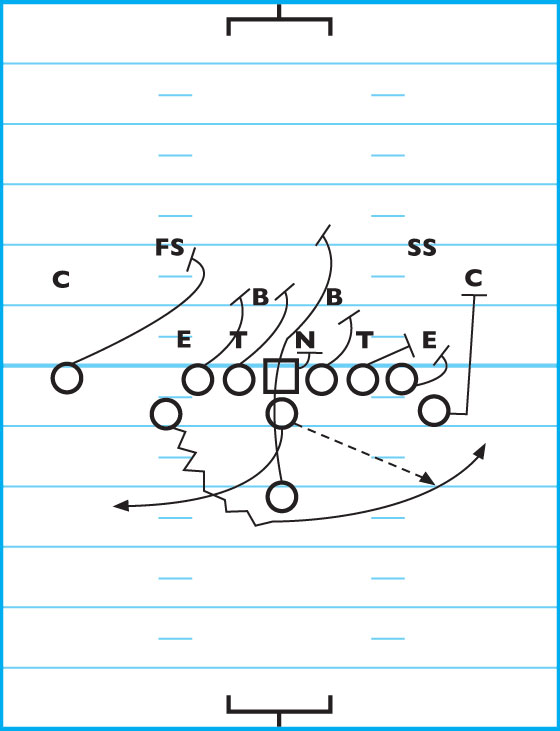
DIAGRAM 6: Rocket Sweep To Nub Side Vs. 50 Defense. In this instance the TE has moved to the other side of the offensive line. The play-side OG gets to the second level while the play-side OT hits the DE, then goes to the second level if he can. The right HB handles the CB. Even going to the short side, you still have the same ratio of blockers against defenders because the SS had to move to accommodate the TE.
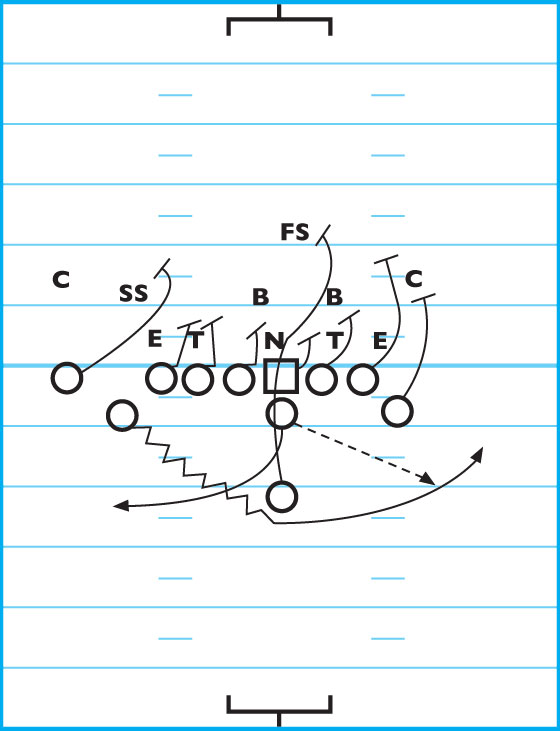
DIAGRAM 7: Rocket Sweep To Nub Side Vs. 4-4 Defense. The right HB blocks the OLB on the play side. The play-side OT bypasses the DE and hits the CB. The play-side OG sticks the inside play-side LB.
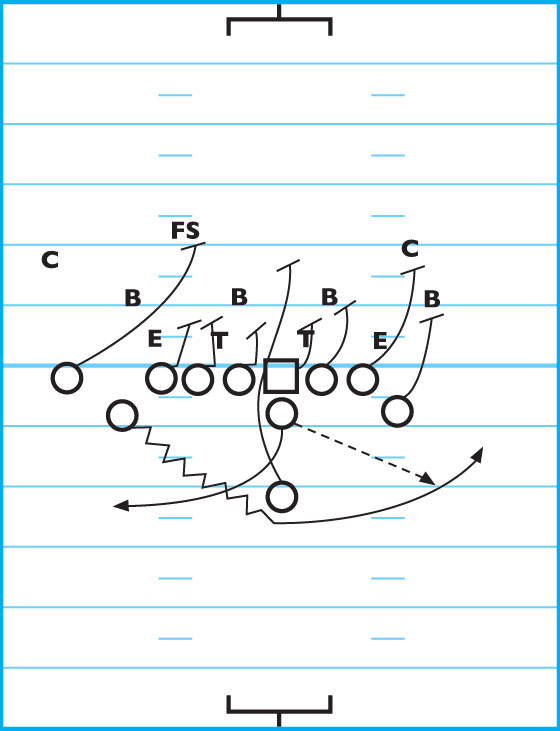
DIAGRAM 8: Rocket From 100 With Diveback. Adding in a diveback doesn’t change the responsibilities in the Rocket Sweep. It simply shortens the motion of the player who is going to receive the ball.
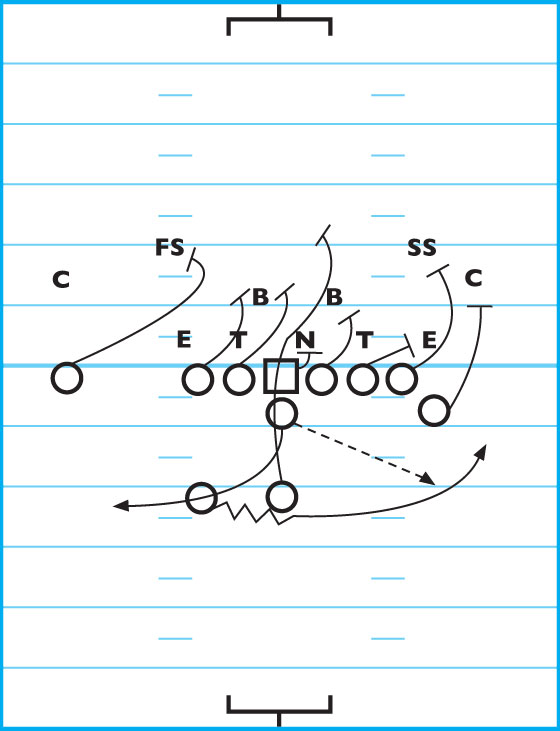
DIAGRAM 9: Rocket From Spread 100 With Diveback. This formation places the WR on the play side of the field and the TE on the side opposite. Always instruct players to block to the second level and not to worry about defenders inside the C-gap.
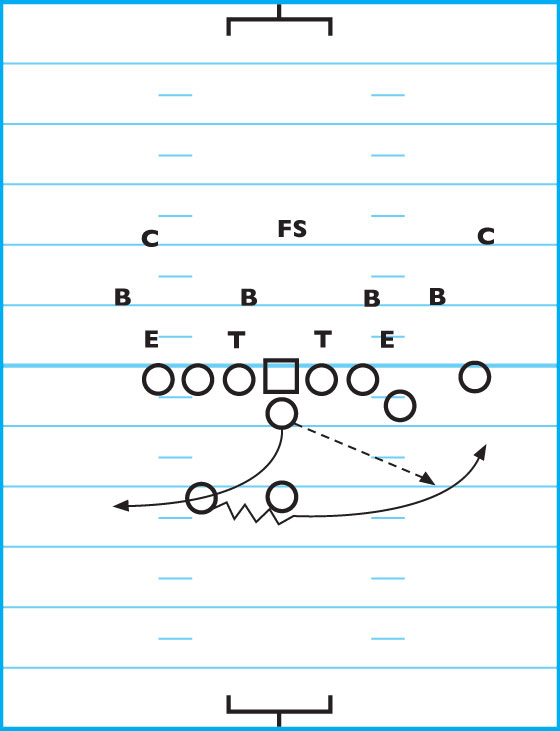
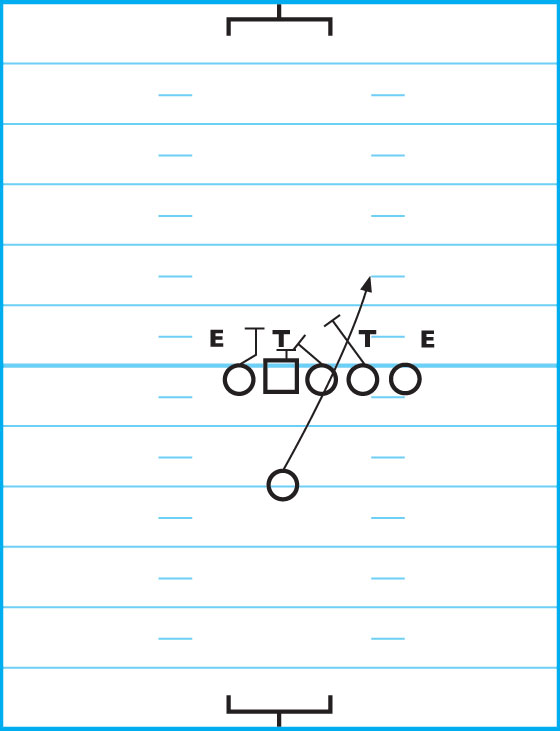
DIAGRAM 10: Rocket From Loose T Formation. Even in a T formation, the Rocket Sweep is effective as the number of blockers to pick up the defenders is even.
companion plays
After running some of the basic plays from the Rocket Sweep, the companion plays should be big gainers for your offense.
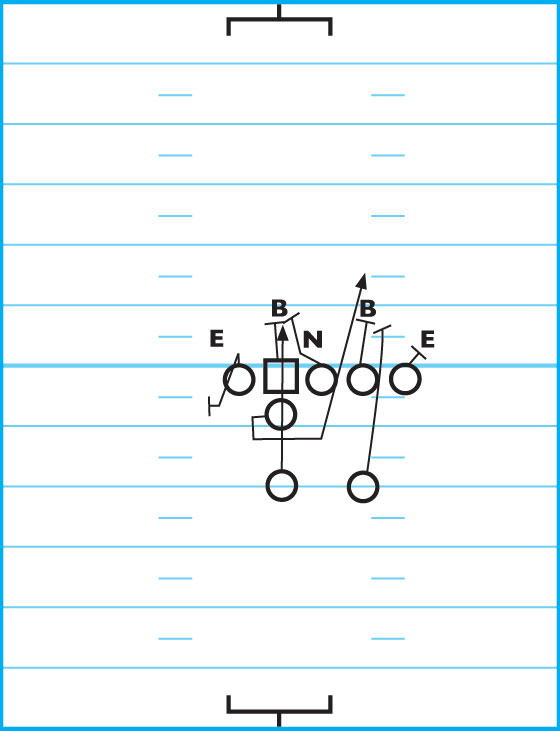
DIAGRAM 11: Rocket Belly Crossblock Vs. 5-2. The responsibilities change when running companion plays. Here are the responsibilities for the Rocket Belly Crossblock:
Play-Side OT: Gap, down, on.
Play-Side OG: Make “on block” or “cross block” call. Block his gap or pull and trap first man outside OT’s block.
Backside: Scoop the play-side gap.
Right HB: Set up 1 yard outside OT and 1 yard deep. First step is for toes of where a normal diveback position play would be. The second and third steps are two small steps for timing purposes. He then plans and blocks the first LB to his side of center.
FB: Take Belly steps — lead, crossover and play. Always make sure toes are north and south. Take handoff from QB and reads block of OT.
QB: Fakes pitch to left HB. Step around FB and show Belly Keep Pass.
Left HB: Run Rocket Sweep without ball, which involves flashing his hands, faking to put the ball away, pumping his inside arm and running for the (fake) first down.
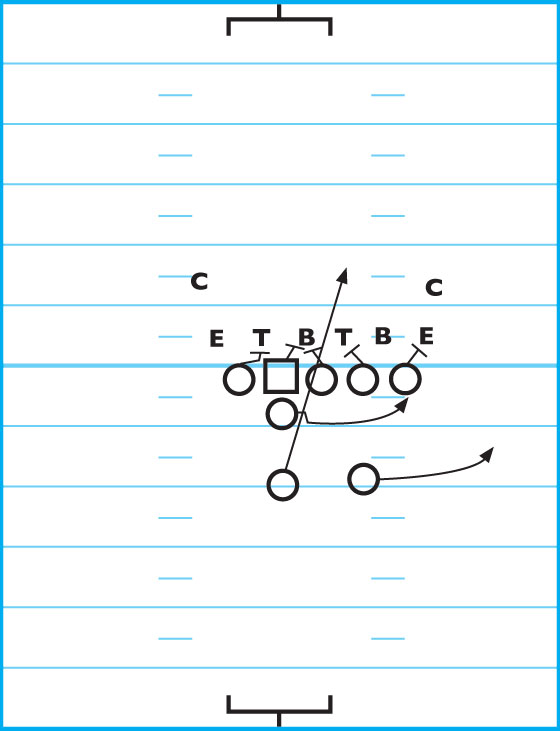
DIAGRAM 12: Rocket Belly Crossblock Vs. 4-4. Responsibilities include:
Play-Side OG: Make “on block” call, blocks many in his gap.
Play-Side OT: Block out.
FB: Sprint to outside leg of OG.
Right HB: Take one step to diveback position, block first LB to his side.
QB: Reverse-pivot 45 degrees, hand off to FB, step at FB’s heels, step around FB, pass fakes.
Left HB: Rocket Sweep without the ball.
SE: Block the cut off.
DIAGRAM 13: Rocket Down Vs. 5-2. Responsibilities include:
TE: Down, backer.
Play-Side OT: Gap, down, backer.
Play-Side OG: Pull and trap first man outside TE.
Center: Fire-block, double-team.
Right HB: Influence and roll off play-side LB.
FB: Take handoff, if OT is covered, aim at inside leg of TE.
QB: Reverse-pivot flat and fast to reach FB, hands off, ride and shuffle. Attack corner.
Left HB: Rocket motion, run pitch reaction with QB.
waggle pass
There are numerous passing plays that come from the Rocket Sweep package. One of the most successful is the Waggle Pass.
DIAGRAM 14: Waggle Pass To SE Side. Responsibilities include:
Left OT: Gap, down, on.
Left OG: Gap, pull and log first man outside OT’s block.
Center: On, away.
Right OG: Pull and block first free man at flank.
Right OT: Pull, check.
FB: Check B-gap blitz. If no one to block, release to flat at 4 yards depth.
Left HB: Rocket Sweep without ball.
SE: Run deep out vs. Cover 3 or soft corner. Fly route if tight corner.
Backside No. 2 WR: Run crossing route at 14 yard depth.
Right HB: Run post. Don’t cross hash mark on his side of field, occupy safety.
QB: Reverse-pivot, fake toss, gain 5-5 1/2 yards depth. Progression is deep to short to run.
DIAGRAM 15: Waggle Pass To TE Side. Responsibilities include:
Right OT: Gap, down, on.
Right OG: Gap, pull and log first man outside OT’s block.
Center: On, away.
Left OG: Pull and cross over, read block of right OG, log block unless penetration at flank.
Left OT: Pull, check.
FB: Fill for right OG, pick up blitz. If no blitz, release to flat at 4 yards depth.
TE: Inside release, 20 yards deep.
Backside No. 2 WR: Crossing route.
Backside No. 1 WR: Post route.
Right HB: Rocket Sweep without ball.
QB: Reverse-pivot, fake toss, gain 5-5 1/2 yards depth. Progression is deep to short to run.