OUR TEAM HAS broken all of our school’s passing and receiving records, while leading our conference in passing in recent years. One key ingredient to this airborne success has been the extensive use of a receiver-screen package.
The following receiver-screen package has been successful against a variety of defensive fronts and coverages.
To make things simple, we’ve introduced a numbering system for play calling. Instead of labeling our receiver positions X, Y, Z and H, we number our receivers and back 1 through 5, beginning from the side the formation is called. For example, when “trips right” is called, the receivers are numbered 1 through 5 beginning on the right side.
DIAGRAM 1: Trips-Right Receiver Numbering System.
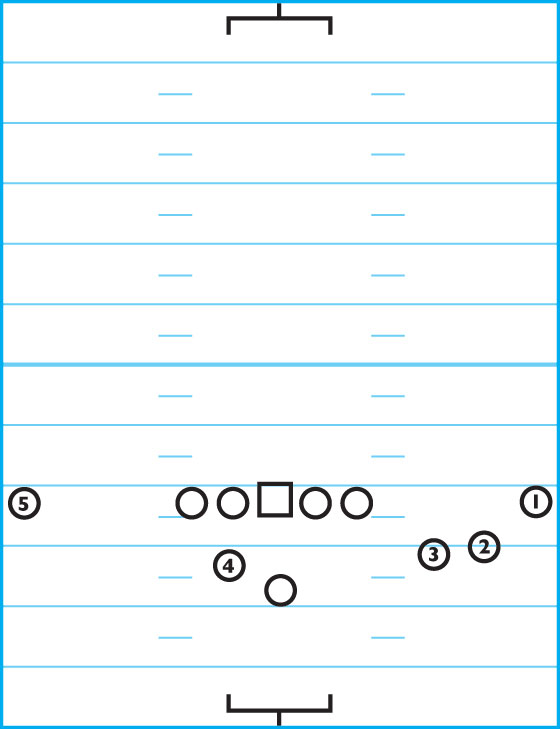
DIAGRAM 2: Balanced-Set Receiver Numbering System. In a balanced set like our “doubles” look, we’ll always number from the right side and the tailback is always No. 4.

Bubble Screen
Our base screen is the bubble screen or what we refer to as our “kick” play. The kick play is just another way for us to run a toss sweep, but it allows us to attack the edge of the defense much quicker. We run the kick play from our trips set the majority of the time, but also throw this screen out of our doubles formation.
There are two key points for the offense to remember that sometimes gets overlooked in regard to screen passes.
1. Watch For Batted Passes. When the QB is under center, the offensive tackle to the play side needs to fire out into the defensive end or cut block him to keep his hands down. Many teams play with very wide
DEs who get upfield quickly and attempt to bat down this type of pass.
2. Beware Of The Backward Pass. The offense needs to keep in mind that screen passes are often backward passes, and therefore are live balls if they hit the ground.
Receiver Blocking Schemes
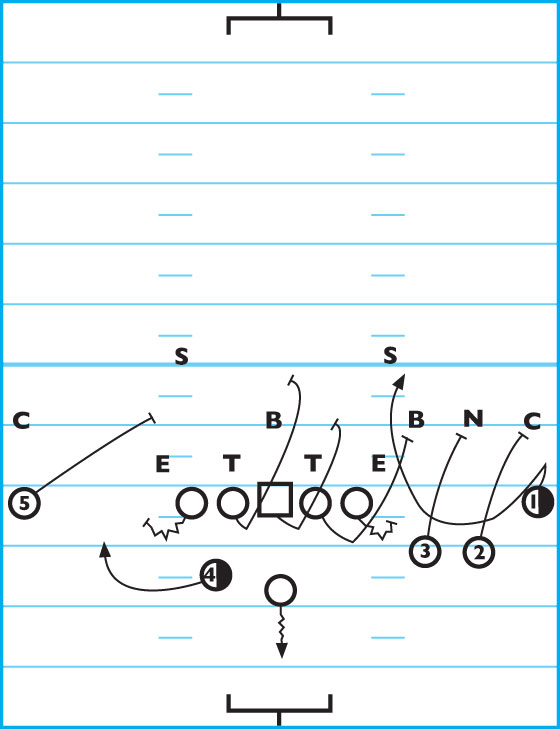
Base Scheme. The No. 1 receiver explodes off the line of scrimmage and reads the cornerback. If the CB bails, the No. 1 receiver releases and blocks the safety. His track to the safety looks similar to his path on a slant route.
DIAGRAM 3: Receiver Blocking Schemes (Base Scheme). The No. 1 receiver reads his corner to execute his block, while the No. 2 receiver blocks the first man over him or to the inside.
Switch-Block Scheme. Another scheme is the switch block executed by the No. 1 and No. 2 receivers. If 1 feels like he can safely block down on 2’s man, he’ll make a “Bingo” call, alerting 2 of the switch block.
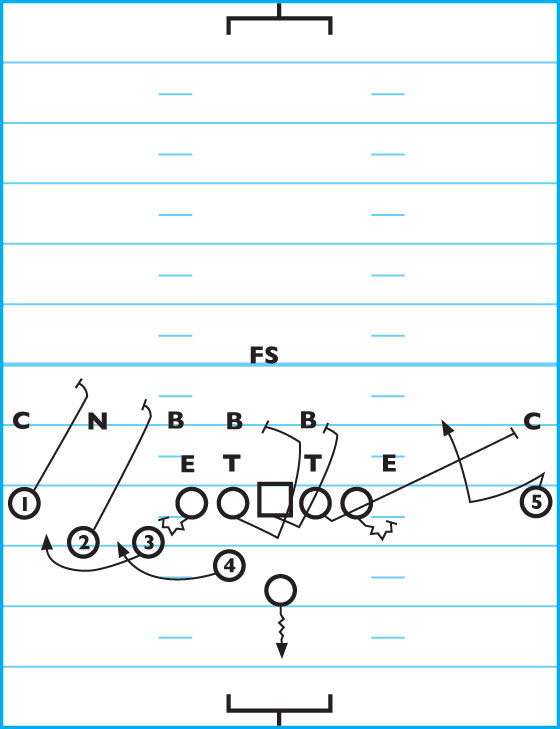
DIAGRAM 4: Receiver Blocking Schemes (Switch Block). When executing this block, 1 blocks down on 2’s man, trying to keep his head on the ball side, while 2 cuts off 1’s butt and kicks out the corner. This forms an alley for the No. 3 receiver.
No matter the blocking scheme, it’s important for 3 to keep his shoulders square to the LOS with only his head looking back at the quarterback. His goal is to catch the ball first and immediately get upfield.
It’s very important that the running back properly executes a flare route away from the kick play in an effort to pull a LB with him.
The QB gives a quick pump fake and looks off to the back flare. You must drill your QBs so that they become adept at the look-off-and-pump fake. It’s a difficult skill when you take into consideration that the QB must catch the snap, gain proper depth and make the necessary throws with the correct timing needed for the screen to work successfully. We’ll run a 15-minute screen period daily with the entire offense, as well as extra time for the QB to get individual work on QB screen technique.
Slip Screen 90/91
This screen can be run out of any formation and to either side, with very few changes in your blocking scheme. We’ve have had a lot of success with this play from the shotgun set.
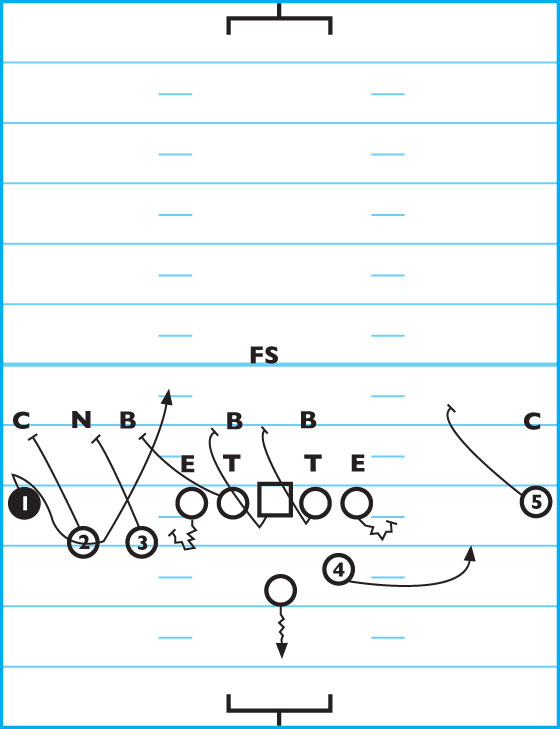
DIAGRAM 5: Slip Screen 90/91. To the single-receiver side, our linemen blocking rules are as follows: The play-side OT takes his normal pass set, enticing the defensive end to rush. As the DE rushes upfield, the tackle cuts him to get his hands down. The play-side OG punches and releases, looking to block the corner that’s aligned over the No. 5 receiver. The center’s rule is to release and block the front-side LB, while the backside OG releases and blocks the backside LB. The backside OT pass sets the DE.
The QB, by using a pump fake away from the play, can make a big difference in the execution and success of this play. In the shotgun set, the QB gains depth, gives a good pump fake to the No. 3 receiver and fakes the kick on the backside (bubble screen). The QB’s target is the upfield shoulder of the receiver, leading him slightly.
The wide receiver’s footwork, splits and timing are all crucial to the success of the play. The WR needs to drive off the LOS to the outside shoulder of the defender over him. He does this with a quick 3-step move, planting, coming back under control and ensuring that he’s behind the LOS. The receiver gives the QB a target, and upon catching the ball, immediately turns upfield and gets into the alley.
Screen To Multiple Receiver Side
There are some slight adjustments in the blocking scheme when running the screen to a multiple receiver side.
DIAGRAM 6: Slip Screen To 3-Receiver Side. The No. 2 receiver blocks out No. 1’s defender, while No. 3 receiver blocks out 2’s defender. This, in turn, adjusts the play-side OG’s responsibility, who now blocks the defender who is over 3. The center releases and picks up front-side LB, the backside OG blocks the backside LB and the backside OT pass sets and blocks the DE.
It’s important to note that our offensive linemen are taught that anytime they feel the man over them is playing for a screen and not rushing hard, he must immediately lock up on him and drive block. This rule has helped us defeat zone blitzes as well.
Slip Screen 95/96
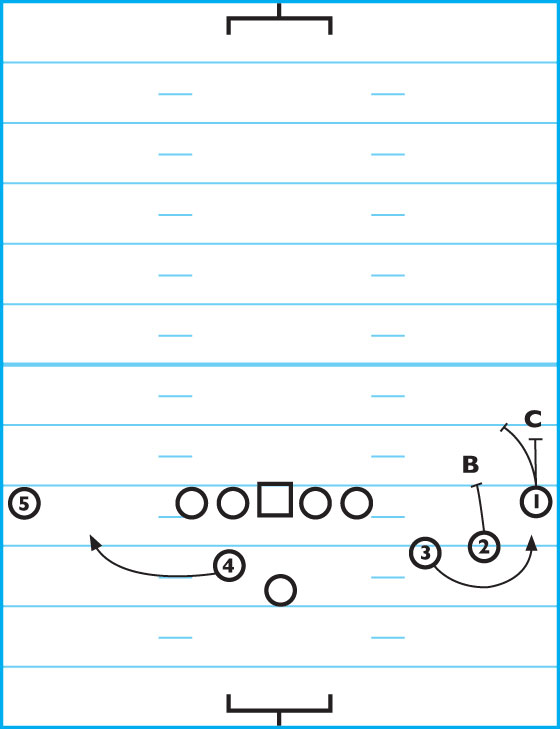
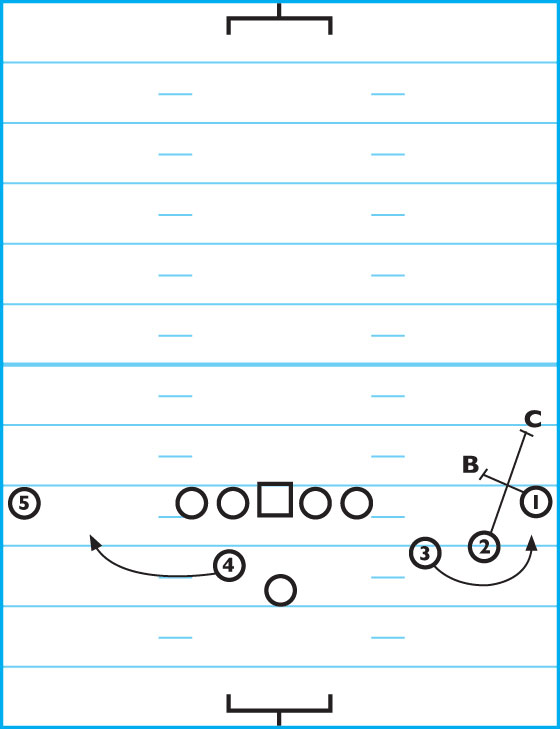
We also run a slip screen to the No. 2 receiver. The main difference in running this particular screen is timing. This screen hits quicker because of the proximity of 2 to the QB.
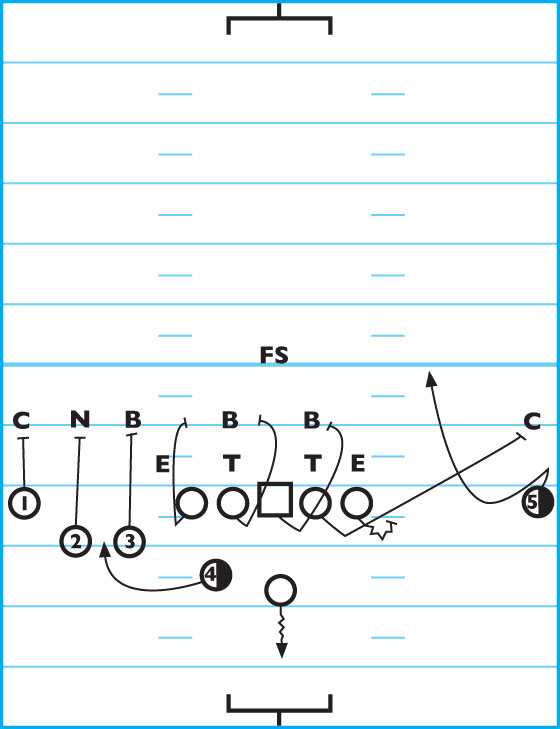
DIAGRAM 7: Slip Screen 95/96. The No. 1 receiver explodes off the LOS while taking an inside, cut-off release on the corner. No. 2 works a good move upfield to help in the timing, comes back across the line and must be ready to knife upfield immediately after catching the ball.

Coaching Point: Your No. 2 receiver will have the tendency to want to keep moving parallel to the LOS after catching the ball. Due to the fact that this play hits a little quicker and closer into the line, he’ll sometimes have difficulty reading blocks. Coach the receiver to catch and turn upfield right away and find his alley. Remind him that pursuit will be coming from inside out and he has no friends in there.
Double Screen
The double screen has been the most productive of the entire package. All the previous screens have had the RB flaring away from the play. But when executing the double screen, you’ll flare the back toward the three-receiver side.
DIAGRAM 8: Double Screen. On this play, the receiver’s goal is to position himself in a good break-down position, much like a basketball defender. His hands will be on the breastplate of the defender with elbows in, sliding his feet and keeping himself between the defender and the ball carrier. He must wait for the “Go” call from the ball carrier to engage and drive the defender. It’s the ball carrier’s responsibility to set up the block. The three receivers in trips formation block the defender over them.
The QB, out of the shotgun, takes his normal 3-step drop reading the end man on the LOS. If the end man comes hard on a pass rush, he throws the ball to the RB on the flare route. If the end man jumps the flare route, the QB gains more depth and throws the screen to the single-receiver side.
We have faked to the back flaring on many of our screens without throwing to him. Defenses begin to ignore the back and when this occurs, you can come back with the double screen. Even if the defense reads the flare route, your QB has the option of coming backside to the slip screen. Whatever the defense does on this play — it will be wrong.
Double-Screen Crack Block
As a change up, you can flare the back to the single-receiver side while executing your slip screen to the three-receiver side. The WR to the single side must perform a crack block on the first DB or LB inside. This puts your back out in space one-on-one with the corner.
DIAGRAM 9: Double-Screen Crack Block. Make sure the WR to the single side performs a crack block on the first DB or LB inside.This matches up your back one-on-one with the corner, out in open space.