WHEN YOU WORK at a school that isn’t a state powerhouse, and worse yet, hardly has enough players to field a varsity team, you need to make game planning easy on the players who do take the field. You never know what level of experience you have among a limited number of players. We now are part of a co-op with another school and have about 40 players (freshmen through seniors) at our disposal to field a legitimate varsity and junior varsity team.
If your squad struggles to get players out for the football team or features many inexperienced players, you need to go with an offensive philosophy that is easy to understand. This doesn’t mean you are without wrinkles, options and variations, but I run our offense out of three primary sets: Titans, Arizona and Ace.
Almost all of our plays are run out of each formation, so it’s easier for players to understand.
DIAGRAM 1: Titans. Titans is a Wing-T formation.

DIAGRAM 2: Arizona. This is a run-and-shoot formation.
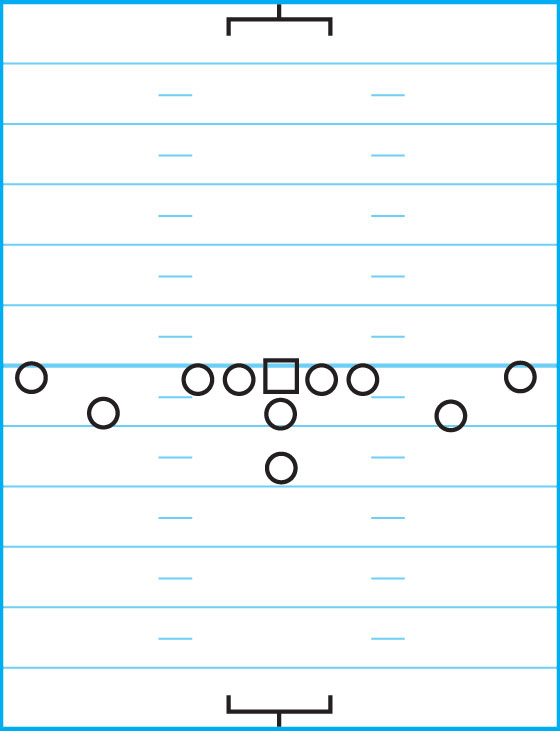
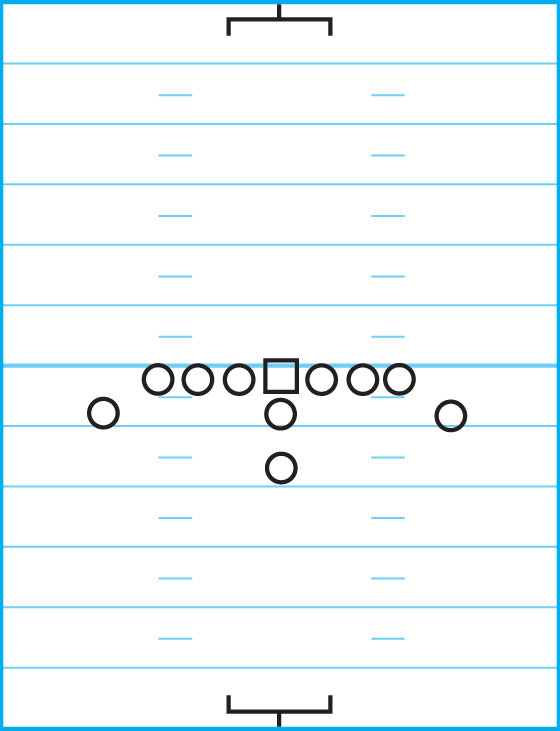
DIAGRAM 3: Ace. Ace is a single-back with double tight ends and double wings.
There are adjustments made from game to game, as well as during the game. However, one of our most effective plays is our inside trap, which is run to both the strong and weak side to take advantage of various defensive alignments. Our inside trap is a major focus of our offense and is run from the Titans formation. After covering the inside trap, the passing attack is outlined.
inside trap plays
Most of our inside trap plays have variations to be used against specific defenses.
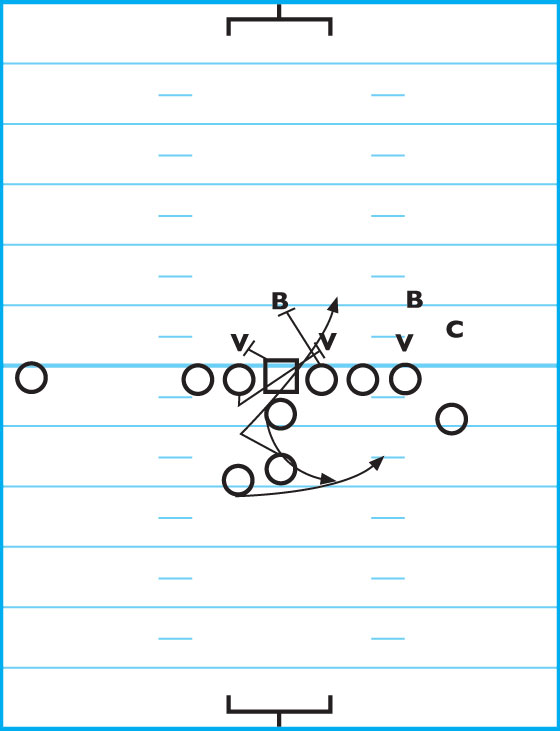
Against a 43 defense, use Titans Right 38 Sweep or Titans Right 22 Trap.
DIAGRAM 4: Titans Right 38 Sweep (Vs. 43 defense). The quarterback runs a play-action to the left to the fullback immediately behind him. He then moves to his right to give the handoff to the RB. The backside OG pulls and the center seals his area. The play-side offensive linemen seal their blocks.
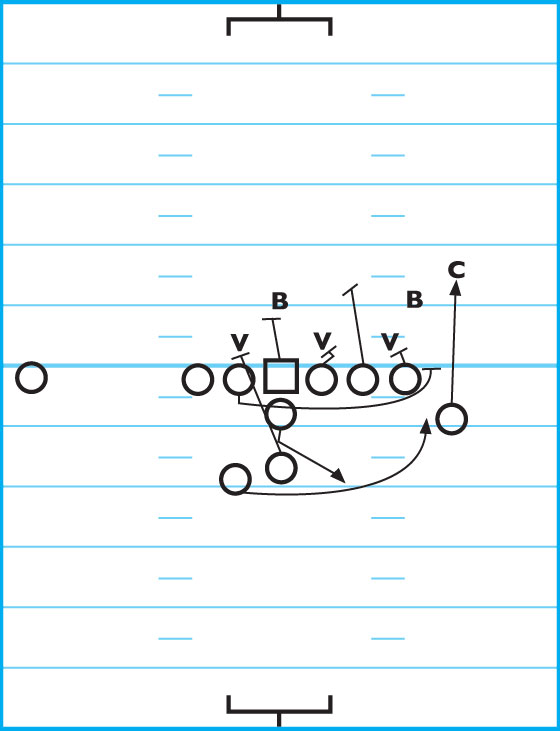
DIAGRAM 5: Titans Right 22 Trap (Vs. 43 defense). This is a FB trap through the 2 hole, which is to the strength of the formation. The “22” in the name means the 2 back (FB) is going through the 2 hole. The OGs and center follow a trap-blocking scheme.
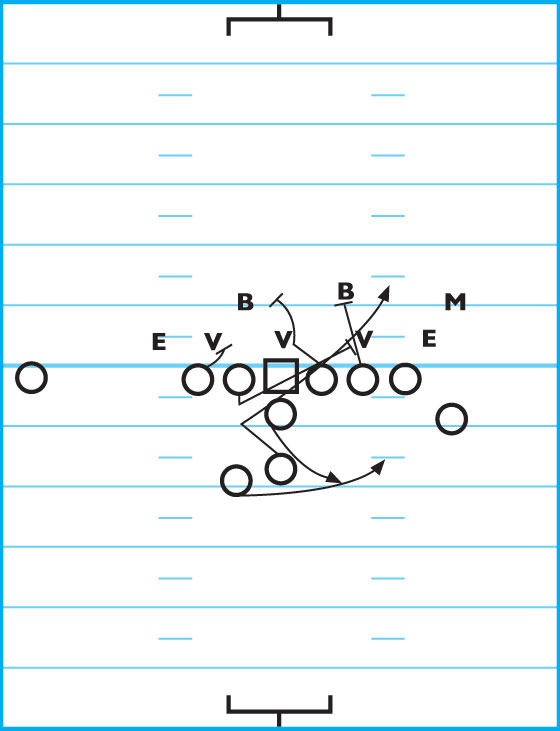
The same two plays with slightly different blocking schemes are run against a 52 defense.
DIAGRAM 6: Titans Right 38 Sweep (Vs. 52 defense). The blocking is the same with the line hitting the first man they see with the exception of the backside OG, who is pulling again. The play-side wing comes up to block the DE.
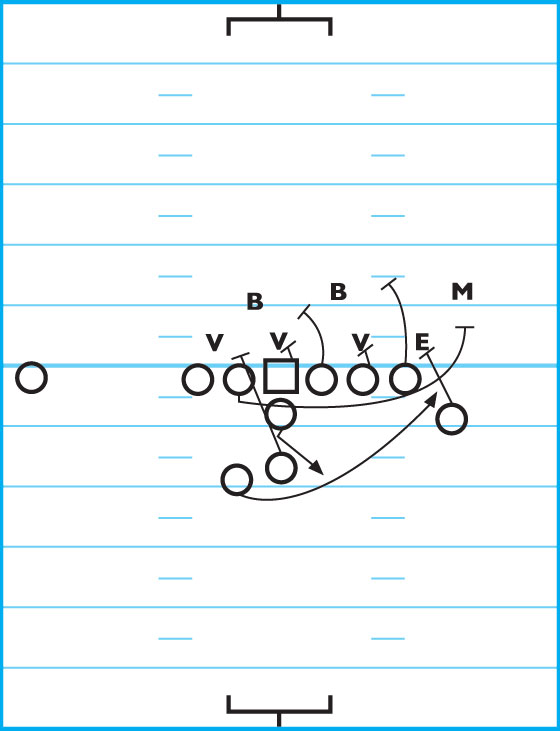
DIAGRAM 7: Titans Right 22 Trap (Vs. 52 defense). The backside OG has farther to go to hit his man on the play side this time. The play-side OT is responsible for the LB on his side, which opens up the hole for the FB. The play-side OG either uses a combo bump block (with the center) if the nose guard is giving you problems. Otherwise, he moves into the second level of the defense and hits a LB. In some cases the nose guard frees your center by slanting hard into the A-gap. If this happens, use the center for your trap man on the backside.
If the defense has made adjustments, this gives you the opportunity to run the Titans 21 Trap, which is set up by the Titans Right 34/36 Lead.
DIAGRAM 8: Titans Right 34/36 Lead. The quarterback opens to the strong side of the formation and the FB leads the halfback (the 3 man) through the 4 or 6 hole (making it either the 34 or 36). The hole opens because the play-side OT seals his man and the center seals the NT. The play-side OG moves into the second level of defense and knocks off a LB if there is one in the area.
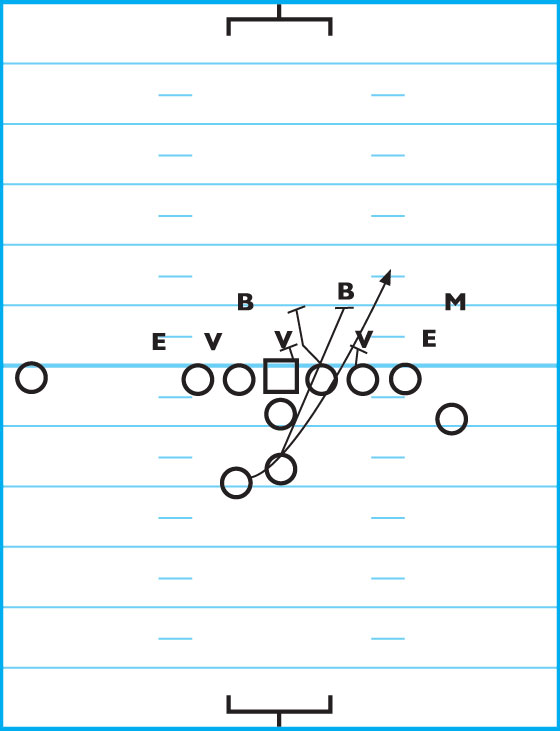
DIAGRAM 9: Titans Right 21 Trap. The Titans Right 34/36 opens up this Titans Right 21 Trap because typically the NG starts to shift to the strong-side gap to take away the pulling OG. Or, if you see a 4-3 front with the LBs shifted to your strength, use the Titans Right 21 Trap. The center seals the NG to the left while the right OG comes across to pick off the DT. The left OG moves into the second level of defense and hits a LB. The halfback runs to the right side, just as in the Titans Right 34/36 Lead to confuse the defense. The FB takes one step to the right to sell the play, then shifts to the left to receive the handoff. This play also works well out of the Arizona formation when the defense starts to adjust to your motion with a backside blitz or when they overshift the linemen.
When the defense starts to pick up on your plays and makes adjustments, be ready with your own adjustments.
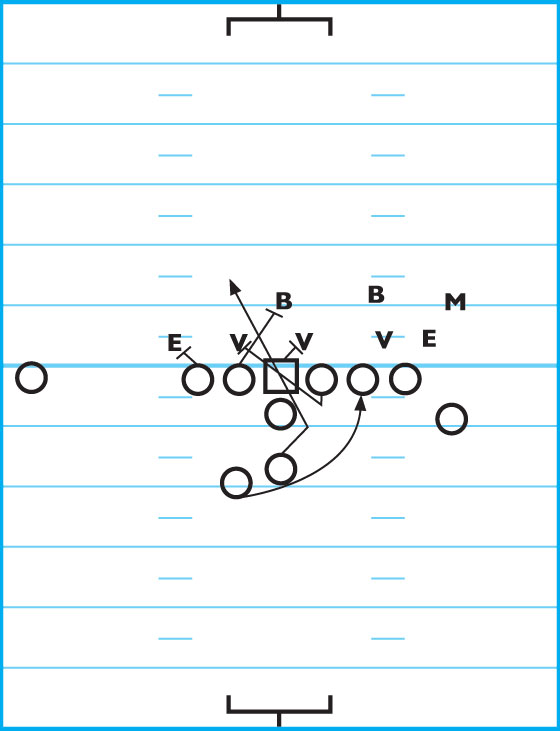
DIAGRAM 10: Titans Right 21 Trap (Vs. 52 defense with adjustments). In this case, the center traps to the left and blocks the DE. The left OG hits the man directly in front of him. The left OT moves into the second level of defense and hits the LB. The right OG seals his man to the left. The right OT moves into the second level of the defense and knocks off a LB. The halfback once again moves from his position on the left and goes to the right, giving the look of a possible run to him on the right. The FB takes one step to the right to sell the possibility of a run to the halfback, then goes to his left and receives the handoff.
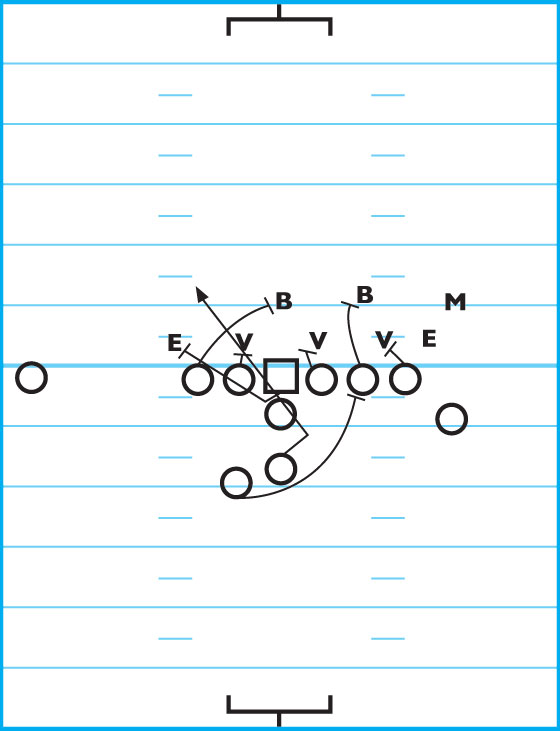
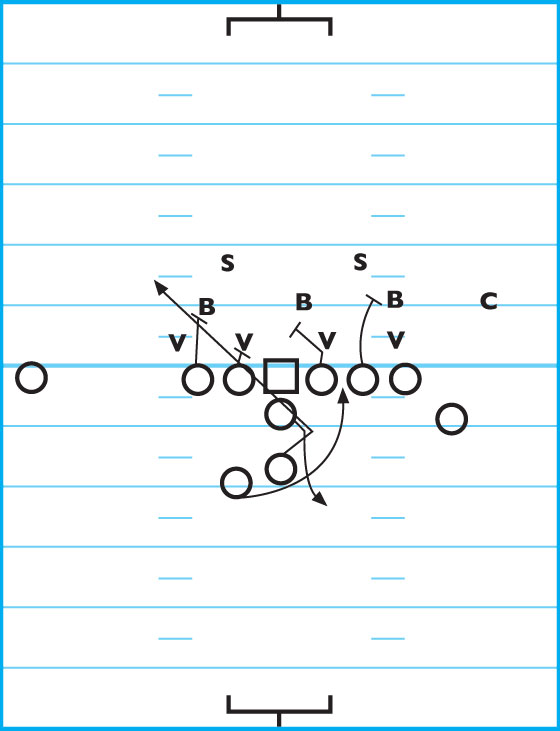
DIAGRAM 11: Titans Right 21 Trap (Vs. 43 defense). When the center is trapping, the backfield action is the same. The left OG (which is the strong side) must control the man over him or the A-gap. The strong-side OT takes the LB and the weak-side OT gets the LB or goes down the field.
Titan passing attack
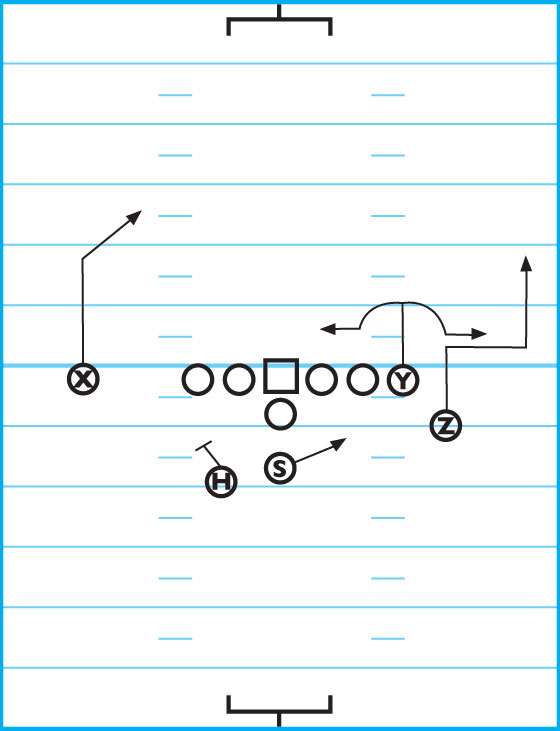
The passing attack within this system utilizes a passing tree (see Diagram 15) with each route numbered and each receiver being identified by a letter, so it’s easy to identify which player is going to be running which route. With this system, you can call a combination of patterns. The next three diagrams show the live receivers within the passing attack and within the three offensive sets.
DIAGRAM 12: Titans Right Formation Passing. X is the WR. Y is the TE. Z is the wingback. S is the FB. H is the RB.
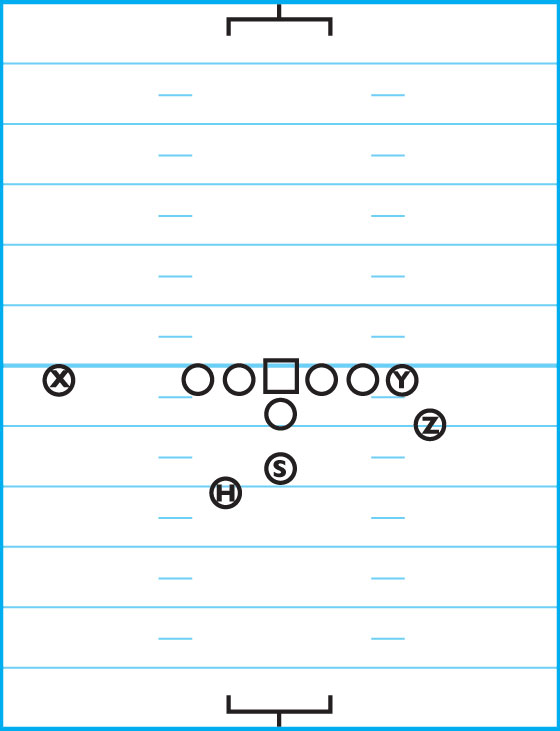
DIAGRAM 13: Arizona Formation Passing. In this four-receiver set, either H or Z will be in motion almost every play.
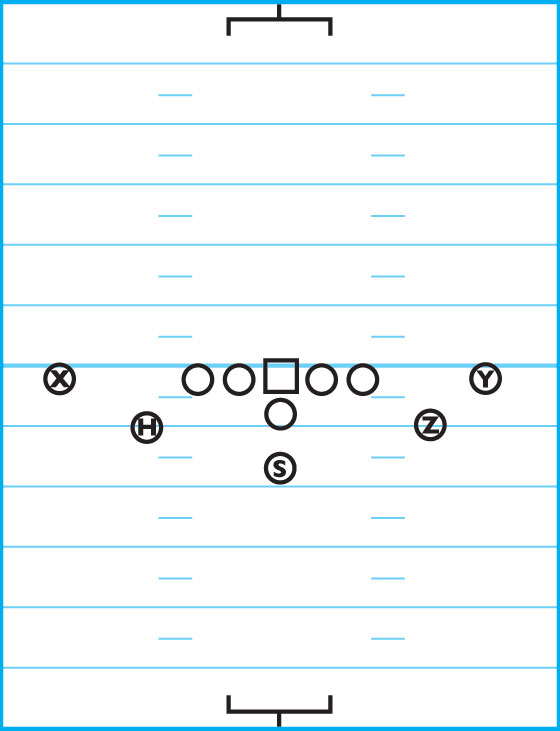
DIAGRAM 14: Ace Formation Passing. This is a double-TE set with X and Y serving as the TEs.
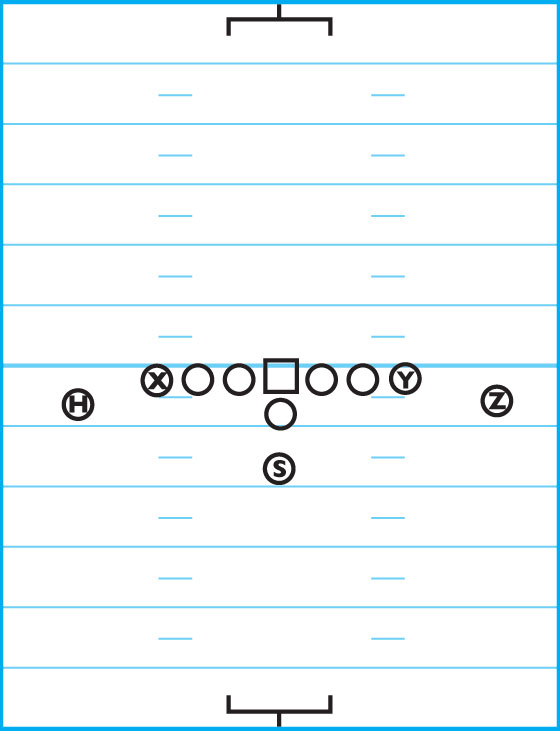
DIAGRAM 15: Passing Tree. The Passing Tree is an easy way to call pass routes for four receivers. All odd-numbered routes go inside and all even-numbered routes go outside. With that in mind, these are the 10 calls made from the passing tree:
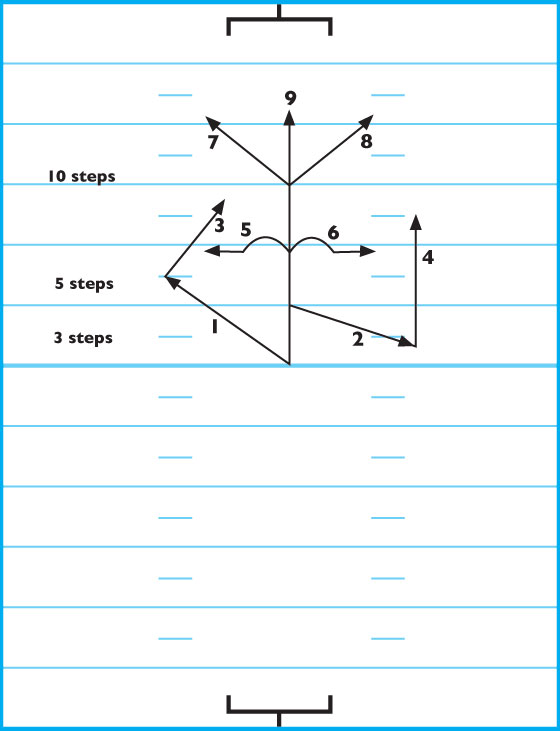
1. Slant.
2. Out.
3. Zag.
4. Out and up.
5. Hook.
6. Curl.
7. Post.
8. Corner.
9. Fly.
0. No route (block).
All routes are designed to complement each other and teach your players that a good route is as good as a good block.
When making a pass call within the parameters of a play, all pass routes are called with a four-digit number. The first number represents X. The second represents Y. The third represents Z. The fourth represents H. For example, you call Titans Right 2750. The call sounds like “twenty-seven, fifty,” signaling that X and Y are running their routes to the inside with Z and H moving to the outside. X runs a slant (2 is an out but with it going inside, it’s technically a slant to the inside from his spot on the left side), Y runs a post, Z runs a hook and H stays to block for protection on a drop-back pass (or runs a play action).
Another example is when X and H stay to block, which would be a call such as Titans Left 0170. This would be said as “zero, one, seventy,” to signal X and H staying back.
DIAGRAM 16: Titans Left, 0170.
In this situation, X and H are staying to block. So, X blocks at the line on the left side (Titans Left). H remains in the backfield for pass protection (on the right side, where there is less protection). Y runs a slant to the inside and Z runs a post.
You also can allow your receivers to read the coverage themselves by instructing a POCO or COHO option off the 9 (fly) route. POCO stands for Post Or Corner Option — so when a receiver is running deep, he must read the safety in a cover 3 and read the free or strong safety in cover
2. COHO stands for Curl Or Hook Option — the receiver reads the LBs, DEs or corners if they are up tight in a blitzing position. The receiver then runs a curl or hook pattern (quick route) to the open area.
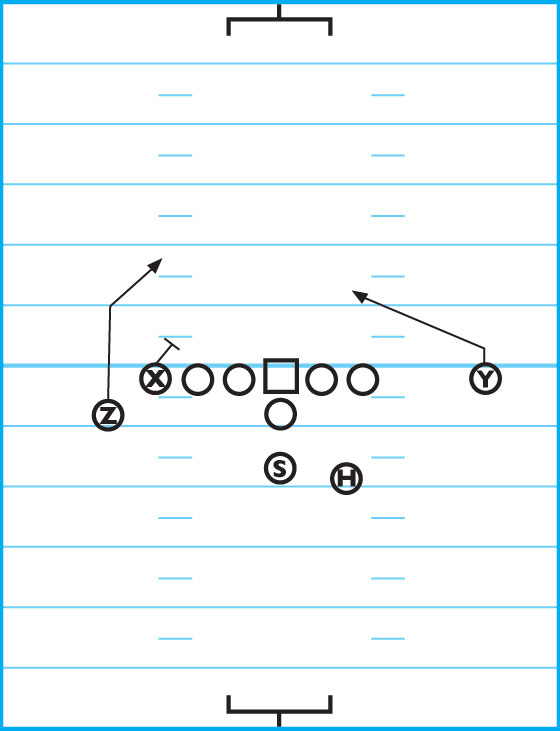
DIAGRAM 17: Titans Right, 9860, “X” POCO. X is to run a 9 route (fly) but the POCO calls allows him to change it to a post or corner route depending if it is a cover 2 or cover 3 secondary. The quarterback reads X’s break and throws accordingly. Use the POCO call in deep-passing situations.
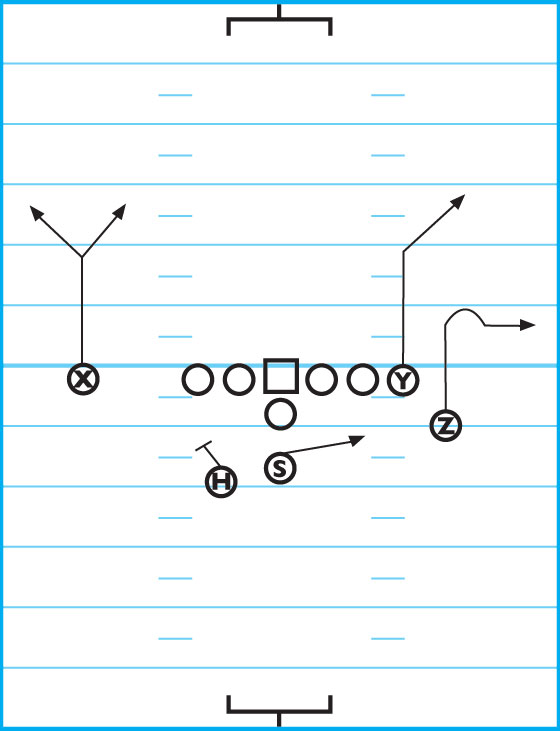
DIAGRAM 18: Titans Right, 7940, “Y” COHO. The short-pass version of POCO is called COHO, which stands for Curl Or Hook Option and is primarily run by the Y or Z out of the Titans Right formation. The receiver (in this case “Y”) reads the LB or blitzing secondary player and goes to the open area, which is usually where the blitzing defender vacated. X is running a post on the outside. Z is running an out and up. H is staying back to block (pass protection).