Route / Planting Skills
In our league, we play a number of teams that play strictly man-to-man in the secondary. We emphasize to our kids that they need to develop the ability to turn the shoulder pads of the defensive backs from parallel to the LOS to perpendicular to the LOS. This gives us something concrete to focus on and allows our players the same. Many of the off-season drills we work on relate to being able to sell a route-look and still maintain the ability to jam it and break it off. Keep in mind that it is all right for players to exaggerate these techniques, as long as it translates into better route performance. Here are a few drills I’ve implemented in our off-season program to work on these route skills.
Dot Drill
We have rubber floor mats with dots configured like rolling a five on a die to work on different quickness drills and I’ve adapted the use of these for WRs. Reading left front to right back, the dots are labeled A – E (C in the middle). We start left on D; right on C and execute the following pattern, emphasizing sticking the appropriate plant foot (D on the left; E on the right) with hip level down, foot slightly turned in, and shoulder pressed. The pattern becomes left foot from D to A to C while the right foot plants on E after stepping back from C to B; then right foot back to B to C while the left goes from C to A to D…the pattern continuing. We do this drill in a high knee format and a route format, all with the same emphasis.
Line Drill
We do a similar drill to the dot drill in the gym using the baseline of the basketball court. We call it 3-step because we do essentially the same drill, using three-steps on each side of the baseline. The player will push off of his 3rd step on each side of the line. This drill can also be done perpendicular to the baseline as a cut drill, as opposed to a route break drill. We emphasize the same descending hip level, foot placement, and shoulder press, reminding players that we’re working to turn the shoulders of the defensive back.
3-Step Forward Drill
We then progress to doing the line drill by running out onto the floor, using the same 3-step technique. On each of the players third-step alternating, they will push their energy down into their plant foot; this is again with the same emphasis on the qualities that will better enable them to turn the defensive back’s shoulders. Using these techniques also forces players to utilize both feet and to be able to turn DB shoulders on any part of the field.
Receiving Skills
We do not always have a game breaker at WR, but we always have players who can run quality routes and subsequently catch and protect the football. Our players catch the football by pulling it into their body with proper hand placement and tuck the ball away in one continuous motion. Hand placement, body control and ball security are points of emphasis for our WRs.
Clock Drill
This is a simple drill with two WRs standing approximately 10 yards apart. The players should throw back and forth with the purpose of hitting each ‘hour’ of the clock. Emphasis should be on pulling the ball in with proper hand position and securing the football. It can be expanded into stepping to the ball, turning and making a move on a cone.
Between the Legs Drill
All WR coaches emphasize watching the ball into the hands. This is a basketball drill that I’ve adapted for football that forces players to look the ball all the way into their hands. Players should stand approximately five yards apart facing one another in an athletic stance with one football. The player with the football takes the ball and passes it through his legs, around one leg, through again, and shovels the ball to the other player. He looks the ball into his hands, tucks to the proper side of his body and repeats the process. Players should push to move the football as quickly as possible without worrying how the football comes off of their hands. They should not be attempting to shovel a spiral or putting an arc on the toss.
Pitcher / Catcher Drill
We want our receivers, when at all possible, to be between the defender and ball. Tips and picks happen more frequently when the receiver does not shift his body in front of the flight of the ball and attempts to stab forward or backwards at the ball. Place two players approximately 10 yards apart. One of the players squats into a catcher’s position, awaiting the throw. The other player is attempting to throw the ball to one of four spots: left shoulder, right shoulder, knees or above the head. The catcher’s goal is to catch the ball with controlled movement, shifting his upper body in front of the shoulder throws. He switches his hand position and pulls the ball in on the knee throw, extending upwards on the throw above the head. Emphasize controlled movement into each reception with proper hand position and tucking / securing the ball to each side of the body.
Grading
For years now, I’ve been grading with a modified + / - system, where I add codes for great effort (GE), poor alignment (PA), etc. This system has become insufficient for what I’m trying to get our players to accomplish. The + / - system does not account for a player simply getting in the way on his slow block on the corner or using great technique to fight inside and force the corner to make a decision. In both scenarios, the job was accomplished, but merely getting inside is going to hurt us down the road, turning a would-be touchdown into a 15-yard gain.
Therefore, I’ve developed a grading system, with the help of computer software, which accounts for everything that I’m trying to get our WRs to do in the game. Although there are seven categories that I am potentially grading each WR on each play, the computer software enables me to use about roughly the same amount of time that I spend using the + / - system. I grade every WR in the game on his alignment, stance, release, route, block, catch and run on each play that the category applies. They can earn or be deducted up to three points on each play with 0 being the expected standard. The criteria for each score is clearly defined so that I don’t have to waste time deciding between two scores. The scoring chart (which has been adapted / changed for use at other positions) is listed below.
Chad Brubaker is the offensive coordinator and wide receivers coach at Wilson High School in West Lawn, PA. You can reach him at ChadBrubaker@GridironStrategies.com.
Marc Marinelli
Co-Offense Coordinator of Andale High School(KS)
2006 and 2007 4A State Champions
Coach Brubaker in his article shows some very good drills to emphasize how important a receiver’s break in his route is. It is very important to have the kids do position specific work as much as possible. During the season we are always harping on having all of our receivers “sink your hips and buzz your feet” when they are breaking a route.
One of the drills that our kids use almost everyday as a quick warm-up at the start of our individual period is what we call the W-drill. The purpose of the drill is to focus on the hips and feet of our receivers. This drill also gives us a chance to get more reps at two of our most effective routes, the hitch and the stick.
You will need five cones for this drill, the distance between cones one and two at 5 1/2 yards, between two and three at 7 1/2 yards, three and four at 7 1/2 yards and finally four and five at 7 1/2 yards. At the start of the drill we want a good efficient take-off with no false or wasted steps. At the next cone we want the player to execute a perfect hitch break focusing on buzzing our feet before the break and sinking our hips when we break the hitch. As soon as we break the route I want to see them rip the inside elbow and their head back to the QB on their hitch and I want to see their hands up and ready for the ball. From cone 2 to 3 and from 3 to 4 we are doing the same route but now at 7 yards. A coach can have them reload and go from that cone out of a stance, or they can do this continuously. For the last cone set we are changing our route to our 7 yard stick. Our stick is a reverse pivot at 7 yards working to the sideline to 6 yards. We will start the drill out at half speed and work our way up to game speed. This drill allows us to combine footwork drills with practicing technical route running (See Diagram).
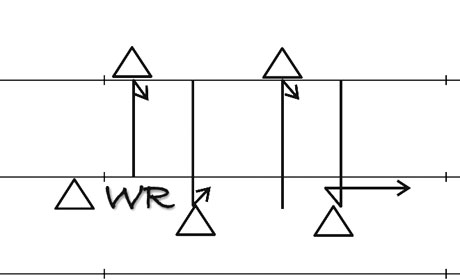
|
Progression:
Cone 1 to 2: 5 yard hitch
Cone 2 to 3: 7 yard hitch
Cone 3 to 4: 7 yard hitch
Cone 4 to 5: 7 yard stick
(ending at four yards to the sideline)