Vertical push is critical in defeating a secondary.
FIRST STEP
Vertical push is the single most important element to stress a defensive secondary. Vertical push makes the defensive back think a receiver is going deep every time. Knowing that when the WR gets to the line of scrimmage he is going to score a touchdown against your opponent in a matter of seconds is a great advantage.
Fleet-footed WRs can produce explosive game breaking plays, but they also help the entire offensive system. Offensive linemen do not have to sustain blocks as long. Your quarterback does not have to sit in the pocket and take bone jarring hits. A finely-tuned play-action passing game will freeze the feet of defenders, giving your lightning-fast receivers the ability to manipulate defensive backs with route running. Having multiple wide receivers that are fast will enhance your running game. When the defense recognizes four wide outs strategically placed along the line of scrimmage, one-on-one battles are on. This puts your running back in a favorable position to exploit huge running lanes.
Vertical push forces the defense into adjustments that can be exploited by any offense. If your WR can get the DB to turn his hips through vertical push, he can defeat him with a variety of routes. The concept of vertical push must be drilled into your wide receivers from day one. To accomplish this, teach them the proper stance vs. the man-to-man and zone coverage they will face.
Versus man-to-man press coverage, have your receivers legs, shoulder width apart and slightly staggered. The left leg will have a slight bend and the right foot will have the heel off of the ground. The upper body should have a slight lean, but not too much, because you do not want to close the distance between the receiver and the defensive back. I like to have my wide receivers’ arms up in the boxing position when faced with press coverage. I want them to literally use martial arts moves to knock away the defenders’ arms. To defeat a bump-and-run defender, the receiver sometimes has to take a lateral step first to get the DB to react to him. This, in turn, creates space.
Versus zone coverage, have your wide receivers get into more of a sprinter’s stance. This staggered stance will prevent false stepping. Have your receivers lean over their lead leg so they are no longer in an upright position. Their chest will be just above the lead leg. I instruct my receivers to lower their chest as close to their thigh board as possible and then come up straight up. Then I have them come to neutral. I have them lower their chest to what they feel is half way between the upright position and their thigh board. Once they do this a few times, it will become automatic. I let my athletes choose how they want their arms in the sprinters stance, with their arms locked and loaded at a 45-degree angle or hanging loosely near their bodies.
Wasted movement coming out of the stance cannot be tolerated. Here are some items to watch for and eliminate:
1. The WR shouldn’t sink his hips to ready himself to come out of his stance only to rise up again. This is extremely inefficient. This also causes the back foot to rise and come back down to the ground and is referred to as a false step. A false step will compromise the timing of the passing game. By the time the foot comes up, the defensive back will have a hand in the WR’s chest, steering him completely out of his route.
2. The WR should not step into a press defender when the ball is snapped. Give him space to escape.
3. The WR should not let his feet open up his hips. If his hips are facing the sideline, so is his belly button. In this situation, the WR has no leverage and the defensive back will make him pay. The WR should keep his feet and torso parallel to the line of scrimmage when making moves such as single and double moves.
4. The WR should also keep his arms in tight to strike. Coming out of his stance with parachute arms leaves his chest wide open and undefended. Parachute arms also slows him you when running. Do not let the DB strike the WR in the breast plate and steer him all over the football field.
TYPES OF RELEASES
Speed Release
The speed release is a technique where the WR explodes into his route void of any kind of move to create space. The key element is to use his hands to immediately ward off the defensive back’s efforts to stop the vertical push. A martial arts background in striking with the hands comes in handy when a speed release is used. The speed release is very effective after the WR has manipulated the defensive back with single and double moves.
Single Move Release
To defeat a bump-and-run defender, this release is very effective. Have the receiver in a stance versus a bump-and-run defender. When the ball is snapped, the receiver moves his off leg laterally toward the quarterback, behind the line of scrimmage. The WR then takes his front leg and moves upfield. The initial move should get the defensive back to mirror the movement of the receiver, creating space to the opposite side.
Double Move Release
This release is an excellent technique to get the defensive back to jump across the line of scrimmage. Have your receiver move the leg that is on the line of scrimmage laterally toward the QB. Then the WR takes his off leg and moves it opposite of his lead leg. Lastly, he takes the lead leg and accelerates upfield. He can start the double move with the off leg.
ROUTE RUNNING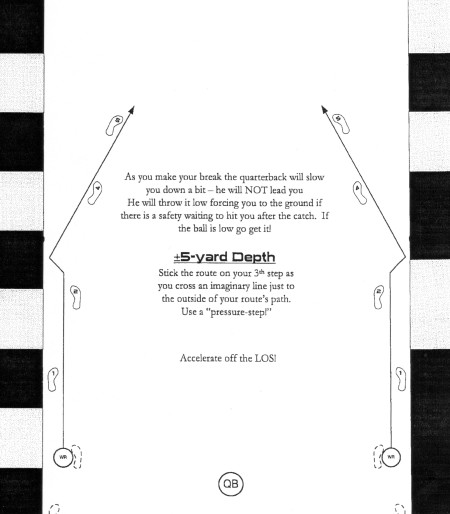
Diagram 1: Quick 2-Route (3-Step Slant)
The slant is the first route. When running a three-step slant, the most important element is the pressure step. The pressure step allows the WR to burst into his route. The pressure step is the last step before snapping a 45-degree slant into his route. A correct pressure step is placed with the
If we notice the DB is taking away the inside slant, the WR can attack this two different ways. He can make a flash call. Flash means to release outside and get vertical. The WR attacks the soft shoulder of the DB and takes advantage of what he is giving up. The pass can be just beyond linebacker depth.
The second way is the ‘Top Gun” release. This is a great release to use near the goal line. Have the WR use a speed release at a flatter angle to get the defender to be more aggressive. The DB does not want to get beaten by the outside fade. Have the receiver take three quick steps toward the fade area while staying low. Have him then plant on his third step (pressure step) allowing the defender to pass by. Instruct your receiver to knock down the hands of the defender as he breaks into the slant. Knocking down the hands is important because the DB will try to grab cloth to prevent a touchdown. Have the WR get inside of the defender and come upfield at an angle and catch the touchdown pass.
Another great complement to the inside slant is the “Slug-Go Route”. The slant receiver will start to notice the defensive back jumping the slant to intercept the ball. This is when you call the slug-go route. The wide receiver will break into his three-step slant. The QB will give a pump fake and the defensive back will run downhill to intercept the ball. The wide receiver will take another pressure step and push vertically upfield. The defensive back has no chance to recover as the wide receiver catches the ball and runs upfield for a touchdown.
9 ROUTE
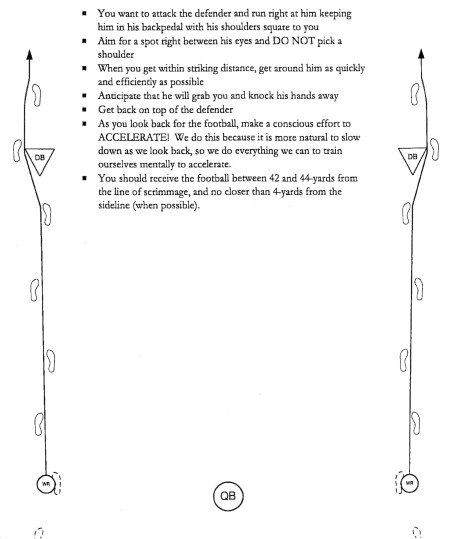
Diagram 2: 9-Route/Go Route
All game you have been making life miserable for the defensive backs with a variety of releases and pass routes such as the slant, hitch, and dig routes. Your receiver has given maximum effort with great vertical push on every snap. The DB has backed off a little to give himself some cushion. It is time to hitch it and rip it and let your wideouts fly.
Have the receiver attack the DB by running right at him, keeping the DB in his backpedal because he fears the slant or hitch. Aim at a spot right between the DB’s eyes. As the WR approaches the DB, anticipate that he will grab the WR. The WR should then knock down his hands and get around him as quickly as possible. As the receiver looks back for the football, instruct him to make an effort to keep accelerating. A lot of receivers will slow down as they look back. Ideally, the WR should catch the ball approximately 40 yards from the line of scrimmage and four yards from the sideline (Diagram 2).
CATCHING THE FOOTBALL
Some athletes catch the football naturally. When the ball hits their hands, you don’t hear anything. It is like their hands are magnetized and everything sticks. They catch the ball, tuck the ball, and accelerate like a lightning bolt. They are fluid from start to touchdown.
Others have speed, size and athleticism but have frying pans for hands. When this type of receiver catches the ball, it resembles the sound of the football coming off of the punter’s foot.
As a coach, you have to develop your WRs fingers. You have to work on their dexterity. Take a deck of cards and stand approximately a yard to a yard and a half away from your receiver, facing him. Start tossing the cards at him. Tell him he has to catch the cards with his fingers. This drill will help his dexterity and hand quickness.
Then have your receiver stand stationary with one arm extended, holding onto a tissue. Have him then drop the tissue and attempt to catch it with his fingertips as it falls to the floor.
Sometimes it is a concentration issue. Tell your receiver to look at the point/nose of the ball as it is coming toward him and to focus on that part of the ball and nothing else. Have him catch the fat part of the ball with his fingertips and squeeze it. You should hear the sound a clock makes when the catch is made. If you hear a thud, the football hit the palm of his hand. There is then a good chance the football will deflect from his hands and into the hands of a defensive back.
After catching the ball over the middle, have your wideout tuck the ball on the QB side. This will prevent the defensive back from knocking the ball loose because he is most likely behind the receiver.
EXERCISES FOR FIRST STEP EXPLOSION
The first step after the snap is critical. Whether the first step is lateral to the line of scrimmage or horizontal, an explosive first step will determine if the WR wins or loses the battle of the line of scrimmage.
I use a piece of equipment called “Shackles” in helping produce an explosive first step. Shackles are strapped on each ankle and an elastic cord connects each shackle. Have your receivers practice high knee raises with the shackles on. The resistance the shackles provides as your WRs move their knees to their chest is an excellent way to develop a dynamic first step. Use the shackles in the frontal plane using an exaggerated first step. Have your athletes step out to a 45-degree angle in the sagittal plane with an exaggerated first step. Then buzz their feet. Have them perform each exercise within a 10-yard distance.
Plyometrics is another way to produce dynamic movement. Plyometric training forces the muscles to engage in quick powerful eccentric and concentric action. Plyometric training creates maximum force output in a minimum amount of time. I have my athletes attend a 12 week speed, agility, and quickness program. They perform box jumps in each plane of human movement - frontal, sagittal, and transverse. You must also teach your wideouts to jump down from the box properly to avoid injury. This teaches stabilization after the initial explosive movement. p
About the Author: Doug Heslip is a Team USA Canton, OH assistant coach and former head coach at Gwinn High School (MI). He has 15 years of coaching experience and is the founder of the “Hitch It and Rip It’’ football camps. Heslip also serves as a member of the Congressional Youth Advisory Board.