THESE PLAYS ARE based on a drop-back protection scheme with the fullback protecting the right-side A-gap.
The FB and the center must combine to protect the middle two gaps. If no one shows in the FB’s gap, he may release to a designated spot.
“All Curl”
This is a base play from a pro set. Before the play, the quarterback gets a pre-snap read of the free safety.
DIAGRAM 1: All Curl Vs. 3 Deep (First Choice).
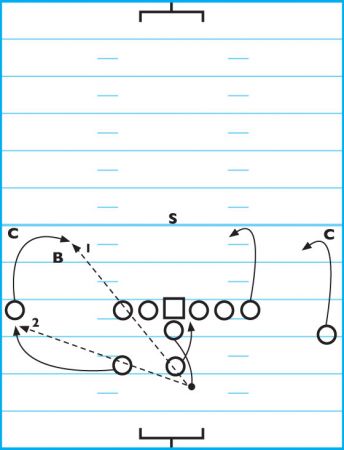
If the defense is in a 3-deep coverage, the QB looks to the split-end side and reads the flat defender. If the flat defender comes up on the flare, the QB should throw the curl to the split end.
DIAGRAM 2: All Curl Vs. 2-Deep (Reads Progressions 1, 2 And 3).
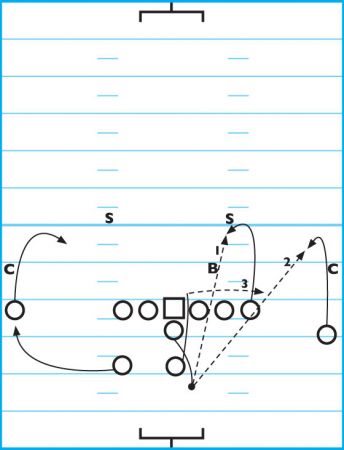
If the defense is in 2-deep coverage, the QB should read the under coverage on the tight-end side. If both safeties drop to the hashes, the middle should be open if the strong-side linebacker drops to a hook zone. If this happens, the TE needs to find a soft spot between the LBs and sit.
If the backers take away the curl, the FB should be open in the flat late (if he gets out). Also vs. a 2-deep coverage, the flanker should be open if the secondary doesn’t rotate and roll someone up in the flats.
“Flare”
Flare routes can be run several ways. In the following diagrams, it’s a read screen between the SE and tailback.
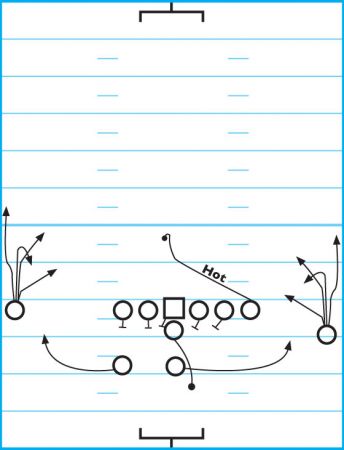
DIAGRAM 3: Flare (Read Screen With SE And TB).
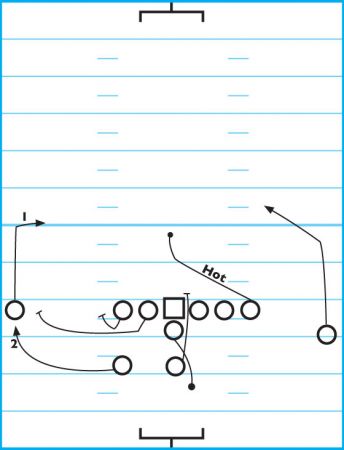
The pulling offensive guard must not be downfield too far if the ball is thrown to the SE. If the defense drops to stop the curl, the flare route will be open and you’ll have a blocker in front of the ball carrier. The TE releases hot to the middle in case of a blitz. If there’s no blitz, the TE needs to release on a deep post and tries to get behind the free safety.
DIAGRAM 4: Flare (Second Option).
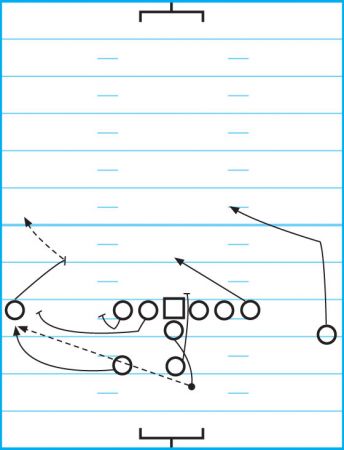
This is a quick screen to the TB. The SE should crack on the flat defender and the pulling OG tries to get outside to the cornerback. The TB must give the OG time to get in front of him. If the OG gets cut off by the rush, the TB must be his own blocker vs. the unblocked CB.
“Double-Flare”
This route uses five receivers. The center needs to know that he has no help in the middle.
DIAGRAM 5: Double-Flare.
Both backs will run a flare route to their side. The TE releases hot in the middle in case of blitz, then settles in the middle about 8 yards deep as a dump receiver. If the inside backers all fly outside to cover the flares, the TE will be open quickly. This is a short, easy throw for the QB to make.
The flare routes also occupy the flat defenders and allow the wide receivers to get open slants, posts or stop routes. We’ve also effectively run the wideouts deep and thrown the flares behind them in the flats.
FB Draw
Using the same formation and flare look, you can run a FB draw play. Since we started this protection with the FB inside, we’ve had a good amount of success using this draw.
DIAGRAM 6: FB Draw.

The TE can be used as another blocker against the dropping LBs. Since the TE has been releasing hot on the flare route, this time he simply looks for a LB to recognize draw and blocks him.
The draw fake can be used on the flare and curl routes to slow down the LB drops and set up the underneath routes. The TB runs his flare route, while the WRs run decoy routes.