AS A VEER-OPTION offensive team, the majority of our offensive practice time was previously devoted to perfecting option assignments and techniques. Our basic passing game was built around play-action and roll-out passes designed to take advantage of the soft spots in our opponents’ schemes to defend our veer plays.
We recognized, however, that a drop-back passing series could be a valuable — and sometimes necessary — complement to our base offense. The benefits of this drop-back passing series becomes clear for a number of reasons:
‰ To meet game situations such as possession downs, two-minute warnings, etc.
‰ To further spread the defense both horizontally and vertically.
‰ To give the defense more preparation problems during the week, using up more of their practice time.
Time they need to spend on defending the triple option.
‰ To get the ball to your playmakers.
‰ To keep the defense from focusing its pass rush in one area.
‰ To help prepare our own defense, which faces drop-back passing teams throughout the season.
‰ To utilize the skills of a quarterback who is better suited to throwing from a set position rather than on the move.
Simple, Yet Effective
Due to our commitment to option football, when designing and implementing this aspect of our offense, we realized that the drop-back series had to be simple. We’ve also designed this series to be adapted and effective to any two-back offense such as the Wing-T, Pro-I, etc.
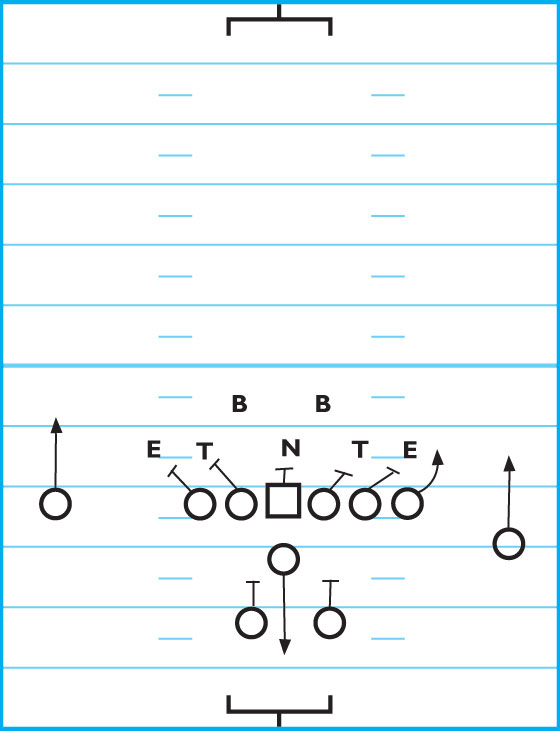
For protection, we’ll use the common “big-on-big” concept with our linemen. This means that the offensive guards must block the first defensive lineman on their side, while the offensive tackles block the second (defensive ends in a “50” or odd front). The center is responsible for the nose tackle against an odd defense or the middle linebacker versus an even front defense.
DIAGRAM 1: Drop-Back Passing Series — Blocking and Protection Schemes. The running backs use the “flare control” principle, meaning that on the snap, each back steps up. If the LB drops into coverage, then the RB runs his designated route.
Quick Lead Draw
The “Quick Lead Draw” has been a consistent yardage gainer with big-play potential and is especially effective in helping to control the pass rush. It’s a good play to call on first-and-ten or it can be used as an “out-of-trouble” play on third down when you’re backed up inside your own 30.
DIAGRAM 2: Quick Lead Draw. The following details the player responsibilities and assignments for this play.
Split End, Flanker: Starts to streak, then stalk blocks the man covering him from the inside-out.
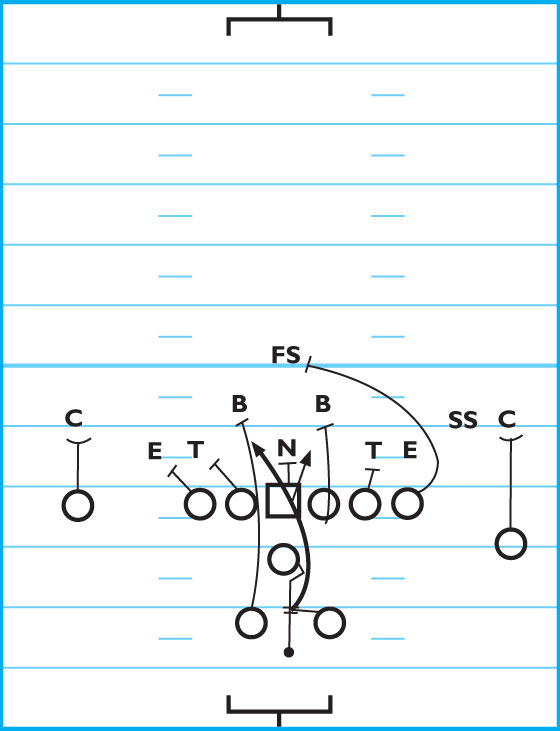
Tight End: Uses an inside or outside release (whichever will work best), starts as if he’s on a streak route and then attacks the free safety. He mustn’t look back to see where the ball carrier is, because if he turns back to look — and the ball carrier is right behind him — it enables the TE’s defender to get free and make the tackle.
Halfback (Left RB): Immediately heads for the LB on his side and attacks him through the outside number on his jersey (this will be the MLB against a 5-3 defense). Goes either through (vs. odd-front) or around (vs. even-fronts) the left OG area to get to the assigned LB.
Fullback (Right RB): Slide steps to the left, sets with his inside arm (left arm) up and waits for the handoff. Secures handoff and runs off either the block of the center (vs. odd) or the OG (vs. even). If he clears into the LB area (second level), he should look for one man to beat and work on him. If successful, he may go all the way!
QB: Opens as if he’s on a drop-back pass and gets the ball to the FB as quickly as possible (by the third step). Looks the ball into the FB’s handoff pocket, then completes the 7-step drop.
“Curl” Or “Flat”
Pattern Play
This is a good possession play that has been around for a long time, yet still remains an extremely effective play against zone defenses.
DIAGRAM 3: Curl, Flat Pattern.
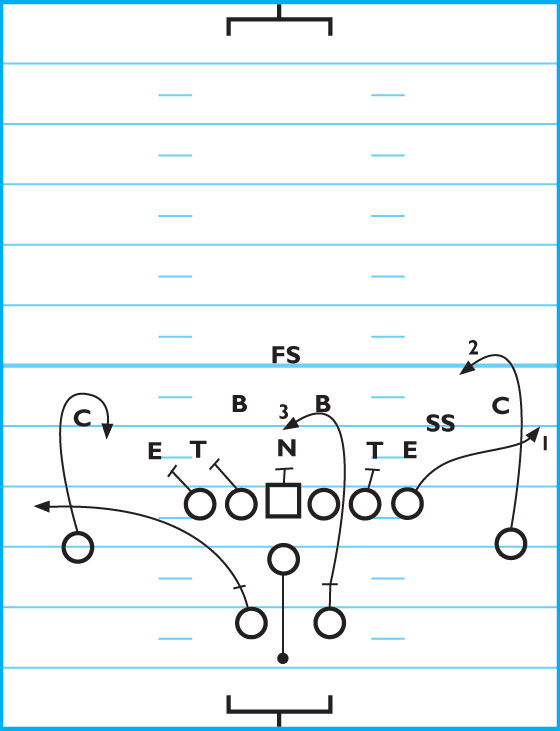
SE: Runs a curl route.
TE: Takes an outside release and runs a flat route at 6 to 8 yards.
FL: Runs a curl route.
HB: Runs a “flare control” flat route.
FB: Runs a flare control “through” route, which is a straight-ahead release through the guard-tackle area, hooking up over the ball 4 to 6 yards past the LOS and making sure to get in the QB’s line of sight.
QB: Takes a 5-step drop and makes a read progression of 1. TE flat. 2. FL curl. 3. FB through.
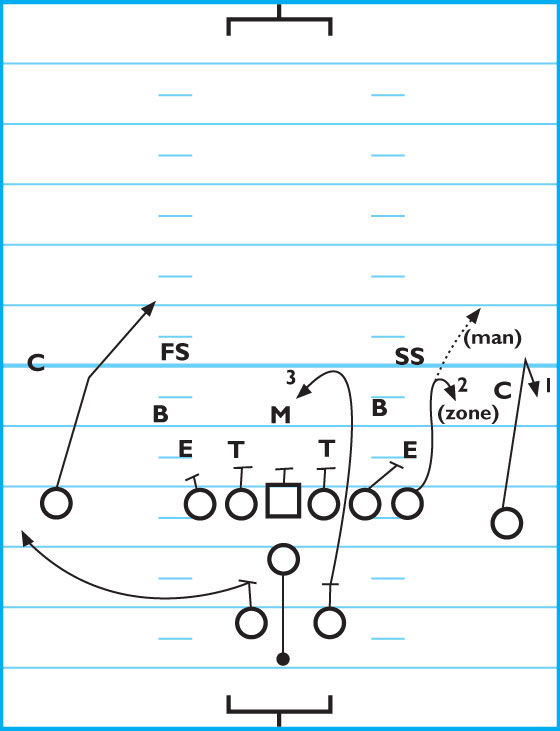
On the QB’s first three steps, he must read the strong safety. The SS’s movements will indicate where he’ll go with the ball (this will be done by the time he sets for his fifth step). If the SS hangs in the curl area, he hits the TE in the flat. If the SS runs to the flat, he looks to hit the FL on the curl route. If there is a defender — such as the inside LB — between the QB and FL, then he dumps the ball off to the FB who runs for first down yardage.
DIAGRAM 4: Curl, Flat Pattern “Tag Call” Vs. 7-Man Fronts. If you’re facing a 7-man front with a “Monster” coverage that voids the weak-side flat, you can still game plan and apply a play call tag that will have the QB throw to the weak side (SE side) and still maintain an outside-in progression that reads as 1. SE curl. 2. HB flat. 3. FB through route.
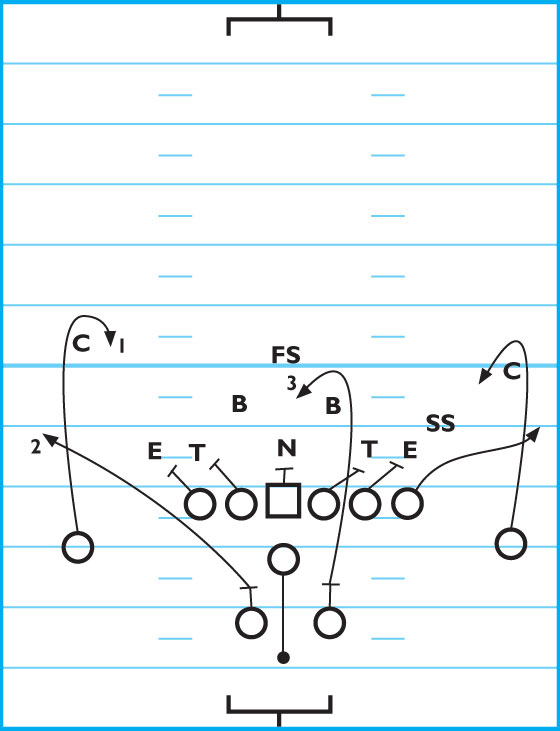
The read player is the weak-side ILB.
“Seam” Or “Out”
Pattern Play
This pattern is better against man coverage, in 2-minute situations (because of the FL’s sideline route) and can still be used against zone defenses.
DIAGRAM 5: Seam, Out Pattern.
SE: Runs a post route. If the CB on his side is playing man coverage, he must quickly get open and should expect the ball 2 to 3 strides after his break. Looks to make the catch and score!
TE: Makes an outside release and reads the coverage. If the defense is playing zone, he runs a hook-up outside-in seam route at 8 to 10 yards (he must be aware of the yardage necessary to gain a first down. If the defense is in man coverage, he runs a flag route.
FL: Runs a comeback (out) route.
HB: Runs a flare control swing route. As he swings to the weak side, if he sees that no one is covering him, he yells “Ice! Ice!” to alert the QB that he’s open on the QB’s blind side. If the play begins to break down, the QB can then dump the ball to him. In 2-minute situations, he must get out of bounds.
FB: Runs a flare control through route.
QB: Takes a 5-step drop. If he pre-reads zone coverage, he again reads the SS on his first three steps. The read progression is 1. FL out route. 2. TE seam route. 3. FB through route. 4. If he hears “Ice! Ice!” from the HB, he knows that he can swing the ball to him as a last resort.
If the QB’s pre-snap read is “man-free” coverage (with the CBs playing man-to-man on the SE and FL, the SS playing man on the TE and the FS positioned in the middle of the field), he looks to deliver the ball to the FL low and to the outside or arch a pass to the TE on the flag route. Note that if the defense is using this kind of coverage, there is a high probability of a blitz by their LBs.
If on the pre-snap read, the QB sees the FS on top of the TE and is showing man coverage (as in an 8-man front), he may still go to the FL out pattern, but should also be ready to drive the ball to the SE on a post route for the touchdown! “SE Post” may also be called from the sideline.
DIAGRAM 6: SE Out Tag. In a 2-minute situation, particularly with the ball placed on the left hash mark, you may call for this pattern with an “SE Out” tag. On this tag call, the QB must read a progression of 1. SE out route. 2. HB swing route. 3. Throw the ball high and out of bounds.
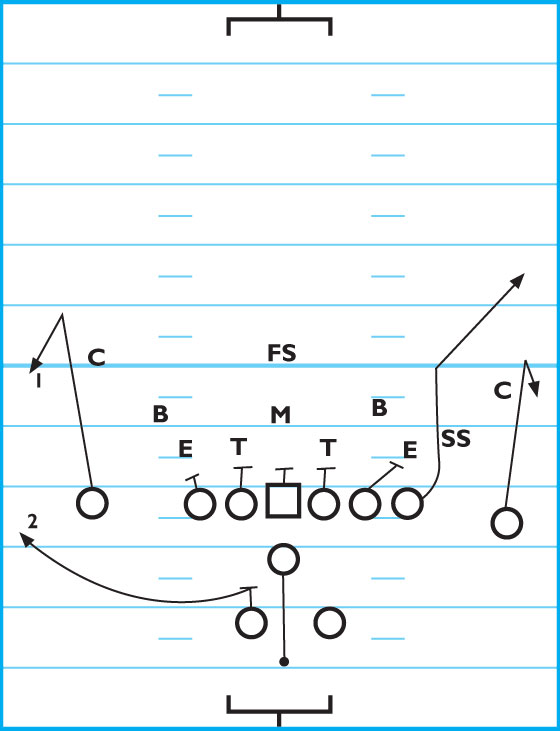
This call gives you a shorter throw toward the sideline for a 10-yard gain, a first down or to stop the clock.
“All-Streak”
Pattern Play
This play can be used against 2-deep coverage and in desperation situations such as the last play of a half or game.
DIAGRAM 7: All Streak Pattern.
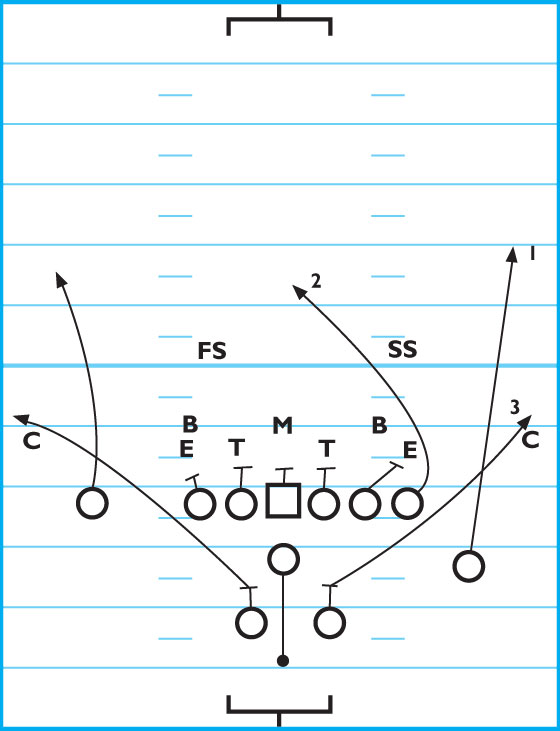
SE, FL: Run a streak pattern. Against a Cover-2, he must fade away from the safety on the hashmark and be no closer than 6 yards from the sideline.
On the last play of a game or half, the SE or FL must aggressively go after the ball at its highest point. If he judges that he can’t catch it cleanly, then he should bat the ball into the air (for either a second chance at the catch or so the trailing TE can make an attempt to grab the batted ball) or try to draw a defensive pass interference call.
TE: Runs a streak pattern. Against a Cover-2, he must split the safeties down the middle of the field, looking for the ball over the inside shoulder. If it’s the last play of a half or game, he must follow the SE or FL and be alert for any tipped or loose ball.
HB, FB: Run flare control routes to the flat. If it’s the last play of the game, he must stay in and block “forever.” For blocking, he must help the offensive linemen on his side or the center.
QB: Takes a 5-step drop and reads the SS. If the SS stays on the hash, then he throws to the FL. If the SS comes off the hash to cover the FL, then he should hit the TE. He can also go to the SE side and read the FS.
On the last play of a half or game, he takes a 7-step drop and throws a high arching pass to the SE or FL (the best receiver or most favorable match-up) in the end zone. He must not take a sack.
“Slow Screen Left” Play
This play also helps control the pass rush and is particularly good at protecting the QB’s blind side. It’s designed to get the ball to a good runner in space and with a convoy.
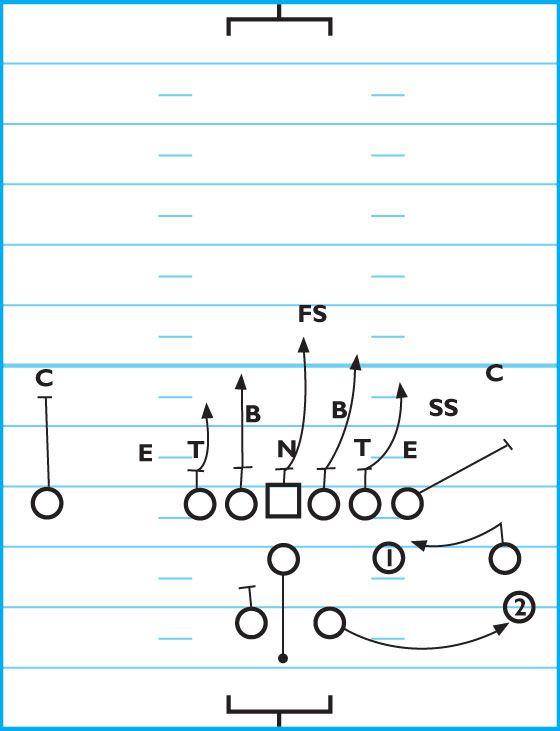
DIAGRAM 8: Slow Screen Left.

SE: Simulates running a post route to draw the CB away from the point of attack, then stalk blocks the FS.
TE: Takes an outside release as if running a streak route and looks to block the FS or off-side CB.
FL: Runs a streak route.
HB: Steps up, just as he does on a flare control route, holds for a two-count and swings to the sideline looking for the ball over his inside shoulder. Secures the pass, tucks the ball in and uses open field running skills.
FB: Runs same pattern as on the “All-Streak” play.
QB: Takes a 7-step drop. On the seventh step, he plants, takes an immediate step directly at the HB and throws him the ball. If the HB is covered, he must throw the ball high and out of bounds behind the LOS.
Left OT: Blocks for a two-count, releases down the LOS and blocks out on the contain man (usually a CB).
Left OG: Blocks for a two-count, releases down the LOS and blocks “up” the alley in front of the HB.
Center: Blocks for a two-count, pulls down the LOS 5 to 6 yards and blocks “back” to pick up defensive pursuit.
Right OG, OT: Blocks as if in normal drop-back protection. Blocks until the play is over.
“Rocket” Screen
This is another screen that’s good for discouraging an all-out rush at your QB. If your FL is a good runner, this could be a play with real “home-run” potential.
DIAGRAM 9: Rocket Screen.
SE: Starts to run a streak route, then stalk blocks the CB.
TE: Runs an outside release as if on a flat route (this draws the safety out of the screen area), then blocks the CB who’s covering the FL. If he is coming in with the FL, as in man coverage, he must kick him out. If the FL’s defender is playing softer, then he must block him using the same technique as in an arch block because the ball may be dropped to the FB swinging behind him — which forces him to become a one-man screen.
FL: Starts in wide alignment. On the snap, he takes one hard step upfield, then comes back inside toward a spot one yard outside and one yard behind the TE’s original alignment (the pass must be caught behind the LOS).