A DILEMMA FACING many coaches is how to give a defense multiple looks while still staying consistent with your plays and blocking schemes. Plus, practice time is limited, which creates another obstacle working against establishing a diverse offense.
The Gun I formation keeps your backfield action and blocking schemes simple while making the defense spend preparation time on a formation that is unconventional and odd to them (while easy to run for you).
In the high-school game, sustaining long offensive drives is difficult. By running the offense from the Gun I formation, you are opening up the field, allowing your players to run free and giving your offense a home-run threat.
Defenders always are taught to play fast. Against the Gun I formation, that is close to impossible because when a defender is confused, he does not have the ability to play fast.
Have A SEcond Passer
To gain the most success when running the Gun I formation, it’s good to have a tailback who throws the football well. He doesn’t need a rocket of an arm because if you set up the Option Pass properly, the throw made by the TB is as short as you feel comfortable to complete.
The way this offense is set up, some of the positions are interchangeable depending on players’ skills. A season ago we had a wide receiver who was decent at throwing the ball and was the backup QB. Our starting QB usually was the fastest player on the field and was a hard-nosed runner. So, we simply moved the WR to the QB position, moved our TB to FB and moved our QB to TB. We stuck a backup WR into the receiver position and experience great success with this offense. Due to our TB actually being our QB, when we ran the Option Pass it ended up being a basic wheel route to the FB, who was hit in stride with the pass. There typically wasn’t a defender within 10 yards of him, which would lead to an easy touchdown and a great momentum boost to start the game.
In addition, your team does not have to be a traditional option-based offense to run this formation because the conventional option blocking rules do not apply on all plays. This offense actually is more of an I-based offense.
By utilizing the I-formation in our base offense, the players easily adapted to the Gun I formation. In the I-formation, we call a simple strength and play call. For example, I Right Iso Right places the tight end and the flanker to the right and the wide receiver on the opposite side. For Gun I, we simply introduce the formation, put in the Gun I personnel and call Gun I Right, TB Iso Right, etc. The players pick up on the terminology and simplicity of the scheme instantly.
The base plays out of the Gun I are: TB Iso, TB Toss, TB Counter, Zone Option, FB Trap, Load Crack Option, Crack Option Pass, Boot Pass and Iso Play Pass. The Load Crack Option, Crack Option Pass, TB Toss, FB Trap, Boot Pass and Zone Option plays are diagrammed in the following six diagrams to give you a better idea of how this formation actually works with real play calls.
6 plays from the gun i
The following six plays work well from the Gun I formation and all are diagrammed against a 4-4 Defense.
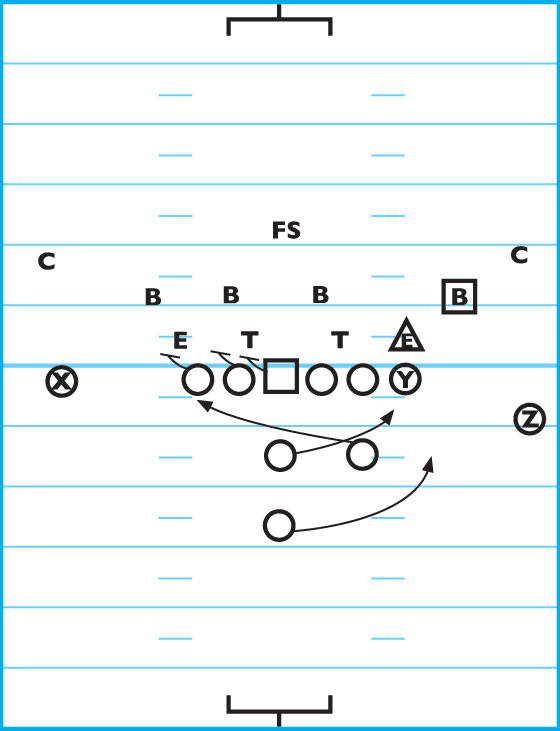
DIAGRAM 1: Load Crack Option. This is a double-option play with either a quarterback run or a QB pitch. The Z receiver comes in short motion and blocks the linebacker closest to him. The fullback comes out of the backfield and blocks the cornerback on the play side of the field.
The line blocking forces the defenders to the left side of the field as the action moves to the right. The QB must be aware of the free safety alley player. If the coach in the booth notices the FS cheating, the Option Pass is a good alternative. You want to pitch at least once before opting for the Option Pass.
You have a choice of solid-blocking the end man on the line or optioning him (in this diagram it is a solid block).
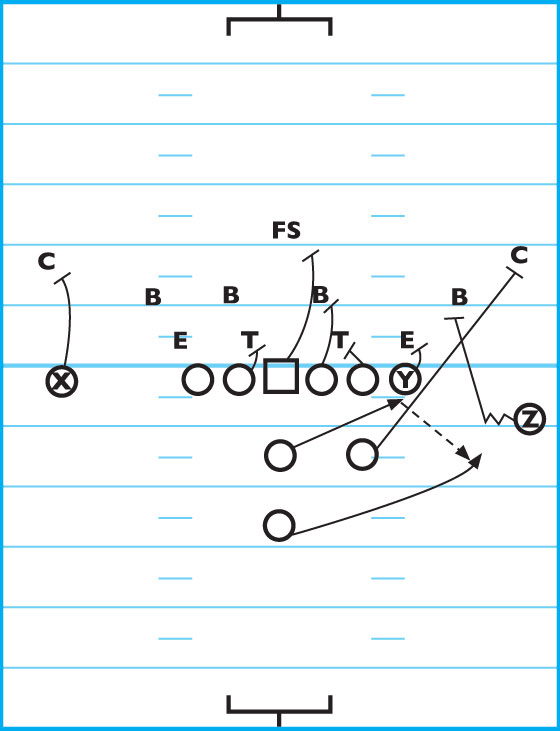
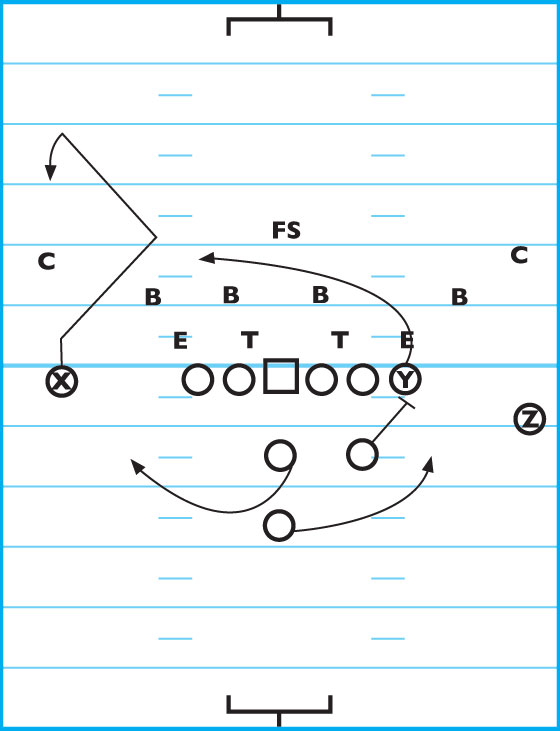
DIAGRAM 2: Crack Option Pass. The offensive line is in slide pass protection to the right. If the FS aggressively plays the option, the QB hits the Z seam. The FB takes the same action as in the previous play as the lead blocker, then breaks to wheel. The QB must pitch the tailback. If the TB has an opening down the field, he throws to the open man. If all the passing routes are covered, the TB runs the football.

DIAGRAM 3: Toss Right. The action is moving to the right again. The backside tackle blocks the defensive end in front of him. The backside guard moves to the second level to block the LB. The center moves to the left to block the defensive tackle.
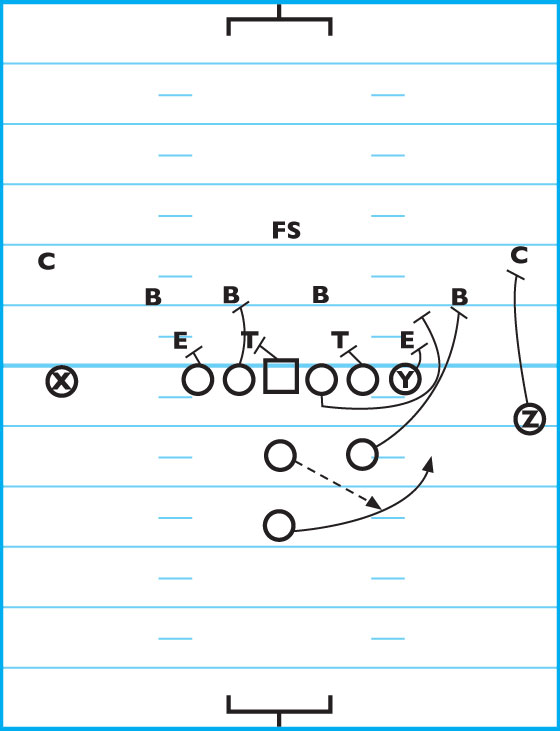
The play-side OG pulls around the end and opens up space between the DE and LB. The Y player (TE) handles the DE and the FB comes out of the backfield to block the LB. The Z receiver occupies the CB.
The QB pitches to the TB who should have plenty of room to the outside to pick up some big yardage.
DIAGRAM 4: FB Trap Left. The blocking shifts to the right to set up the trap. The left OT moves to the second level to block the LB and the left OG blocks the DT in front of him. The center moves to the second level to pick off the LB. The right OG pulls to the left to stop the pursuit of the DE. Use the strong-side OG to cut the strong-side DT.
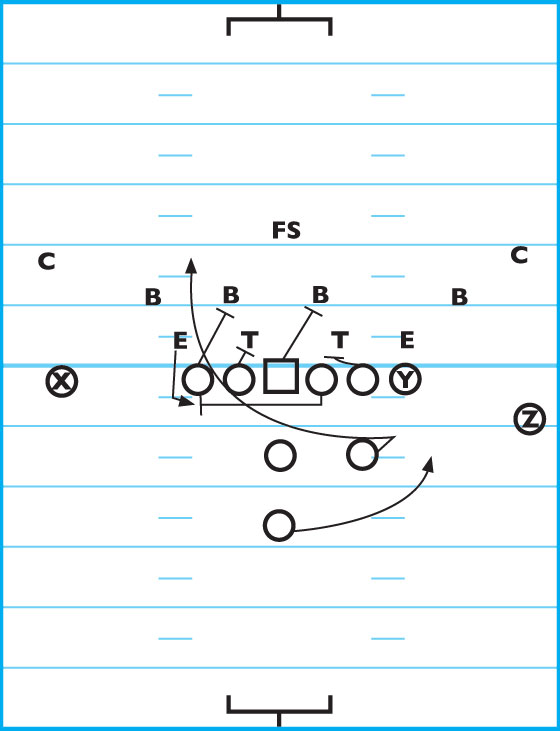
The TB runs his usual motion to the right side to freeze the defense while the FB starts right (as is his movement in the previous plays) but then shifts back to the left, receiving the handoff and bursting through the hole.
DIAGRAM 5: Boot Pass. It helps to be creative out of the Gun I as well. The boot pass works well after the defense has seen some of the previous plays.
The QB moves to the right and the TB starts in his usual movement to the right, which signals to the defense this should be another run to the right. However, the QB rolls left while the TB continues right. The Y receiver runs a drag route across the middle at a depth of 8 yards. The X receiver runs to the post, then cuts back to the corner only to curl back toward a potential pass. The FB steps up to block the area where the Y receiver vacated. The QB looks short to the Y or deeper to the X.
DIAGRAM 6: Right Zone Option. The strong-side DE is a QB read key (QB will “ride and decide”). The strong-side outside LB is a pitch key. The QB makes a decision to run or pitch based on the keys he reads in these two defenders.
The TB remains in a pitch relationship with the QB. The FB has cut in the opposite direction.