THE DOUBLE-WING offense has been picking apart defenses for quite some time and now it is a popular offensive strategy for many coaches. With its tight formation and movements, it poses a problem for those trying to stop it.
Plus, with its big-play capability (don’t let those Double-Wing coaches fool you, they are looking for big yardage), many teams have found themselves on the losing side at the end of the game against this set.
However, we have come up with a strong plan to stop this offense once and for all. Your defense has to be secure in the idea that they are going to give up some yards but eventually, if you force a Double-Wing team to drive the ball down the field instead of beating you with a home run, the offense will make a mistake.
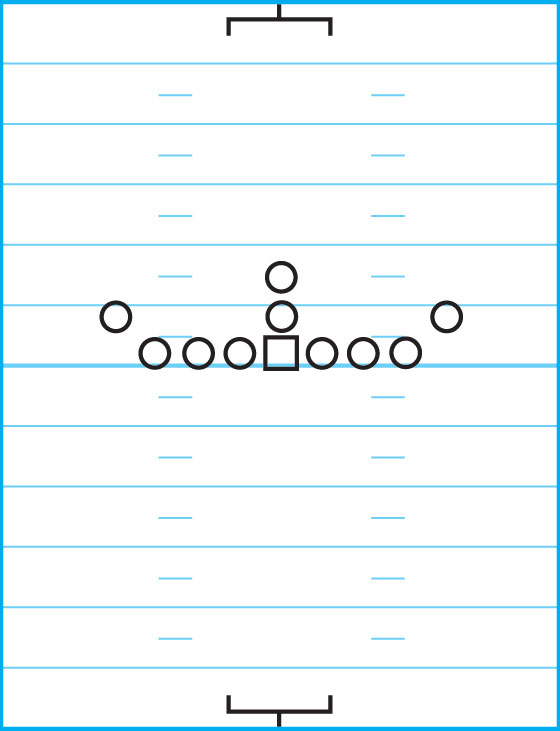
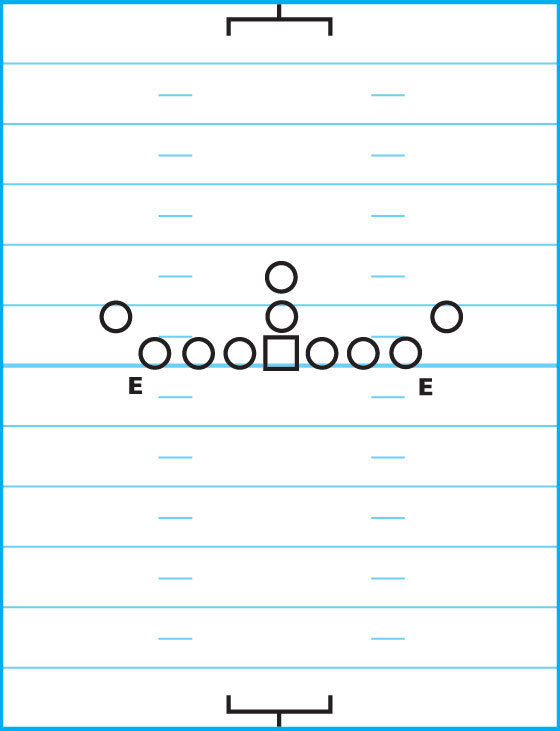
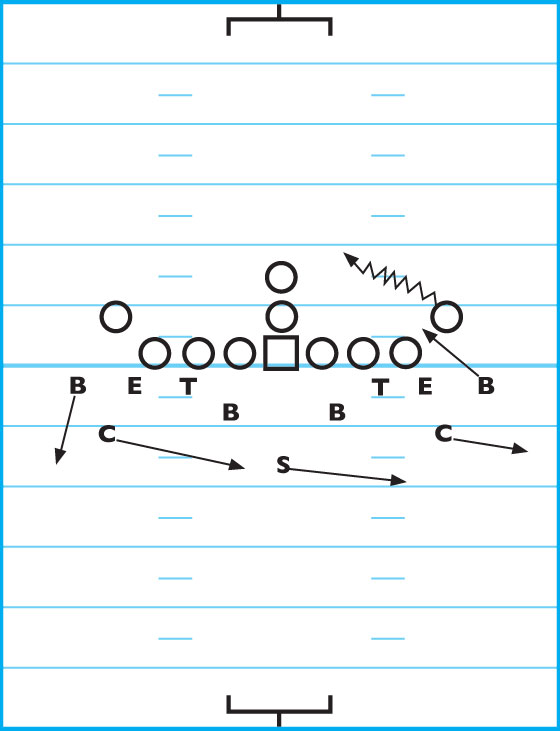
Before we dive into the specifics on how to stop this offense, we must be on the same page as to what the Double Wing actually is. Below is a diagram of the basic Double Wing.
DIAGRAM 1: Double-Wing Set. The offensive linemen and tight ends line up toe to toe with no splits. The fullback is positioned directly behind the quarterback’s backside and there is a wing on each side with one going in motion based on the cadence or a snap count.
To beat the Double Wing, you have to know the seven basic plays the offense runs. There are variations to some of these but overall, your defense only needs to concern itself with these seven plays:
1. FB dive — goes opposite of the motion of the wing.
2. FB trap — goes in the direction of the motion of the wing.
3. Power pitch — an off-tackle play.
4. X (or Buck) sweep.
5. Pitch — goes outside.
6. Reverse — goes away from the action.
7. Pass.
After knowing the plays the offense is going to run, then you need to know how the offense plans to pick up big yardage against you. This comes in the form of horizontal and vertical spacing. Today, many coaches strive for horizontal spacing through the use of zone blocking. But, in the Double Wing, the offense is daring you to come across the line of scrimmage, which creates vertical spacing and big plays.
To beat the Double Wing, teach your players not to penetrate (this takes some practice), to stay at the LOS and to not give up the big play. Giving up a few first downs isn’t going to kill your team but giving up 20-25 yards at a time will.
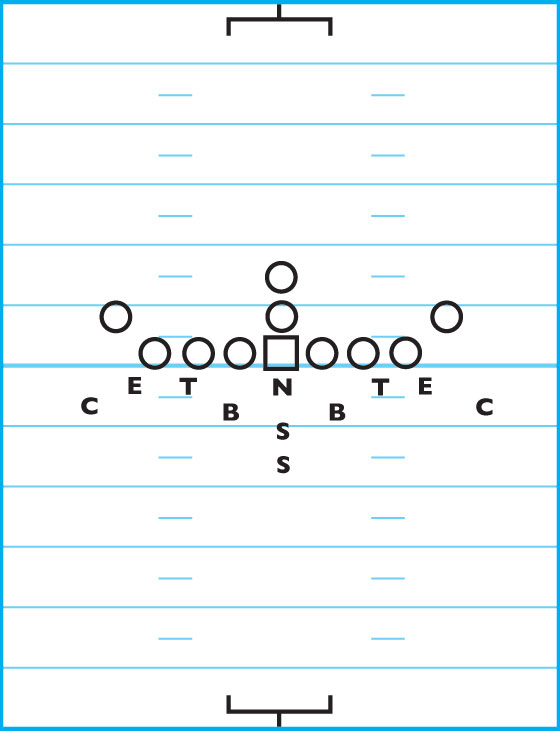
Before jumping into the individual player responsibilities, realize that running a variety of defensive fronts is important to beating the Double Wing. For the sake of this article, I have focused on our 50 Defense, which is what we play about 75 percent of the time. We switch to a 40 Defense (even-front defense) the other 25 percent of the plays (discussed later).
defensive linemen
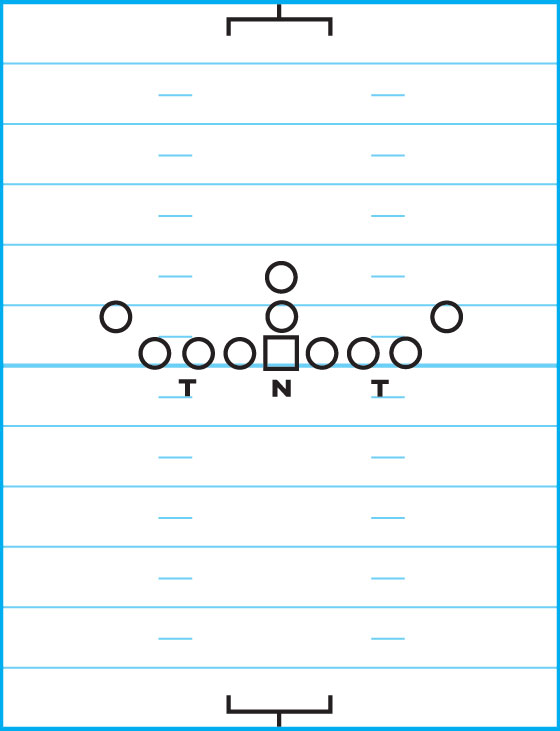
When discussing the defensive linemen, we are focusing strictly on the defensive tackles and the nose tackle. The defensive ends have their own responsibilities.
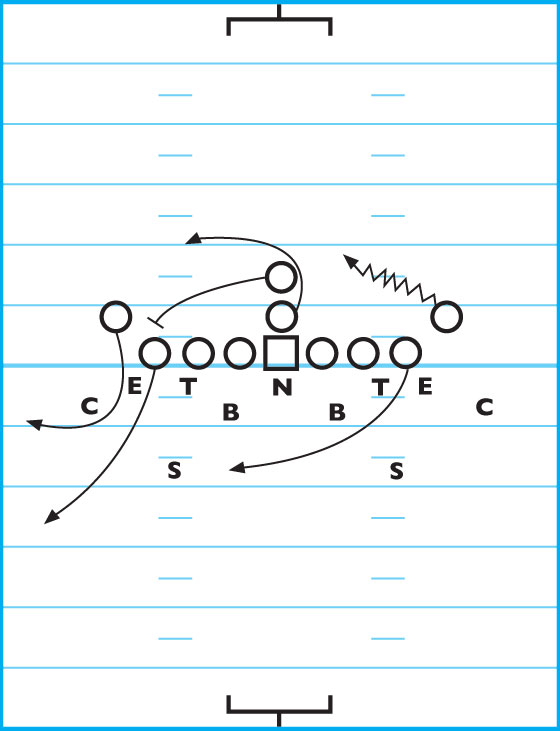
DIAGRAM 2: Defensive Linemen Alignment. The NT lines up over the center but you want him to get some direction, typically in the direction of the slant. The DTs line up on the outside eye of the OTs.
For the NT to figure out the direction of the slant, he looks at the alignment of the offensive line to determine which side they are pulling toward. This is done by reading if there are any splits on the line or if the FB lines up slightly off to one side. If the NT can’t get direction, then he just reads the center and reacts. The center, for the most part, blocks away from the play.
The DTs play a read technique by reading the movement of the OT in front of them. The OT is going to do one of three things:
1. Man-block the DT, which means the play is a pitch, X sweep or dive.
2. Double-team the DT with the TE, which means the play is the power pitch.
3. Block down on the LB and not block the DT at all, which means the play is a trap.
When the OT is man-blocking, your DT is responsible for making the play in the C-gap. He hits the OT, stands him up and makes the play. We play this way because we figure out DT is better than their OT, otherwise, we are in for a long night. Remind your DT not to cross the line of scrimmage.
If the double-team comes, the DT drops, takes a knee, grabs grass and makes a pile. This is extremely difficult to teach because the instinct is to make a play. But, we do not want a double-teamed DT to try to stand up, butt-roll or split the players — if he does, he could be driven back by both offensive players, creating the vertical spacing the offense desires.
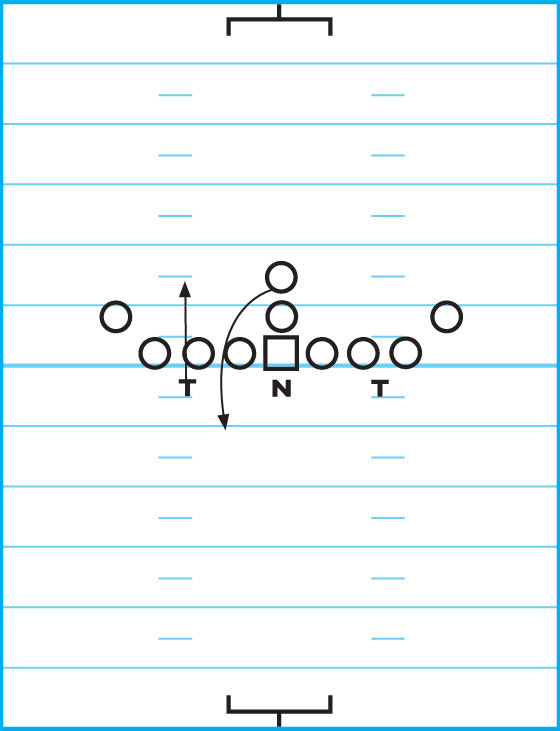
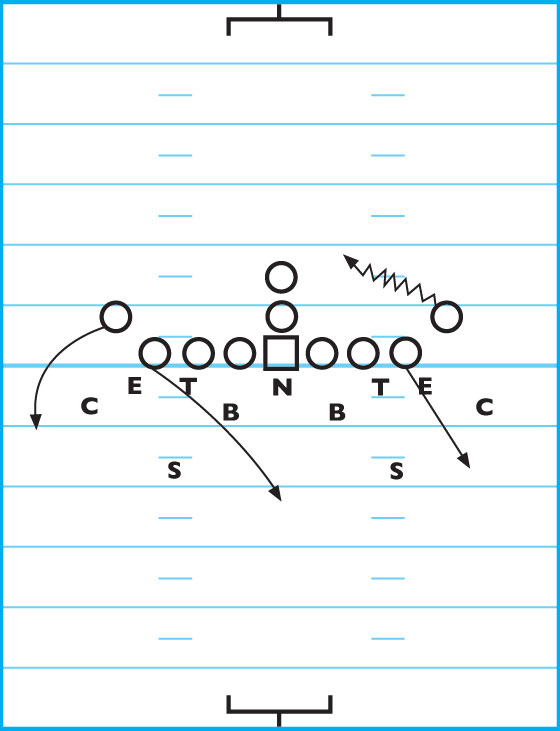
If the OT blocks down to the LB, your DT does not run up the field. Once again, if he does and crosses the LOS, vertical spacing is established and the offense has a better opportunity for a big play. Just think, if the DT comes flying across the LOS and the QB hands the ball to the FB on a trap, then the DT has taken himself out of the play.
DIAGRAM 3: DT Crosses LOS. The DT takes himself out of the play by over-pursuing as the FB already has the ball and is headed up the field.
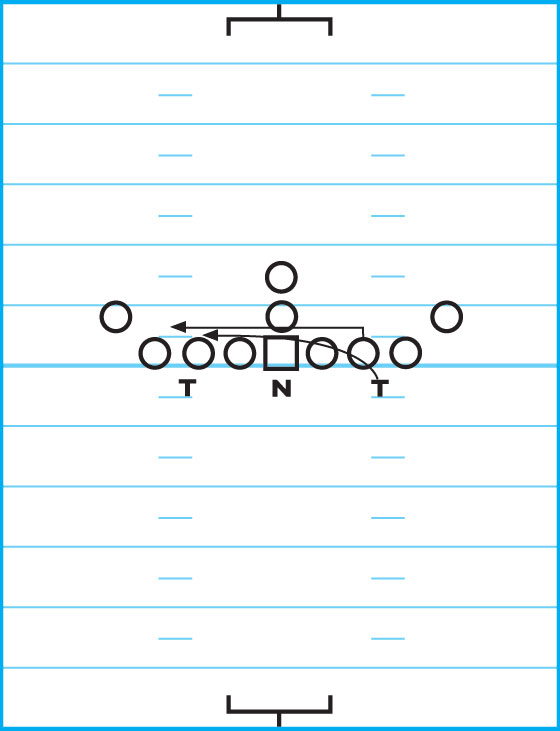
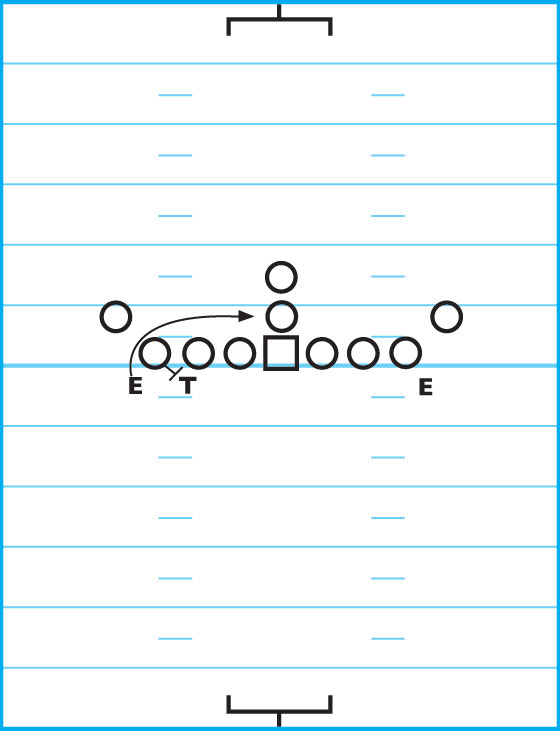
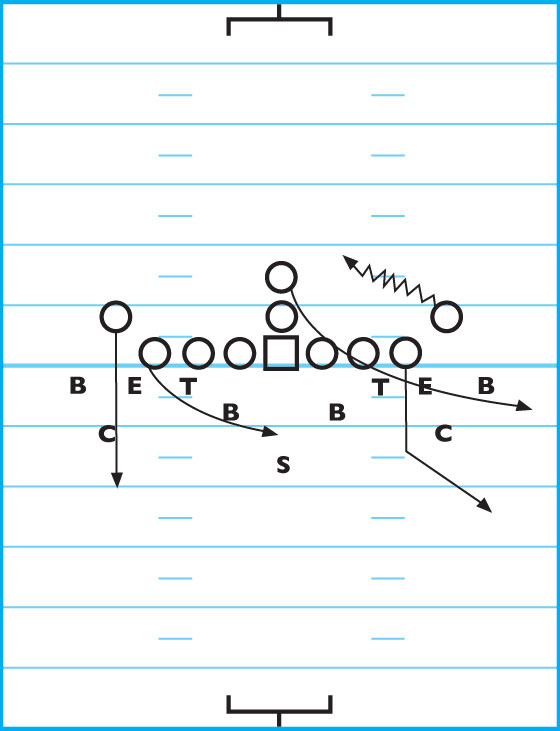
The responsibility of your backside DT changes when the OT in front of him pulls.
DIAGRAM 4: Backside OT Pulls. In this case, the backside DT follows the OT. This forces their TE to try to block your DT.
defensive ends
Your defensive ends are the key to stopping the Double Wing. Due to their importance, it’s good to have four solid DEs available to you. This way, you filter them in and out of the game to discuss in-game strategy and adjustments. DEs are so important, we assign a coach just to watch them and report what is happening.
DIAGRAM 5: DE Position. Your DEs are in a 3-point stance and line up at the feet of the outside shade. They stand at a 30-degree angle facing in. Their read is the TE.
The TE does one of three things, which shows your DE what play is coming:
1. Block down, which means it’s the power pitch or trap.
2. Man-block, which means it’s the dive, pitch or X sweep.
3. Try to cut the DT, which means the ball is going away.
Many coaches who attempt to defend the Double Wing send their DEs at the FB. We don’t.
When the TE blocks down, we send our DEs to a box, which is 1 yard in and 1 yard behind the space behind the OG and OT.
DIAGRAM 6: DE’s Responsibility. Getting to this box area eliminates the vertical spacing the offense wants. If you send your DEs directly at the FB, this creates vertical spacing. Don’t worry, the FB will find the DE.

Plus, if the backside OG and OT pull, they run directly into the DE.
Your backside DE has a slightly different responsibility if the TE moves out to cut the DT. In this case, the DE comes across the LOS and catches the play from behind.
DIAGRAM 7: Backside TE Cut DT. This shows your backside DE’s responsibility if the TE cuts the DT.
Your DEs aren’t going to make a lot of tackles in this defense of the Double Wing but if they do their job properly, they are the players of the game.
linebackers
Your LBs are going to key on the QB, the FB or the OG and are going to line up at the second level over the
OGs, as shown in Diagram 8.
DIAGRAM 8: LB Position. The LBs line up slightly outside the OGs.
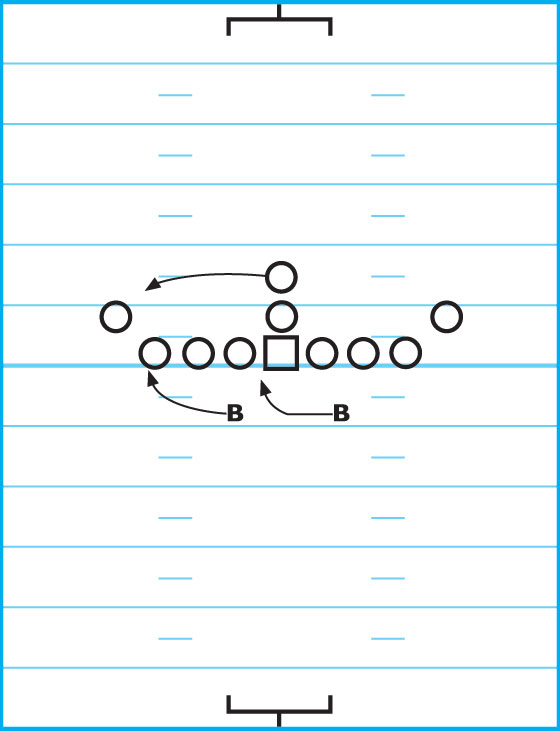
The easiest key to call for your LBs is on the FB. The FB is going to take you to the play in every instance except for the X sweep.
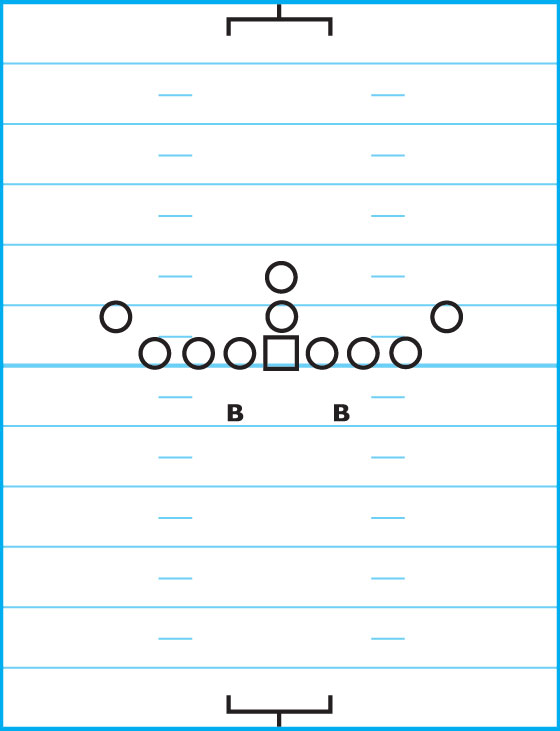
DIAGRAM 9: FB Read. This is the motion of your LBs when in a FB read when the FB breaks to one side. The play side LB has the scrape read and the backside LB has the shuffle read. The LBs go inside-out and do not overrun the play.
When reading the QB, the LBs watch the QB’s backside as it normally goes where the play is going, except for with the dive and reverse.
If you call for the LBs to read the OGs, then when the OG man-blocks or blocks down, the LB has the scrape read. If the OG pulls, that LB has the shuffle read.
defensive backs
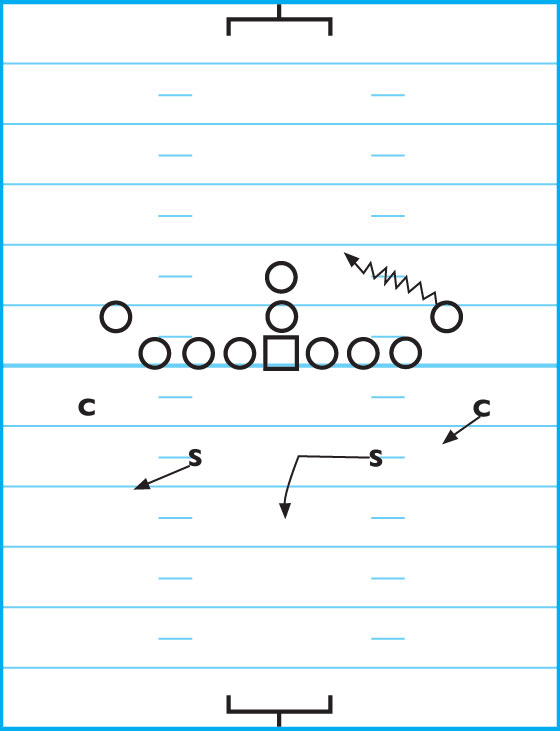
Against the Double Wing we play a Cover 2, corner-rotation type look with our four defensive backs.
DIAGRAM 10: Defensive Backs Position. The corners line up 4 yards by 4 yards off the TE, which leaves them just outside of the wingback. The CBs key on the wingback on their side of the ball. Safeties line up 6-8 yards off the LOS and are positioned behind the DT. Their read typically is the QB and they are to watch what the CBs do as well. Sometimes the safeties key on the TE but most of the time it’s the QB. In this defense, the safeties normally are going to be your leading tacklers in the game.
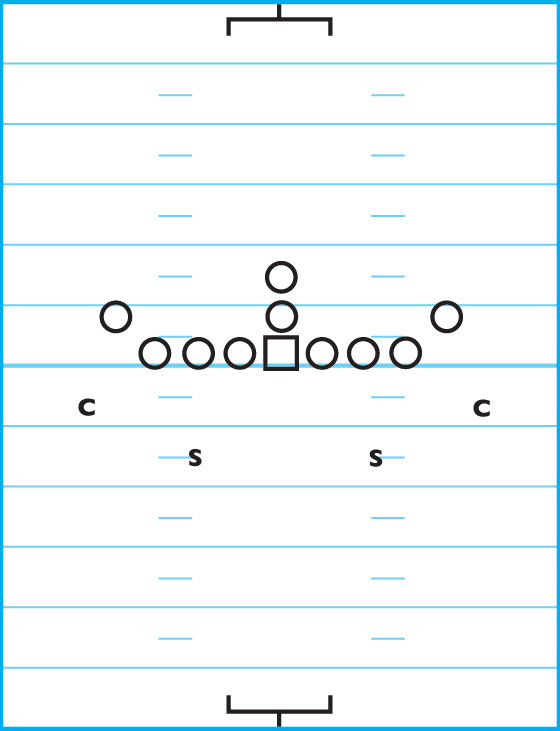
DIAGRAM 11: Wingback Blocks Down. If the wingback blocks down, the CB fills as shown in the diagram. If the wingback blocks the CB, then the play is coming to that CB’s side. If the WB releases for a pass, the CB covers the earmarked flat zone.
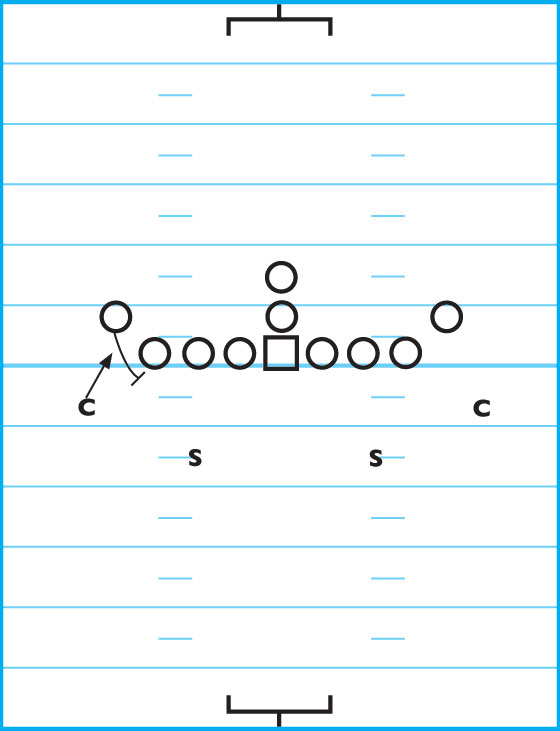
DIAGRAM 12: Zone Coverage. When the one CB’s wingback goes in motion, that CB drops back to a depth of 5 yards and moves toward the middle 2 yards, then keys on the TE while standing at an angle technique. If the play is a pass, this CB takes the right one-third side of the field. He’s also the cutback defender, so if the play comes back to his side of the field, it’s his responsibility to make the tackle. The safety on the right side takes the center one-third of the field with the other safety covering the left one-third side of the field.
This gives you a three-deep coverage in a two-deep look, which is important because the Double Wing relies on having specific pass calls for a two-deep look and a three-deep look.
In some cases, the CB on the side where the motion is coming is allowed to attack, which we call the Cover 2 Attack.
DIAGRAM 13: Cover 2 Attack. In this instance the CB is allowed to cross the LOS. He gets deeper than the DE. In essence, you now have two DEs on this side of the field. This is a great call against the pitch and the X sweep. Although if they run a play off tackle, he is too far inside to make a difference. So, this call isn’t made too frequently during the game.
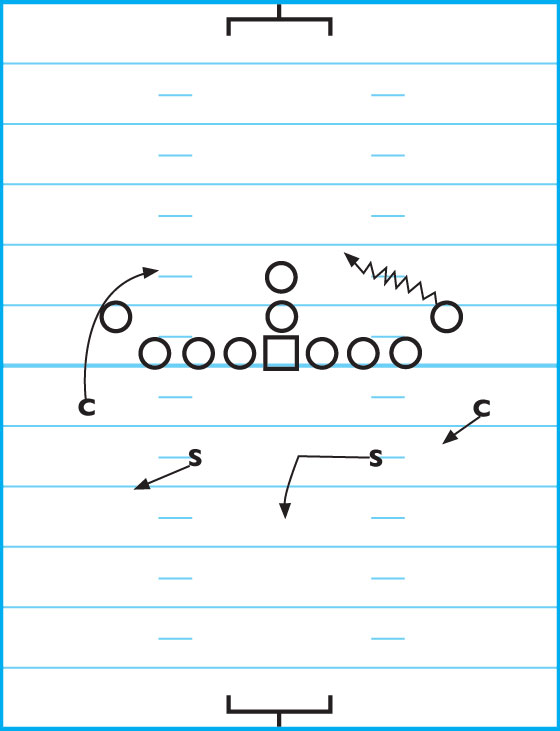
DIAGRAM 14: Cover 2 Attack Opposite. If you get a good feel that the offense is throwing due to the situation, call the Cover 2 Attack Opposite. In this instance, the CB whose wingback goes in motion is the attack person, instead of dropping into coverage. With his wingback in motion, this CB should have a free shot at the QB if it’s a pass play. The safety on the attacking CB’s side of the ball now is responsible for the right one-third of coverage. The left safety takes the middle one-third coverage. The left CB drops into coverage of the left one-third of the field.
Changing to a Cover 3 requires no change in the defensive line or ends. In this case you either add another LB and play 5-3 or go with 50 Wild, which means having a second safety who plays man defense on the FB or either of the wingbacks.
DIAGRAM 15: 50 Wild Cover 3. The wild cover man (the second safety) lines up in front of the original safety in a typical Cover 3 look. This wild cover safety plays man coverage on the FB or either wingback.
When playing the Cover 3, you do lose your attack, opposite attack and wheel adjustments. But, it is necessary to have a Cover 3 as part of your defense so the offense has to keep thinking about what defense you might be playing.
Another way to confuse the offense is by showing a Cover 3 look, then rotating to a Cover 2.
DIAGRAM 16: Cover 3 Rotate Into Cover 2. The CB whose wingback goes in motion drops back into coverage, as does the safety. The other CB takes the flat. You are giving up the flat on the left side of the ball but you are assuming they are flooding the right side of the play.
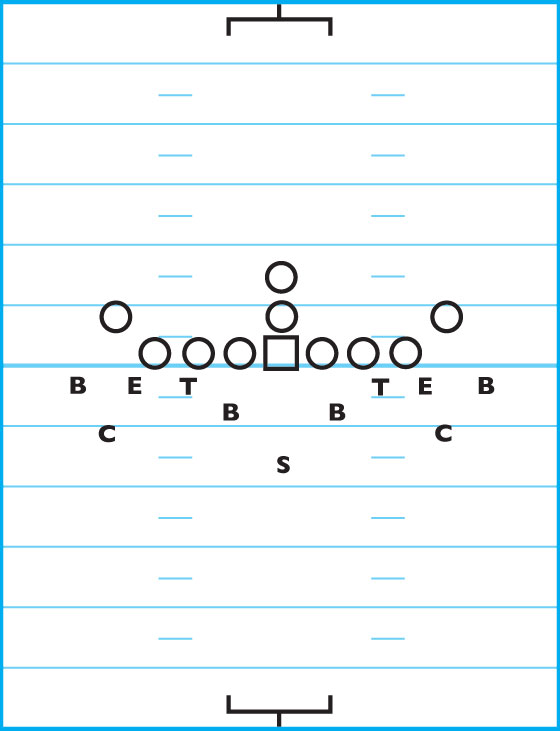
40 defense
The majority of this article focuses on our 50 Defense, which we play most of the time. But, as has been discussed, mixing up defenses and looks is critical to stopping the Double Wing. Jumping into a 40 Defense is a good way to keep the offense guessing.
DIAGRAM 17: 40 Defense Basic Look. The 40 defense is strong on both corners. Its weakness is an off-tackle play. The DEs need to work to close off the off-tackle hole.
The 40 Defense also has an attack option. The OLB on the side where the motion is coming toward becomes the attacking player.
DIAGRAM 18: 40 Defense Attack. The OLB attacks while the CB on his side takes the flat. The safety comes over the top. The opposite CB takes the middle and the opposite OLB takes the deep coverage. This keeps you in a three-deep coverage while still having an attacker.
This look also has an opposite attack variation as well. The opposite LB is the attacker this time with the CB on that side taking the flat, the safety coming over the top in the other direction than the regular attack and the other CB coming into the middle. The other OLB drops into coverage.
DIAGRAM 19: 40 Defense Opposite Attack. With the opposite OLB attacking, the offense has another look against which to prepare.
pass looks
The Double Wing utilizes a few variations of a pass play. So you need to be ready for what they are going to do. The following are three passing looks and movements within the Double Wing. I dropped our typical defensive set into each diagram so you see where you need coverage and how the offense plans on
attacking this defense.
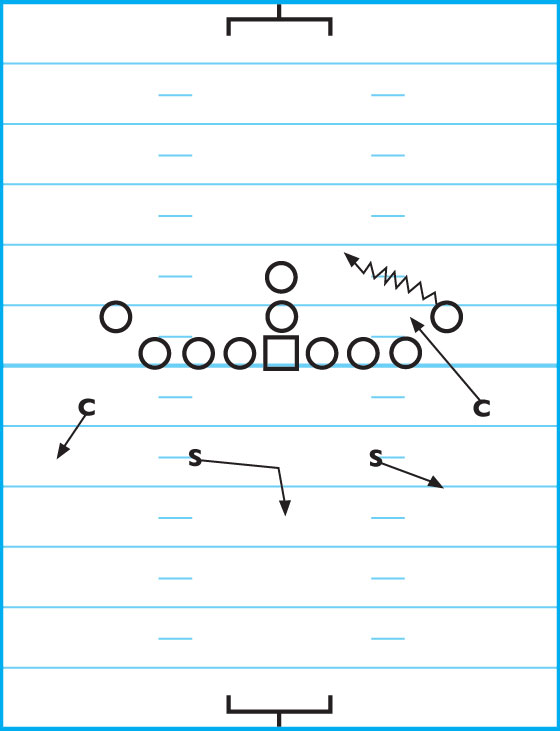
DIAGRAM 20: Roll Pass. The Double Wing utilizes a roll pass, which this defense typically defends with our 50 defense, as that is the one most often played. In this pass, the offense sends one wingback in motion. The other wingback runs to the flat. The TE on the side of where the motion is coming runs a drag across the middle of the field. The TE on the other side of the ball runs a deeper corner route. The FB stays to block and the QB fakes the handoff to the FB before rolling out.
Knowing the offense’s intentions shows that your defense needs to have a flat defender, a deep defender and a middle defender to take away all passing options.
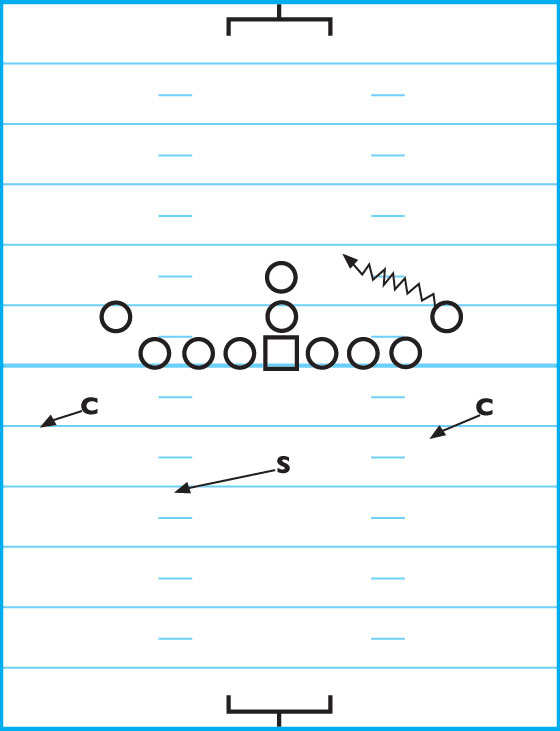
To try to keep your defense on its toes, the offense also uses a roll throwback play. This play puts the same wingback in motion. The other wingback runs a short route. The TE on the side where the motion is coming runs a corner and the other TE runs a deeper route through the middle of the field. The QB still rolls but throws back to the side of the field he is rolling away from.
DIAGRAM 21: Roll Throwback Pass. The roll throwback is designed to catch you with too many defenders on one side of the field, which opens up the opposite side for both TEs.
The offense also utilizes an X pass or Buck sweep pass. In this instance, your 40 defense is the best option.
DIAGRAM 22: X Pass (Buck Sweep Pass). The motion comes from right to left (in front of the defense) but all of the action is heading right. The right TE runs a deeper corner route. The FB runs to the left flat. The left
TE drags to the middle of the field. The left wingback runs a vertical route.
Understanding where the TEs, receivers and FB are going in passing situations makes it much easier for you to defend to the Double Wing and to limit those big plays.
For more great defensive information on stopping this high-powered offense, check out Dick Bruich’s brand-new DVD “Defending The Double-Wing Offense” (Item number FD-02742) from the highly popular Gridiron Strategies “Top-Coaches-In-The-Nation Series.”