Diagram 1 depicts a simple read drill that involves a strong safety reading a tight end. The tight end will block down, block out, release down field for a pass, run a crossing pattern or run to the flat and the safety will react accordingly. This drill is the best method we have found for providing our safeties with multiple tight end reads in a very short period of time. Four rotating safeties can each receive three repetitions per minute with this drill.
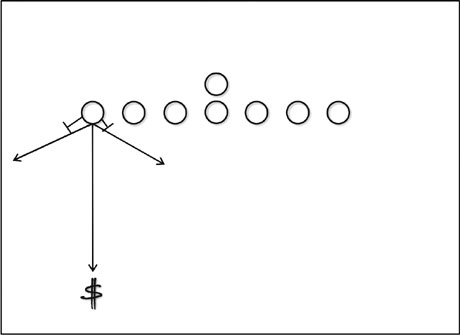 Diagram 1: $ keys Y, Y can block down, block out, release downfield, run a crossing route or run to the flat.
If the drill is modified so that it is performed to the right and left simultaneously, as in Diagram 2, six safeties can each perform four repetitions per minute. This is a very efficient and effective drill that simulates the reads as they happen in game circumstances. For the sake of illustrations, the tight end is labeled as ‘Y’ and all of the safeties are drawn as strong safeties (‘$’). However, certain schemes and offensive formations can require free safeties and even cornerbacks to perform this read. Any player who is asked to perform this read should be included in this drill.
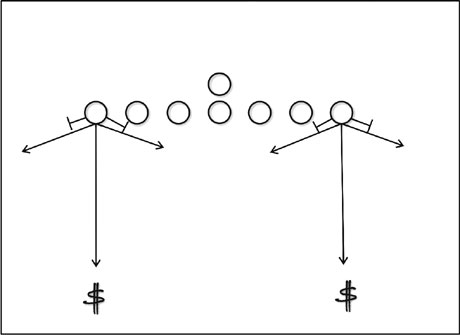 Diagram 2: Two read drills going at once can double the total repetitions.
The exact reactions can be adjusted based on the coverage that a given team employs but the drill remains the same. The defensive back keys the tight end and employs the reactions that are required of the particular defensive scheme. For the purpose of this article, each of the reactions depicted in Diagrams 3 and 6 will be explained in detail using quarters coverage with backer force. It is also important to note that the diagrams show a tackle (T) and an outside linebacker (B). However, we rarely have the luxury of having enough players that we can afford to have players standing in these positions. Instead we will use stand-up dummies to simulate these players.
 Diagram 3: Y blocks down, $ fills outside of tight end, but inside of B.
Down Block
The most common block we see is the down block (See Diagram 3). In our league, and I suspect in many others, the lead play of most of the teams we compete against is usually some type of off tackle play. This generally entails a down block by the Y and a kick-out block on our outside linebacker. Even if the team pulls the backside guard to wrap around on the playside backer, as in the traditional power scheme, the safety can often be the extra player that the offense cannot account for.
When the safety reads a down block, he will charge straight ahead filling the hole between the down block and the kick-out. If the safety encounters a member of the offense attempting to block him, it is important that he maintains outside leverage on the blocker. This will allow the inside linebackers a chance to fill and make the play. Proper reading of the down block with a swift and aggressive charge by the safety can turn what would be a long night for the defense into a long (specifically third and long) night for the offense.
Block Out
Many inside running schemes require the Y to block out on the outside backer (See Diagram 4). When the safety reads this, he is instructed to shuffle inside and to fill off of the inside linebacker. It is important that he shuffles inside first to avoid a duplication of effort with the inside linebacker. Proper reading and reaction to this play will prevent the offense from breaking a long run on an inside play.
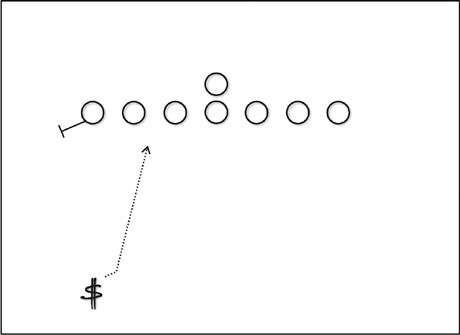 Diagram 4: Y blocks out, $ shuffles inside and fills off the ILB.
Release Downfield
When the Y releases straight down field the safety will cover him man-to-man (See Diagram 5). This may be the most important read that the safety performs. If he misreads this, or has his eyes in the backfield on this one, it is an almost certain touchdown for the offense. When initially running this drill, it is a good idea to give the DBs plenty of repetitions on this read. It will pay huge dividends in the long run.
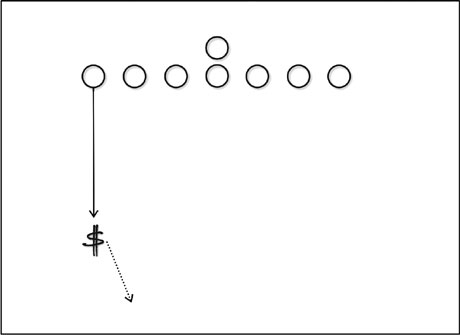 Diagram 5: Y releases downfield, $ covers him man-to-man.
In or Out Break by the Y
When the Y releases to the outside or across the formation (See Diagram 6), in other words whenever a pass is shown and the safety’s deep zone is not threatened, he will look to double the number one receiver to his side. This is one of the advantages of playing quarters coverage. Whenever the offense does not send both receivers deep, we can aggressively double cover the most dangerous receiver. Mastering the reactions to this read is what separates quarters coverage from a simple man-to-man defense.
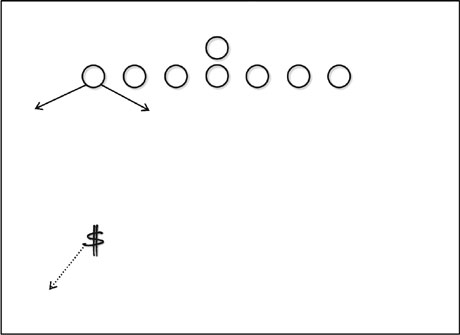 Diagram 6: Y breaks in or out, $ is free to double #1 receiver.
Conclusion
Regardless of the schemes employed by the defense, proper reads and reactions are critical to successfully executing the coverage on game day. This article has detailed a simple drill that will provide the defensive backs with a high volume of repetitions in a short period of time. The drill can easily be adapted to fit different coverages and different reactions – such as the safety having force on a down block by the Y (See Diagram 7). This drill could also be modified to allow for the reading of an inside receiver to a twins side (See Diagram 8). In addition, this drill is a great opportunity to reinforce proper footwork. A ball carrier could even be included in the drill to require a form tackle at the end of the drill. The important point is to keep an open mind and to modify the drill to make sure it accomplishes what your team needs the most. Good luck and feel free to contact me with any questions or comments.
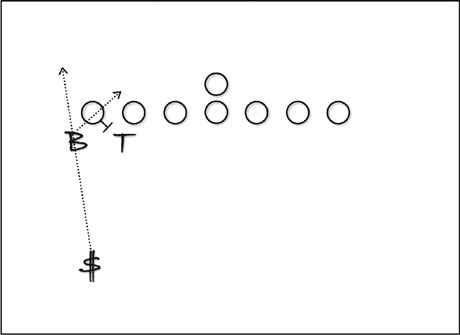 Diagram 7: Y blocks down, $ fills outside of the B and has force.
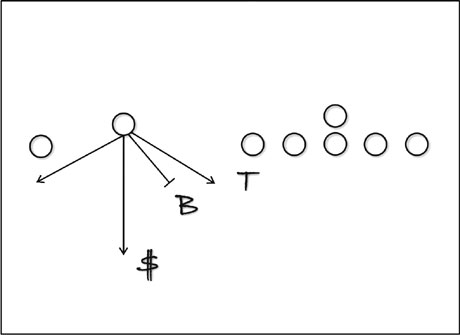 Diagram 8: Y blocks down, $ fills outside of tight end, but inside of B.