A. Forcing the defense to commit defenders from the ‘Box’ to the outside.
B. Limiting defensive stunting and coverage calls.
C. Being able to run quick screens and ‘Bubble’ screens with an extra lead blocker.
D. Giving the defense an ‘Overload’ side, forcing them to show its coverage and ‘tip its hand!’
Many of our conference teams have added the Spread Offense to their attacks in recent seasons and with this we have seen more and more usage of the Quads packages to further enhance their ability to get the ball OUTSIDE to their best and fastest players. In conducting our off season research and opponents’ film study, we looked to develop a simple yet effective defensive adjustment within the framework of our basic multiple seven man front schemes (3-4 and some 4-3) without forcing our players to learn numerous adjustments and frontage checks. Versus the ‘Quads’ package, however, we still wanted to be able to give the offense more than just one adjustment to have to prepare for, but once again, keep it simple and disguised. We felt the need to be able to do a few things from one frontage, helping us to disguise our intentions before the snap of the ball.
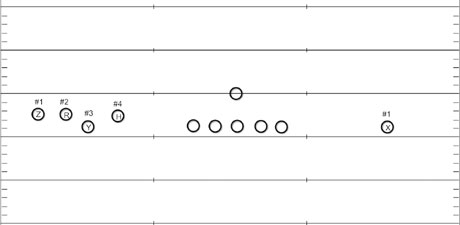
Diagrams One, Two, and Three show the three most often used ‘Quads’ formations which we see from our opponents. The ‘Diamond Quads’ formation shown in Diagram One has one receiver aligned behind three others and almost at quarterback depth in the Empty-Gun set. The ‘Straight Line Quads’ shown in Diagram Two gives us the traditional ‘Trips’ set with an extra flanking receiver on the same level in the backfield. We have also seen the ‘Quad Slot’ set, shown in Diagram Three, with teams using this adjustment to be able to run Spring Out Passes and the popular ‘Shovel Option’ play developed by Northwestern University and University of Florida.

|
|

|
While preparing our adjustment packages versus the ‘Quads’ sets, we came to several conclusions. First and foremost we wanted to use one frontage and secondary shell to better disguise our players movements and coverage angles. This would help us to not tip our hand as to our intentions once the ball was snapped. Secondly, we wanted to use movement changeups with our defensive front players and our linebackers to force indecision in the quarterbacks reads, giving our rush players time to get to him even when we were not blitzing or stunting. Face it – the Shotgun-Empty quarterback is already anywhere from five to seven yards deep and he can get the ball off quickly vs. any type of rush. We therefore felt that we had to be able to cover first and deny quick receiver routes and quick screens whether we were coming after the quarterback or not. We also felt that the quarterbacks depth helped our linebackers and defensive backs get their run/pass quickly so our ‘Disguise by Simplicity’ design would work; that is so long as our rush lanes were maintained up front and our coverage defenders maintained their zone or man to man coverage leverage.
Four basic defensive principles we felt were crucial to our success vs. ‘Quads-Empty’ were:
1. The ability to change up our coverage and pressure defenses and use both.
2. Always keeping five defenders in the ‘Box’ but also having the ability to get seven when we needed it.
3. Denying quick throws, ‘Pick’ routes and quick screens and ‘Bubbles.’
4. Keeping the quarterback inside and forcing him to run!
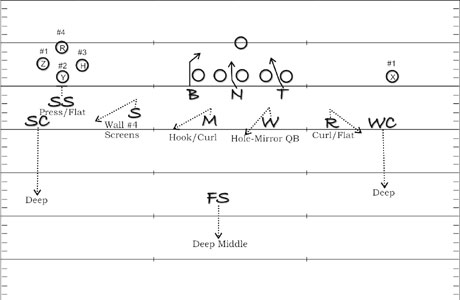
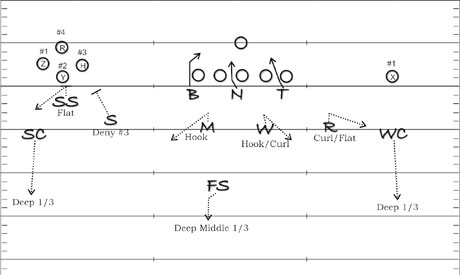
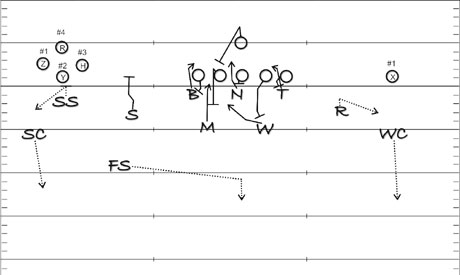
With these thoughts and ideas in place we developed our ‘Shade’ frontage package, a defensive adjustment we would check to whenever Spread Offense teams showed us their ‘Quads’ receiver alignments. With this we also implemented our basic Cover 6 look. Diagram Four shows our ‘Shade-Cover 6’ alignment vs. a ‘Diamond Quads’ set. Notice our strong safety is in a heads up, press alignment on the wide receiver aligned on the line of scrimmage. This helps us to deny the ‘Pick’ route combinations many teams want to run out of ‘Quads.’ Our inside linebackers (Mike and Will) maintain their normal depth of five yards, as does the Rover Outside Linebacker. Our Sam or strong side outside linebacker aligns splitting the difference between the offensive tackle and the #4 wide receiver in the ‘Quads’ set. His depth is at four yards, allowing him to get depth or to break to the thrown ball vs. quick screens and passes. Our corners show their original alignment depth at five yards with the Will Corner aligned with an INSIDE leverage on the #1 wide receiver weak side. Once again this helps with our disguise aspect as he can now ‘weave’ his movement based on coverage called to be able to maintain his leverage on either his zone drop or his man assignment. He has inside help from the Rover’s alignment. The free safety aligns over the strong side offensive guard at a depth of twelve to fourteen yards dependent upon the speed and ability of the WRs we are defending. Our frontage shades to the strong side of the set.
|
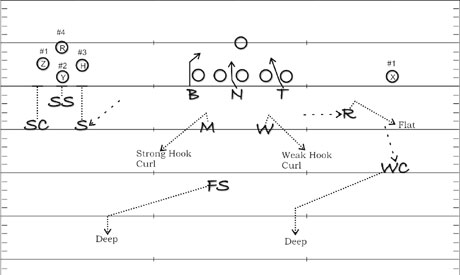
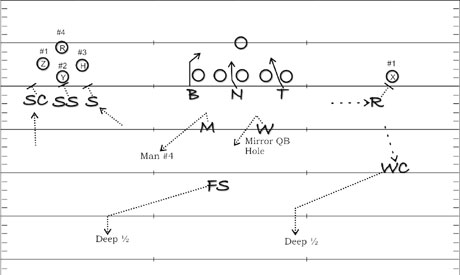
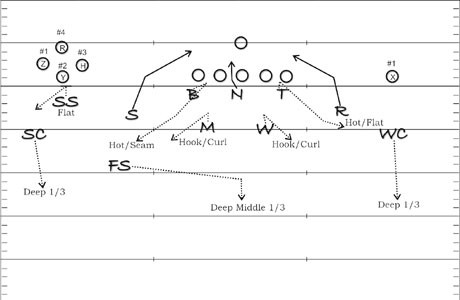
From this BASIC alignment that we have in our defensive package from day one, we feel we can adjust on the snap of the ball to any one of five different stunts, movements, blitzes and coverage adjustments in our package and be able to deny the play series our opponent utilizes. Diagram Five shows our Shade-Cover 5 which is a roll to Two Deep, 5 Under Zone, while Diagram Six shows a variation of this, rolling to 2 Deep, 5 Under Man, known as Shade-Cover 5 ‘LOCK.’ Diagram Seven shows our Shade-Cover 3 ‘ROLL’ look, giving us a true 3 Deep, 4 Under Zone defense, while Diagrams Eight and Nine show our two basic pressure packages, Shade-Stack-Bear with man coverage, and Shade-Blast-Orange 3 which is our Zone Blitz look.
|
|
|
|
|
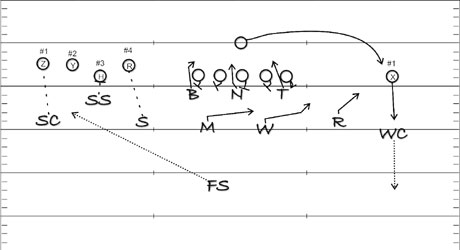
Diagrams Ten and Eleven show our adjustments ‘on the run’ vs. the run! Here we show our run ‘fits’ for our linebackers and our front three should the offense decide to hit us with a weak side spring out pass or quarterback ‘Draw’ actions. Here we feel it is crucial to have a defender mirroring the quarterback.
|
|
If you have any questions, you can email the author at DaleSprague@GridironStrategies.com.
WHAT IF?
Q1. What if there are certain situations where you want to use a blitz package against the Quads Empty Spread formation?
When we see the QUADS EMPTY set on third and 8+ yards to go for the first down, we will utilize and actually check to our “Shade-Stack-Bear Man” blitz package. This forces the offense to make a quick “Hot” throw and we feel we can make a tackle for a short gain and force the offense to punt on fourth down. If they do not throw hot, we will get a big sack or force an incompletion as they do not have enough people to protect us vs. this blitz.
Q2. What quad alignment gives your defense the most trouble? Is it the diamond alignments, quads across, or a 2 and 2 configuration?
The Diamond Quads Empty alignment gives us the most trouble for the following reasons:
A. The offense now has three receivers capable of catching a quick or bubble screen.
B. The deepest quad gives the offense the threat of a double pass play which can be executed quickly, and can also execute a QB throwback off the quick or bubble.
C. Three receivers are in position to (1) block for any other receiver, or (2) release vertically downfield or pick horizontally for each other. Our Sam LB\'s alignment in “Shade” helps to deny each of these options.
Q3. In your “Shade-Cover 6” defense, what kind of support does your strong safety get?
We feel that the most important defender in the “Shade-Cover 6” packages is the strong safety. He has inside help from the Sam LB and Mike LB and we really emphasize that he physically deny the release on the LOS quad receiver to prevent pick routes from occurring. In addition, we find that his press alignment gives us a second defender, along with the SAM LB, in position to break on any quick, jailbreak, or bubble screens which may occur.