THE SAN DIEGO CHARGERS run a very aggressive “attack-and-read-on-the-run style” of defense.
Our defensive linemen are constantly told to knock their man back off the ball and not to run laterally and create running lanes for cut-back runners.
DL should have a basic knowledge of opponents down-and-distance tendencies, different backfield sets and blocking schemes for each set prior to the snap of the ball.
To effectively stop an opponent’s running game, you must teach your defensive linemen the following run-stop techniques.
- Stay Balanced. The DL should line up with his feet well underneath him so that he’s ready to fight pressure from any direction.
- Focus On The Man Closest To You. DL must always concentrate on the opponent nearest to him, as he is the man who can block him first.
- Read On The Run. A DL should develop the ability to read blocking combinations while on the run that will help him identify what kind of running play it is and what kind of escape technique to use.
- Key The Opponent’s Head. The DL must key the opponent’s head and it will take him to the ball. He must move instantly on the snap of the ball or the movement of the offensive linemen in order to attack him or penetrate the line of scrimmage as fast as possible.
- Learn Proper Striking Technique. DL should never allow an easy release. They must learn to attack the blocker by delivering a blow that neutralizes the power of the block or gains position on him.
Teach the DL to step with the inside foot (back foot) on the initial blow and deliver the blow with open palms to the opponent’s chest or shoulders.
The movement of the DL’s hands and arms must be forward, locking his elbows out as the blow is struck. Strike the blow through the man and get operating space by locking out the arms.
- Drive The Opponent Backward. The DL must accelerate his feet on contact and move the opponent back.
The goal is to play the game on the opponent’s side of the line.
3-Technique DT
The following illustrates and explains the techniques, counters and responsibilities against run keys for a
3-technique (defensive tackle).
Stance: The DT uses a 3-point stance with his inside foot back.
Alignment: Split outside leg of guard and slightly cocked.
Key: Guard’s head.
Responsibility: If the play is a run toward the 3-technique, the DT must close the B-gap.
If the play is run away from the 3-technique, he must squeeze and release to the A-gap.
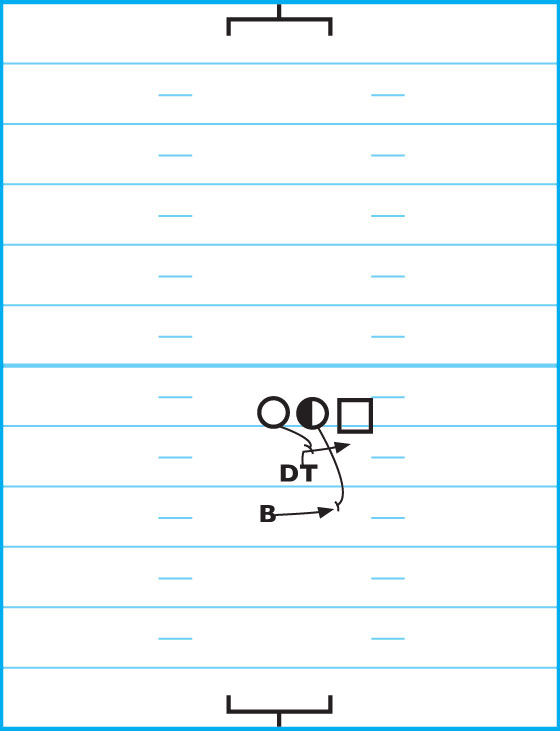
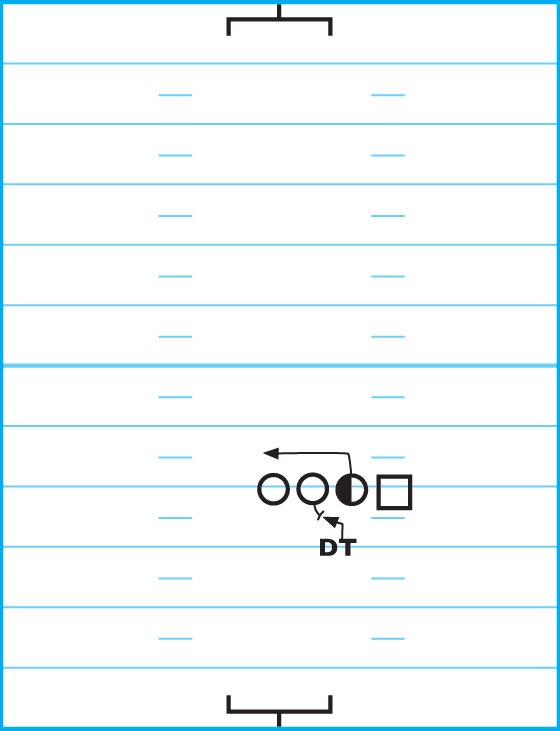
DIAGRAM 1: Base Block.The DT must explode into the offensive guard with the first step attacking the OG’s near shoulder. The DT must get his hands inside, lock out and create separation. Hold the B-gap and squeeze the A-gap.

The 3-technique DT must always be ready to locate the ball, shed the block and make the play.
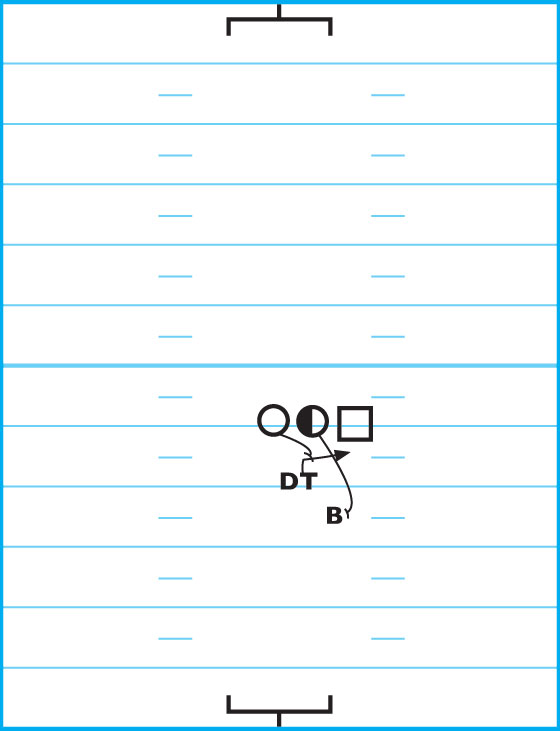
DIAGRAM 2: Reach Block. The 3-technique must explode into the OG with his first step attacking the opponent’s near shoulder.

He must drive through the OG with a hand shiver and push him with the on-side arm on the outside shoulder of the OG and drive him up the field. Knock him back and keep leverage on block until ball is declared inside or outside. If guard is too flat, drop your outside shoulder and wheel back door. Locate ball, shed and make play.
DIAGRAM 3: Cut-Off Block. The DT explodes into the OG with his first step attacking the OG’s near shoulder. He squeezes the OG down, condensing the A-gap and protecting the B-gap.

When there’s no threat to the B-gap, the DT must locate the ball, shed the block and pursue to the ball.
If the OG is too flat, the DT must drop his inside shoulder, wheel to the back door, flatten out and pursue.
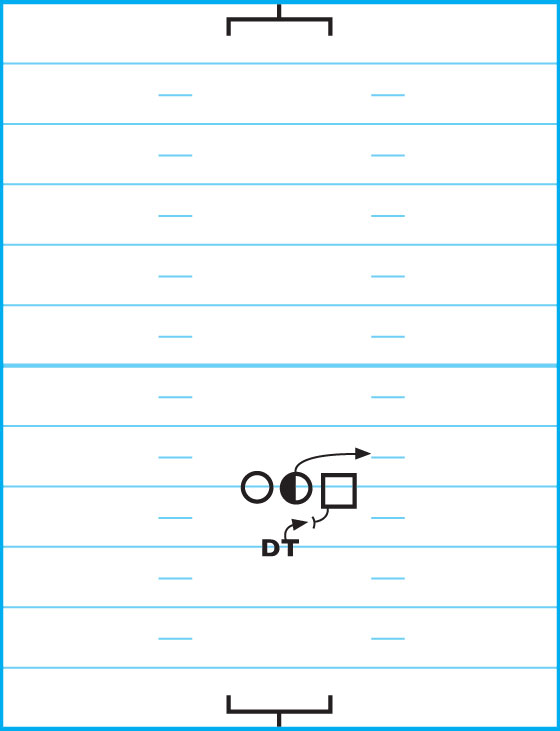
DIAGRAM 4: Power-Scoop Block. The DT explodes into the OG with the first step attacking his near shoulder. He must get hands on the OG and use a cut-off block. When the DT feels the offensive tackle, he must get in the seam between the OG and OT and shoot upfield with his arm and shoulder through.
The DT should force the OT to push him into the play (he must hold on to the OG for as long as he can — this will pull him into gap). He should use his outside hand to protect his legs against a cut block.
Coaching Point: The DT must make note of all the offensive linemen’s pre-snap splits and stance. The power-scoop block is the No. 1 block that’s used against 3-technique tackle. The DT must locate the ball, shed the block and make the play.
DIAGRAM 5: Speed-Scoop Block. The DT explodes into the OG with the first step attacking the OG’s near shoulder. He must move laterally, grabbing anything and keeping the OG off the linebacker.
The DT must reach for the OG’s far number or hook his near elbow and run away from the OT. The DT must beat the OT and make play if the OG escapes. This player must also replace the LB. He must locate the ball, shed the block and make the play.
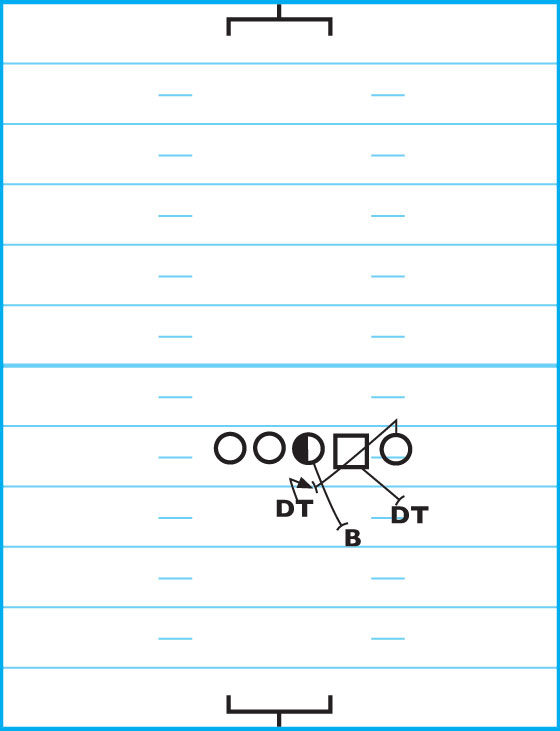
DIAGRAM 6: Double-Team Block. The DT explodes into the OG with his first step attacking the OG’s near shoulder. When he feels the OT, he must drop his outside knee to the ground and turn to lean back into the OT. He must also hold on to the OG as he leans back and splits the double-team. Once the double-team is split, must come off his knee when one of them releases upfield.
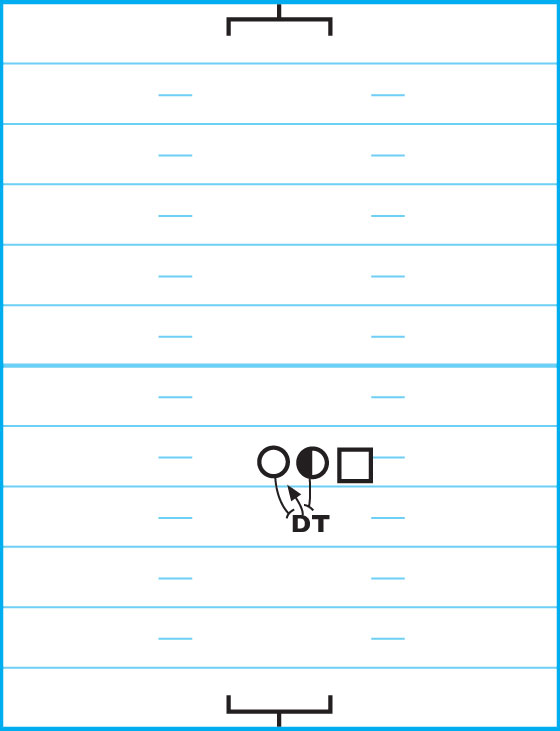
DIAGRAM 7: Fold Block. The DT explodes into the OG with his first step, attacking the OG’s near shoulder. When the OG pulls — the DT must watch out for the fold block by the center.
When the DT feels pressure from the center, he must squeeze him and protect the B-gap. When there isn’t a threat to the B-gap, the DT must beat the center’s block and sprint hard toward the ball.
If the center is upfield, he must drop his inside shoulder and flatten down the line backdoor. If the center is too flat, he should cross his face.
DIAGRAM 8: Influence-Trap Block. The DT explodes upfield with his first step attacking the near shoulder of the OG. 
Coaching Point: Remember that a “high hat = pass.” So rush!
If the OG releases to the outside, the DT must think trap. In that case, the DT must find the trapping OG and blast him with his inside shoulder and squeeze the ball. he must be sure to close the distance between himself and the trapper.
DIAGRAM 9: Draw Block. The DT initially reads the short set of the OG.

When the DT feels the OG, he must turn upfield and come back out the way he went in. He retraces his steps and diverts the ball carrier’s course. The key is to recognize the short set and influence by the OG and then play the pass first! He must note the difference between a draw set and a pass set.
DIAGRAM 10: Tag Block. The DT must explode into the OG with his first step, attacking the OG’s near shoulder. When the OG pulls, he must play back into the OT by squatting and squeezing the hole.
If OT is flat, the DT must cross his face. If the OT is upfield, he must backdoor his block by lowering the inside shoulder and flattening down the line.
It’s imperative that the DT not get driven down the LOS. He must locate the ball, shed the block and pursue.
DIAGRAM 11: Veer-Trap Block. The DT explodes into the OG with first step, attacking the OG’s near shoulder.
Coaching Point: Remember a “veer block = a trap play!” The DT must get his hands on the OG and close.
The DT must also look for the trapping guard. If the trapper is coming, the DT must spill outside with the upfield shoulder underneath the trapper.
DIAGRAM 12: Tackle Cut-Off Block. He explodes into the OG with his first step attacking the OG’s near shoulder. He must ricochet off the OT and flatten with the OG. He uses his outside hand to protect his legs from getting cut-blocked. He locates ball, sheds the block and makes the play.

The DT must make note of a cheated down-split by the OT. If this occurs, the DT should tighten down to the outside eye of the OG.