AT OUR SCHOOL, we play a base 4-3 defense. But, we also have many stems, fronts and variations out of this package, including our 4-4 Magnum. The Magnum package is effective against a variety of offenses and it consists of one front, two coverages and six blitzes. These are easy to install into your defense and many player responsibilities are the same, depending on which side of the field players are stationed.
There are three reasons why we might use our Magnum defense, given the offensive opponent we are facing that week.
1. The Magnum puts another defensive player in the box. When playing a team that primarily runs, the Magnum is an important part of the game plan.
2. When playing a spread team that has a good running game with an athletic quarterback, the base defense of a 4-3 puts us at a disadvantage. We don’t have enough people in the box to contend with the running game and if the QB springs free in the middle of the field. We’ll use the Magnum to slow down this type of team.
3. It’s a great way to change up things and give the offense something else to prepare for when scouting our team. The more you can confuse an opponent, even before stepping onto the field, the better position you are in to win the game.
Base formations
This set of diagrams shows two instances in how our 4-3 base looks against an offensive set, then how our 4-4 Magnum looks against the same set, which illustrates why the Magnum works in these situations.
DIAGRAM 1: Base 4-3 Vs. I-Power Formation. When the offense is in an I-Power formation, the 4-3 leaves you a bit short-handed to handle the amount of action about to occur in the box area.
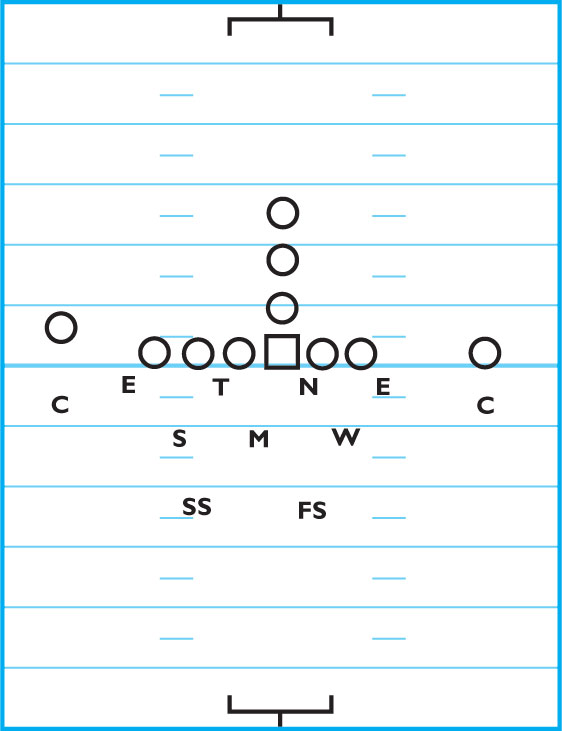
DIAGRAM 2: 4-4 Magnum Vs. I-Power Formation. The Magnum lets you handle a good running team by bringing the strong safety down into the box to support your rush defense. The free safety shifts to the middle of the field.
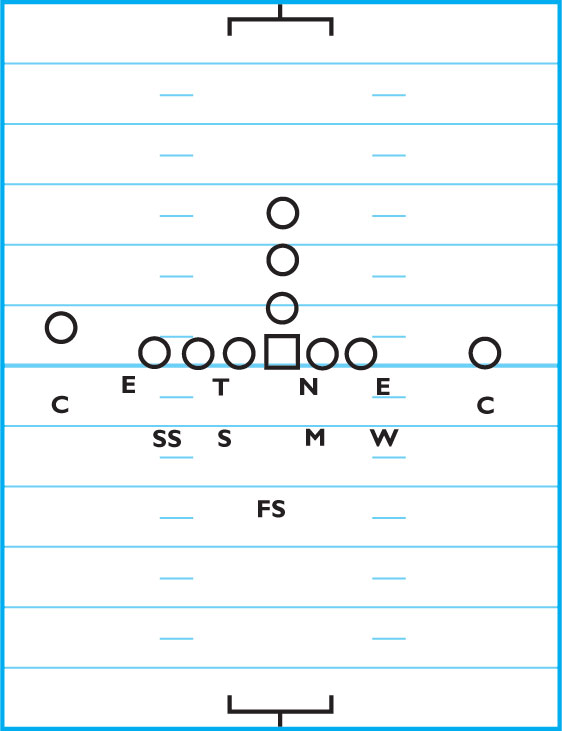
DIAGRAM 3: 4-3 Base Vs. Spread. Against a spread offense, a 4-3 once again leaves you a little lacking in the box, especially if the opposition likes to run. You only have five players in the box and are out-numbered by the offense in this situation.
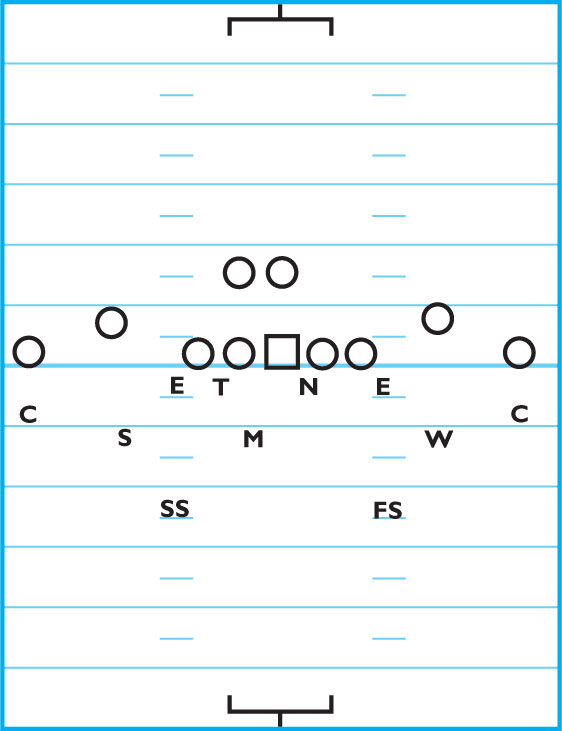
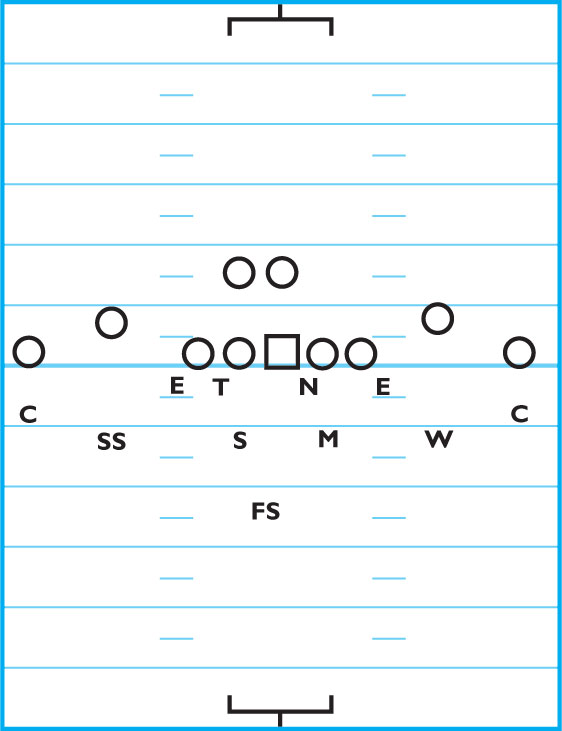
DIAGRAM 4: 4-4 Magnum Vs. Spread. By going to the 4-4 Magnum against a spread-offense team that likes to run, you now have six men in the box.
Plus, it’s very simple to switch from the base 4-3 to the 4-4 Magnum. There are three main changes:
1. The front four stays the same in both formations.
2. The Mike and Sam linebackers (middle and strong) align over the offensive guards.
3. The strong safety rolls down to the C-gap if there is a tight end (like in Diagram 2) or lines up against the No. 2 receiver on that side of the field (like in Diagram 4).
coverages
There are two main coverages in the Magnum package: man free and cover 3.
DIAGRAM 5: Magnum Man Free. In the Magnum Man Free coverage, the corners, the Will linebacker (weak side) and the strong safety are in man coverage on the four WRs. Try to play hard-press coverage but you can play soft-man coverage if you wish.

The Sam is responsible for the running back and the Mike is responsible for the middle drop. The FS plays center field and provides help.
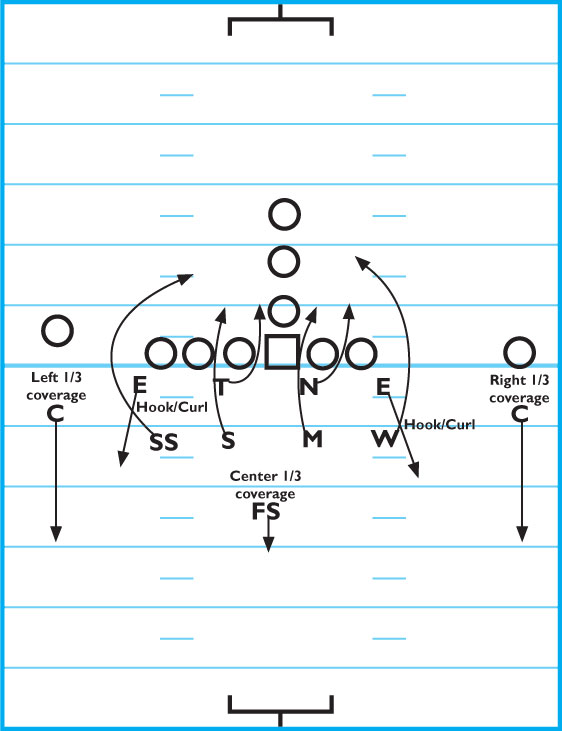
DIAGRAM 6: Magnum Cover 3. In the Magnum Cover 3, the CBs and FS have deep one-third coverage, meaning the CB on the left side of the field is responsible just for that side. The FS is responsible for the middle one-third of the field and the right CB covers the right one-third of the field.
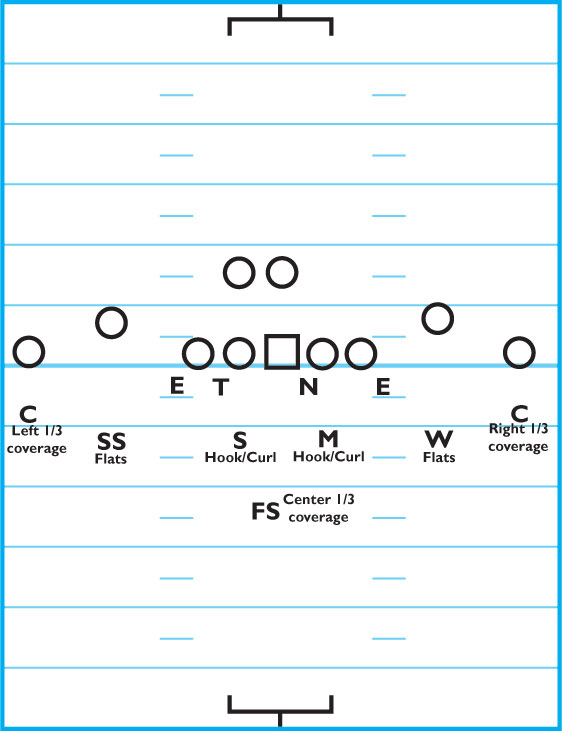
The Will and SS patrol the flat on their respective sides of the field. The Mike and Sam are watching for the hook and curl routes in their area.
Blitzes
There are six blitzes within the Magnum package that work wonders in putting pressure on the on the offense: Strong Texas, Weak Texas, Double Texas, Thunder, Lightning and Tornado.
DIAGRAM 7: Strong Texas. The Strong Texas blitz consists of the defensive tackle looping into the strong A-gap. The Sam explodes into the strong B-gap.
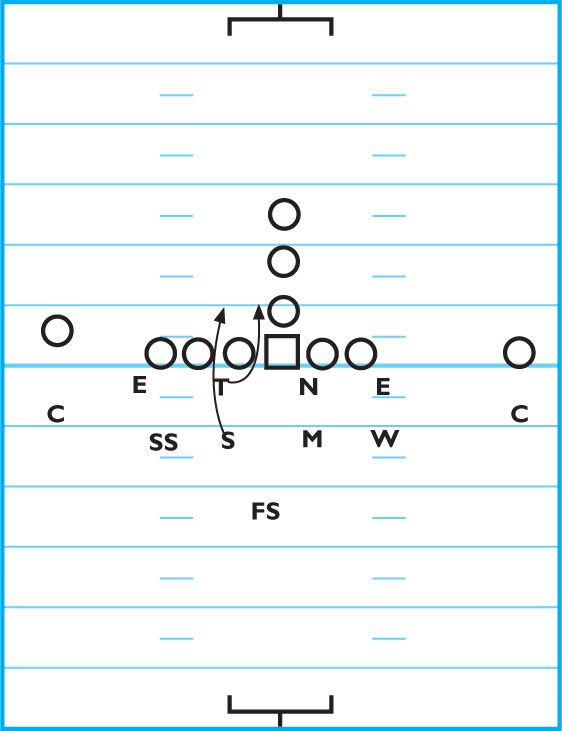
DIAGRAM 8: Weak Texas. When running the Weak Texas blitz, the nose guard loops into the weak B-gap. The Mike explodes into the weak A-gap.
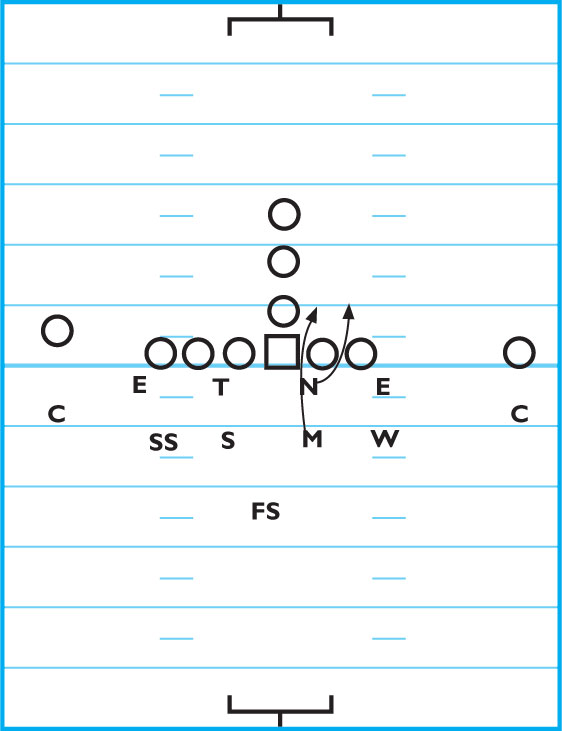
DIAGRAM 9: Double Texas. As the name indicates, the Double Texas blitz is a combination of the Strong Texas and the Weak Texas.
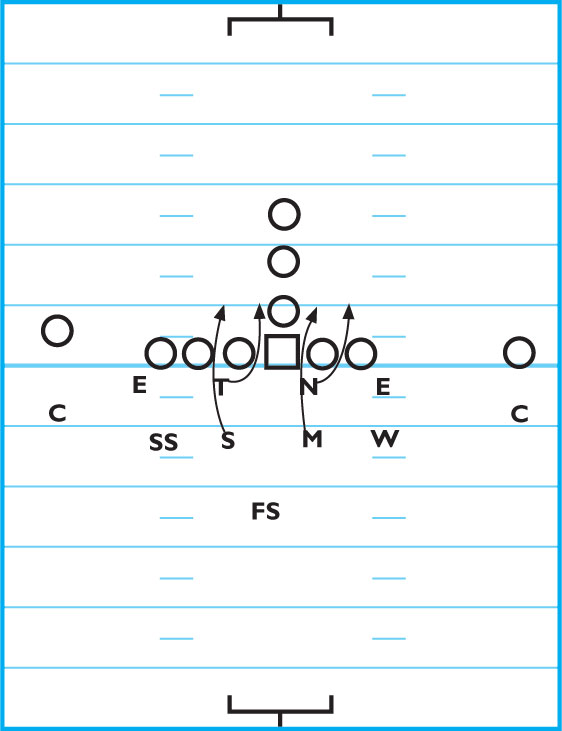
The DT loops into the strong A-gap with the Sam exploding into the strong B-gap. The NG loops into the weak B-gap and the Mike explodes through the weak A-gap.
DIAGRAM 10: Thunder. The Thunder blitz has the weak-side defensive end dropping to cover the hook or curl patterns. The Mike is responsible for any player running into the flat area. The Will blitzes off the weak end.
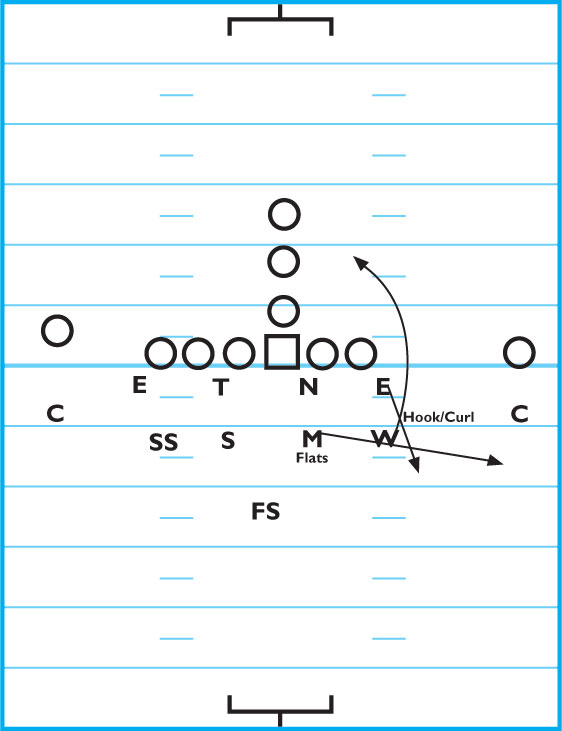
DIAGRAM 11: Lightning. The Lightning blitz has the strong DE dropping into coverage to watch for the hook and curl patterns. The Sam is responsible for any player in the flat area. The SS blitzes off the weak end. It’s the same as the Thunder blitz, only run to the other side of the field.
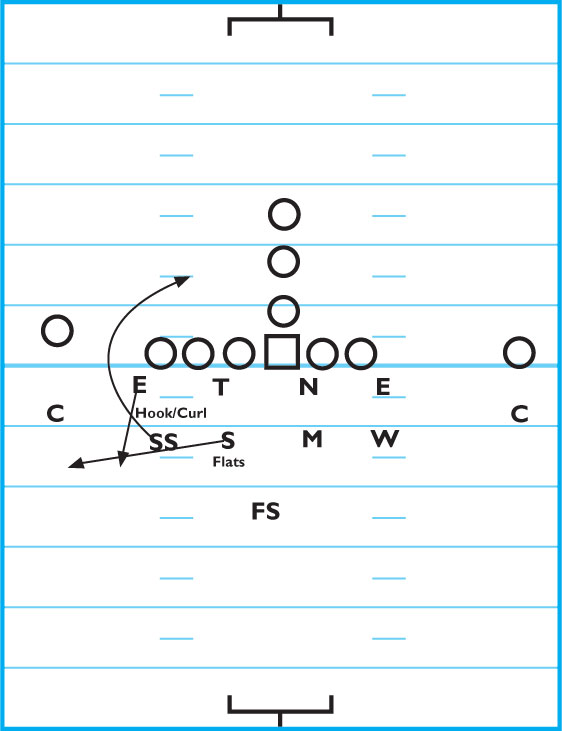
DIAGRAM 12: Tornado. The Tornado blitz incorporates the responsibilities of many of the blitzes already discussed earlier in this article.
The Will and SS blitz by coming off the edges. The Mike explodes through the weak A-gap. The NG loops into the weak B-gap. The DT loops into the strong A-gap and the Sam explodes through the strong B-gap.
These are the responsibilities covered in the Double Texas blitz.
Both ends drop back into coverage to cover the hook and curl routes. The CBs and FS are responsible for their respective deep one-third of the field as in Magnum Cover 3 coverage.