At the junior college level, we’re in a little bit of a different situation than four-year schools in that (1) we’re dealing exclusively with underclassmen, and (2) we’re counting on those underclassmen to contribute immediately. Also, at New Mexico Military, our kids have extremely structured days, so we have very limited film and practice time. Our kids have a dinner formation every night, which limits our practice time to well under two hours each day. So, our approach in developing our defensive linemen has to be a little bit different than if we had our kids for four years and didn’t have the time constraints that we have. We have to focus on the aspects of defensive line play that we feel are the most crucial to getting a young man ready to be productive immediately. So, we focus on the most fundamental aspects of the position and try to be as good as possible at those aspects.
At New Mexico Military, we’ve had quite a few talented players, but a lot of times we have to sign the best athletes that we can get and then develop them at a specific position that they quite possibly have never played before. Two years ago, we signed a very athletic quarterback to play D-end for us. He had never played any other position besides quarterback and had never put his hand on the ground. Our kids are always willing to work and to learn, and a year-and-a-half later that same QB signed to play DE at Delta State. I feel we’ve been fairly successful in our player development as we’ve had three defensive linemen go to FCS schools in the past three years and another nine go to Division II colleges. We don’t do anything revolutionary, so you probably won’t find any ground-breaking schemes or techniques in this article, but this is the way that we’ve found to be the most successful in getting our kids ready to play, and to play well, in a short amount of time.
We spend about 80% of our time focusing on two areas: 1) starts/get-off: stance, footwork, stepping to landmarks, pad level, and 2) hands: hand placement, extension, releases. In my opinion, these are the areas that are most crucial to our success. If we’re not good in these areas, we’re not going to be good at all. We spend the remainder of our time working on defeating specific blocks (double teams, reaches, combos, etc.) as well as pass rush, body control and agility.
STance
We focus on our stance early in camp. I’m not picky about how a kid’s stance looks as long as he can be effective out of it. I’ve seen some ugly stances, but if a kid feels comfortable and can do everything that’s asked of him out of that ugly stance, I don’t see a need to change that stance for the sake of aesthetics. If a stance is limiting a player’s ability to be effective, then I’ll step in and make a change. We want the majority of the weight on the front hand, with a slight stagger in the feet (roughly toe to instep) and always stepping with the back foot first.
FOOTWORK/ LANDMARKS
On run downs or 50/50 downs, we want to take a short, 6” first step to the V of the offensive lineman’s neck. We work on this constantly. Our guys always want to take a giant first step which gets them off balance and into a situation where they have absolutely no leverage. A primary drill that we do is to have the guys line up, three at a time, and take 3-5 short choppy steps out of their stances on ball movement. They have to come out low, shoot their hands and take short steps. I’ll usually make them go three-five times if everyone does it right every single time, which means that we usually do it seven-ten times each time that we do it. It gets to be fairly grueling, which is fine because it’s important that we play low and use good footwork when we’re tired as well as when we’re fresh. We perform this on air every day at the start of practice, then do it against man in a later period, and we also do it out of the chutes.
I said before that we always want to step to the V of the offensive lineman’s neck. Ideally, this means that the D-lineman’s down hand should be the hand closest to his shade. If I had time to develop it, I would teach both a right-handed and left-handed stance for that reason. I don’t feel like we have the time to get most kids to the point where they’re equally effective with either hand on the ground. We can’t play with a kid who is 60% as effective with his weak hand on the ground as he is with his dominant hand, so we have to adjust. This is especially critical for squeezing down blocks. The first step can’t be straight up the field and it can’t be stepping away from the offensive lineman. If a right-handed end lines up on the left side of the line in a 5 technique, he’s set up to step to the V, and put both hands on the O-lineman. But, if that same end lines up in a 5 technique on the right side, his first step will not take him to his landmark. The way that we adjust to this is to slightly alter his stance so that the first step will take him towards his landmark. We don’t worry so much about getting reached. Hopefully, we can recover from a reach, or the LB will fit off of us. If we can’t squeeze a down block, though, there’s no recovering from that.
SLANTING
We include slanting as a part of our start technique. We tell our guys to get to a position where they will be able to execute their stunt. If they have to adjust their alignment, that’s fine. Our landmark is the shoulder dot of the adjacent offensive lineman. Our first step is a lateral step, and is taken with the foot that’s closest to the direction that he’ll be slanting. This hasn’t always been the way that I’ve taught it, but I’ve found that it helps our guys get a little width and helps keep a decent base. Our second step takes us up the field and towards our landmark. When we bring our second step through, it’s crucial that we rip with that same arm. We then want to square back up and re-direct if necessary, based on what our landmark does.
HANDS
Proper use of the hands is an area in which our kids are typically weak when they arrive at NMMI. It’s an area that we have to fix if we’re going to be productive. If a D-lineman isn’t using his hands properly, he can’t get extension, can’t defeat a block, and can’t squeeze a down block. Our proper hand position is: 1) each hand on either side of the blocker’s breastplate; 2) grabbing pads, not just cloth; and 3) thumbs up, elbows in.
The following is our hands progression. We usually perform at least four of these every day.
1. We pair up with the players facing each other and start out in an athletic two-point stance. I’ll blow the whistle five times. On each whistle, the defender has to shoot his hands and grab his partner’s pads, not just his jersey, at the breastplate with his thumbs up and elbows in. Reset and repeat.
2. One whistle, 5 grabs. I’ll blow the whistle once and they have to shoot their hands five times as quickly as possible, each time grabbing pads with proper hand placement.
On the following drills, we work both the right and the left sides.
3. Fitted extension and release. Players will start in a two-point stance with their hands fitted in the proper position. On the whistle, the player will extend his knees, hips and push his partner off of him to full extension. Once he gets to full extension, he will pull violently and rip with his man-hand.
4. Extension and release with no-fit. Same as #3, but the defender will start with his hands at his side, shoot his hands to the proper position and execute the push-pull.
5. Shoot drill. The defender will lean on his partner, with his facemask lower than the offensive player, hands fitted. On the whistle, the defender will extend and drive his partner three steps and then release with a rip.
6. Defensive charge. The defensive player will be in his defensive stance, offensive player will be in a slightly crouched two-point stance, about ½ yard to 1 yard away. On ball movement, the defender will get out of his stance, shooting his hands to the proper position while maintaining low pad level, get full extension on his partner, and work a release to the specified side. We will do this both with and without the chutes.
7. Steer drill. Players will partner up, both players in two-point stances. The defensive player will start with his hands fitted in the proper position. On the whistle, the defensive player will work a long-arm/short-arm drill, back and forth, four times (two on each side). If the defensive player is working to his left, his left arm will push and his right arm will pull, while working his feet clockwise and maintaining a good base. This teaches the players how to use their hands once they have them in position.
PASS RUSH
We don’t neglect pass rush, but we do put a different focus on it. At most, I want our kids to have three pass rush moves. We simply don’t have enough time for these kids to develop more than three moves and be successful with them. I’d rather have a kid have two-three moves that he’s good at than have five-six moves with which he’s so-so. Now, I’m not naïve enough to think that every kid will be good at the same three moves, so I don’t use the approach where I spend a lot of time working on every single move with every player. We do a lot of our pass rush teaching off of film and in 1-on-1’s. We watch the 1-on-1 drills almost every day so that we can focus on each kid’s specific moves and how they can improve those moves.
The one move that I do teach every defensive lineman, regardless of position, is the speed rush. The ability to blow by an offensive lineman opens the door for every other move in that defensive lineman’s arsenal. If an offensive lineman has been getting beaten by a speed rush, he will start to either overset, bail, or open his shoulders, which is exactly the point that we want to get to.
A few key elements of the speed rush are:
1. A great get off. We want to shorten our stance into more of a sprinter’s stance. This will allow us to get a big first step and cover as much ground as possible with that first step. We want to eat up the space between ourselves and the offensive lineman as quickly as possible. We can’t have a slow/small first step and allow the offensive lineman to get set in his pass set and be waiting on us.
2. Body lean. Our first few steps have to be straight up the field in order to get the offensive lineman to bail or turn his shoulders. Once we get to the point where contact will be made, we have to lean into the offensive lineman while carrying our speed as much as possible and rip.
Here are a few of the speed rush drills that we practice:
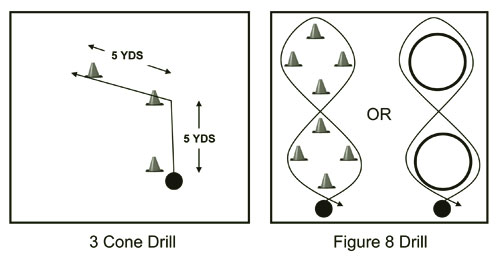
1. 3-cone drill (See Diagram 1). Start out of a 3-point stance. Get out of the 3-point stance as fast as possible on ball movement, with a big first step and sprint five yards straight upfield. At the cone, plant and rip with the inside arm and bend the path as sharply as possible to the third cone. The player should be as low as possible when he gets to the second cone. If necessary, place a towel/t-shirt on the ground at the second cone and have him swipe it off the ground as he rips.
2. Lean and rip. Partner up. Have the defensive player start in a fitted rip position. The offensive player should lean as hard as he can into the defensive player. On go, the defensive player leans back into his partner, driving his elbow up into the rip and leaning/bending his way back to the QB.
3. Lean and rip with arm lift. Same as #2, but this time we use our off hand to lift the offensive lineman’s hand up off of our rip arm.
4. Figure 8. This is practiced to teach speed with proper body lean (See Diagram 2). On ball movement, the defensive player will sprint around the hoops, maintaining a low pad level and staying as tight to the hoops as possible.
5. Chase drill. The offensive player starts 3-5 yards away from the defensive player, who is in a three-point pass rush stance. The offensive player backpedals. On the offensive player’s movement, the defensive lineman gets into his pass rush and covers as much ground as possible. The rep ends when the defensive player touches the offensive player.
We also set up the pop-up dummies and work on flipping our hips, both with and without an arm swat/club. Being able to flip their hips around an offensive lineman and then square back up into their rush has been a valuable tool for us. p
About the Author: Joe Forchtner was recently promoted to defensive coordinator at the New Mexico Military Institute. This is his fifth season coaching at NMMI. He previously coached at Mount Allison University, Delta State, and Haskell University.